Lexmark X864 SCS/TNe Emulation User's Guide - Page 38
Choose Assign To > TN3270 Service on > Name-of-SNA, LU Number, LU Name, Number, TN3270
 |
View all Lexmark X864 manuals
Add to My Manuals
Save this manual to your list of manuals |
Page 38 highlights
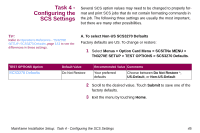
2 Fill in the LU Number and the LU Name. The LU Number must match that on the host. If you do not know the LU Number, ask your system administrator. Finish by pressing the |OK| button. 3 Right-click the connection created in the previous step. Choose Assign To > TN3270 Service on > Name-of-SNAServer to assign the connection to the SNA server. Rightclick the new connection again and choose Properties. 4 Left-click the TN3270 tab. Mark Specific Printer and the IBM- 3287-1 terminal name. 5 Click the |OK| button to finish. Mainframe Installation Setup: Task 2B - Configuring an SNA Server For TN3270e Printing 40
-
 1
1 -
2
-
3
-
4
-
5
-
6
-
7
-
8
-
9
-
10
-
11
-
12
-
13
-
14
-
15
-
16
-
17
-
18
-
19
-
20
-
21
-
22
-
23
-
24
-
25
-
26
-
27
-
28
-
29
-
30
-
31
-
32
-
 33
33 -
 34
34 -
 35
35 -
 36
36 -
 37
37 -
 38
38 -
 39
39 -
 40
40 -
 41
41 -
 42
42 -
 43
43 -
44
-
45
-
46
-
47
-
48
-
49
-
50
-
51
-
52
-
53
-
54
-
55
-
56
-
57
-
58
-
59
-
60
-
61
-
62
-
63
-
64
-
65
-
66
-
67
-
68
-
69
-
70
-
71
-
72
-
73
-
74
-
75
-
76
-
77
-
78
-
79
-
80
-
81
-
82
-
83
-
84
-
85
-
86
-
87
-
88
-
89
-
90
-
91
-
92
-
93
-
94
-
95
-
96
-
97
-
98
-
99
-
100
-
101
-
102
-
103
-
104
-
105
-
106
-
107
-
108
-
109
-
110
-
111
-
112
-
113
-
114
-
115
-
116
-
117
-
118
-
119
-
120
-
121
-
122
-
123
-
124
-
125
-
126
-
127
-
128
-
129
-
130
-
131
-
132
-
133
-
134
-
135
-
136
-
137
-
138
-
139
-
140
-
141
-
142
-
143
-
144
-
145
-
146
-
147
-
148
-
149
-
150
-
151
-
152
-
153
-
154
-
155
-
156
-
157
-
158
-
159
-
160
-
161
-
162
-
163
-
164
-
165
-
166
-
167
-
168
-
169
-
170
-
171
-
172
-
173
-
174
-
175
-
176
-
177
-
178
-
179
-
180
-
181
-
182
-
183
-
184
-
185
-
186
-
187
-
188
-
189
-
190
-
191
-
192
-
193
-
194
-
195
-
196
-
197
-
198
-
199
-
200
-
201
-
202
-
203
-
204
-
205
-
206
-
207
-
208
-
209
-
210
-
211
-
212
-
213
-
214
-
215
-
216
-
217
-
218
-
219
-
220
-
221
-
222
-
223
-
224
-
225
-
226
-
227
-
228
-
229
-
230
-
231
-
232
-
233
-
234
-
235
-
236
-
237
-
238
-
239
-
240
-
241
-
242
-
243
-
244
-
245
-
246
-
247
-
248
-
249
-
250
-
251
-
252
-
253
-
254
-
255
-
256
-
257
-
258
-
259
-
260
-
261
-
262
-
263
-
264
-
265
-
266
-
267
-
268
-
269
-
270
-
271
-
272
-
273
-
274
-
275
-
276
-
277
-
278
-
279
-
280
-
281
-
282
-
283
-
284
-
285
-
286
-
287
-
288
-
289
-
290
-
291
-
292
-
293
-
294
-
295
-
296
-
297
-
298
-
299
-
300
-
301
-
302
-
303
-
304
-
305
-
306
-
307
-
308
-
309
-
310
-
311
-
312
-
313
 |
 |

40
Mainframe Installation Setup:
Task 2B - Configuring an SNA Server For TN3270e Printing
2
Fill in the
LU Number
and the
LU Name
. The
LU Number
must match that on the host. If you do not know the
LU
Number
, ask your system administrator. Finish by pressing
the |OK| button.
3
Right-click the connection created in the previous step.
Choose Assign To > TN3270 Service on > Name-of-SNA-
Server to assign the connection to the SNA server. Right-
click the new connection again and choose Properties.
4
Left-click the
TN3270
tab. Mark
Specific Printer
and the
IBM-
3287-1
terminal name.
5
Click the |OK| button to finish.