Marantz DR4050 DR4050 USER'S MANUAL - Page 30
Menu Mode/recording Settings
 |
View all Marantz DR4050 manuals
Add to My Manuals
Save this manual to your list of manuals |
Page 30 highlights
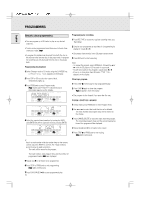
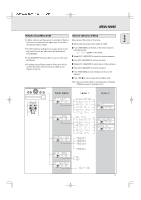
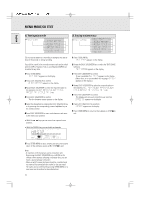
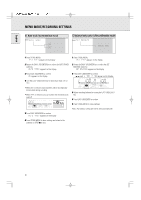
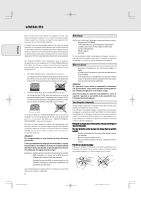
English MENU MODE/RECORDING SETTINGS D. Auto track increment/auto track AUTO TRACK ON OFF E. Balance (only active in Record/Standby mode) SET BALANCE L 100 R 100 1 Press STORE/MENU. § TEXT EDIT appears on the display. 1 Press STORE/MENU. § TEXT EDIT appears on the display. 2 Rotate the EASY JOG/ENTER key to select the AUTO TRACK submenu. § AUTO TRACK appears on the display. 2 Rotate the EASY JOG/ENTER key to select the SET BALANCE submenu. § SET BALANCE appears on the display. 3 Press EASY JOG/ENTER to confirm. § ON appears on the display. 4 Turn the EASY JOG/ENTER key to select Auto track ON or OFF. • When ON is selected, track numbers will be automatically incremented during recording. • When OFF is selected, you can number the recorded tracks yourself. REM REC TIME TRACK TOTAL REM TRACK TIME STEP 1 2 3 4 5 6 7 8 9 10 11 SYNC MANUAL DIGITAL I CD OPTICAL I ANALOG RW RECORD CHANGER PROG CD SHUFFLE ALL RW REPEAT SCAN TRACK EASY JOG - + STORE CANCEL /MENU /DELETE PUSH ENTER 3 Press EASY JOG/ENTER to confirm. § FE and L 100 R 100 appear on the display. REM REC TIME TRACK TOTAL REM TRACK TIME STEP SYNC MANUAL DIGITAL I CD OPTICAL I ANALOG RW RECORD CHANGER PROG CD SHUFFLE ALL RW REPEAT SCAN TRACK 4 Adjust recording balance by turning the EASY JOG/ENTER key. 5 Press EASY JOG/ENTER to confirm. 6 Press STORE/MENU to store settings. Note: The balance setting will not be stored permanently. 5 Press EASY JOG/ENTER to confirm. § AUTO TRACK appears on the display. 6 Press STORE/MENU to store settings and return to the submenu or STOP 9 to exit. 30
-
 1
1 -
2
-
3
-
4
-
5
-
6
-
7
-
8
-
9
-
10
-
11
-
12
-
13
-
14
-
15
-
16
-
17
-
18
-
19
-
20
-
21
-
22
-
23
-
24
-
 25
25 -
 26
26 -
 27
27 -
 28
28 -
 29
29 -
 30
30 -
 31
31 -
 32
32 -
 33
33 -
 34
34 -
 35
35 -
36
-
37
-
38
-
39
-
40
-
41
-
42
-
43
-
44
-
45
-
46
-
47
-
48
-
49
-
50
-
51
-
52
-
53
-
54
-
55
-
56
-
57
-
58
-
59
-
60
-
61
-
62
-
63
-
64
 |
 |