Nokia N86 8MP Nokia N86 8MP User Guide in US English - Page 38
Video recording, Video capture indicators
 |
View all Nokia N86 8MP manuals
Add to My Manuals
Save this manual to your list of manuals |
Page 38 highlights
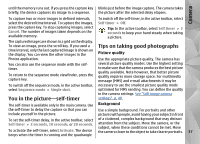
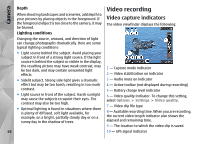
Camera Depth When shooting landscapes and sceneries, add depth to your pictures by placing objects in the foreground. If the foreground object is too close to the camera, it may be blurred. Video recording Video capture indicators The video viewfinder displays the following: Lighting conditions Changing the source, amount, and direction of light can change photographs dramatically. Here are some typical lighting conditions: ● Light source behind the subject. Avoid placing your subject in front of a strong light source. If the light source is behind the subject or visible in the display, the resulting picture may have weak contrast, may be too dark, and may contain unwanted light effects. ● Sidelit subject. Strong side light gives a dramatic effect but may be too harsh, resulting in too much contrast. ● Light source in front of the subject. Harsh sunlight may cause the subjects to squint their eyes. The contrast may also be too high. ● Optimal lighting is found in situations where there is plenty of diffused, soft light available, for example, on a bright, partially cloudy day or on a sunny day in the shadow of trees. 1 - Capture mode indicator 2 - Video stabilisation on indicator 3 - Audio mute on indicator 4 - Active toolbar (not displayed during recording) 5 - Battery charge level indicator 6 - Video quality indicator. To change this setting, select Options > Settings > Video quality. 7 - Video clip file type 8 - Available recording time. When you are recording, the current video length indicator also shows the elapsed and remaining time. 9 - The location to which the video clip is saved. 38 10 - GPS signal indicator
-
 1
1 -
2
-
3
-
4
-
5
-
6
-
7
-
8
-
9
-
10
-
11
-
12
-
13
-
14
-
15
-
16
-
17
-
18
-
19
-
20
-
21
-
22
-
23
-
24
-
25
-
26
-
27
-
28
-
29
-
30
-
31
-
32
-
 33
33 -
 34
34 -
 35
35 -
 36
36 -
 37
37 -
 38
38 -
 39
39 -
 40
40 -
 41
41 -
 42
42 -
 43
43 -
44
-
45
-
46
-
47
-
48
-
49
-
50
-
51
-
52
-
53
-
54
-
55
-
56
-
57
-
58
-
59
-
60
-
61
-
62
-
63
-
64
-
65
-
66
-
67
-
68
-
69
-
70
-
71
-
72
-
73
-
74
-
75
-
76
-
77
-
78
-
79
-
80
-
81
-
82
-
83
-
84
-
85
-
86
-
87
-
88
-
89
-
90
-
91
-
92
-
93
-
94
-
95
-
96
-
97
-
98
-
99
-
100
-
101
-
102
-
103
-
104
-
105
-
106
-
107
-
108
-
109
-
110
-
111
-
112
-
113
-
114
-
115
-
116
-
117
-
118
-
119
-
120
-
121
-
122
-
123
-
124
-
125
-
126
-
127
-
128
-
129
-
130
-
131
-
132
-
133
-
134
-
135
-
136
-
137
-
138
-
139
-
140
-
141
-
142
-
143
-
144
-
145
-
146
-
147
-
148
-
149
-
150
-
151
-
152
-
153
-
154
-
155
-
156
-
157
-
158
-
159
-
160
-
161
-
162
-
163
-
164
-
165
-
166
-
167
-
168
-
169
 |
 |
