Oki C5650n C5650n/C5650dn User's Guide - Page 63
If the printer has been powered on, the, This area is clearly labelled. Do not touch it., fuser is
 |
View all Oki C5650n manuals
Add to My Manuals
Save this manual to your list of manuals |
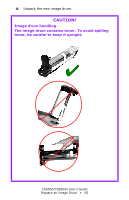
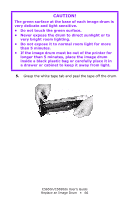
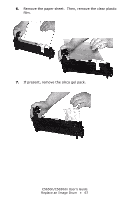
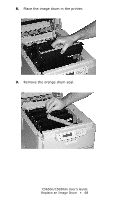
Page 63 highlights
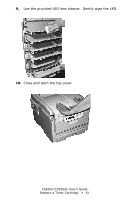
1. Press the cover release and open the top cover fully. c53_02_opencvr.jpg WARNING! If the printer has been powered on, the fuser is HOT. This area is clearly labelled. Do not touch it. 2. Note the positions of the four image drums: Cyan (1), Magenta (2), Yellow (3), Black (4). c53_09_lidup.jpg C5650n/C5650dn User's Guide Replace an Image Drum • 63
-
 1
1 -
2
-
3
-
4
-
5
-
6
-
7
-
8
-
9
-
10
-
11
-
12
-
13
-
14
-
15
-
16
-
17
-
18
-
19
-
20
-
21
-
22
-
23
-
24
-
25
-
26
-
27
-
28
-
29
-
30
-
31
-
32
-
33
-
34
-
35
-
36
-
37
-
38
-
39
-
40
-
41
-
42
-
43
-
44
-
45
-
46
-
47
-
48
-
49
-
50
-
51
-
52
-
53
-
54
-
55
-
56
-
57
-
 58
58 -
 59
59 -
 60
60 -
 61
61 -
 62
62 -
 63
63 -
 64
64 -
 65
65 -
 66
66 -
 67
67 -
 68
68 -
69
-
70
-
71
-
72
-
73
-
74
-
75
-
76
-
77
-
78
-
79
-
80
-
81
-
82
-
83
-
84
-
85
-
86
-
87
-
88
-
89
-
90
-
91
-
92
-
93
-
94
-
95
-
96
-
97
-
98
-
99
-
100
-
101
-
102
-
103
-
104
-
105
-
106
-
107
-
108
-
109
-
110
-
111
-
112
-
113
-
114
-
115
-
116
-
117
-
118
-
119
-
120
-
121
-
122
-
123
-
124
-
125
-
126
-
127
-
128
-
129
-
130
-
131
-
132
-
133
-
134
-
135
-
136
-
137
-
138
-
139
-
140
-
141
-
142
-
143
-
144
-
145
-
146
-
147
-
148
-
149
-
150
-
151
-
152
-
153
-
154
-
155
-
156
-
157
-
158
-
159
-
160
-
161
-
162
-
163
-
164
-
165
-
166
-
167
-
168
-
169
-
170
-
171
-
172
-
173
-
174
-
175
-
176
-
177
-
178
-
179
-
180
-
181
-
182
-
183
-
184
-
185
-
186
-
187
-
188
-
189
-
190
-
191
-
192
-
193
-
194
-
195
-
196
-
197
-
198
-
199
-
200
-
201
-
202
-
203
-
204
-
205
-
206
-
207
-
208
-
209
-
210
-
211
-
212
-
213
-
214
-
215
-
216
-
217
-
218
-
219
-
220
-
221
-
222
-
223
-
224
-
225
 |
 |

C5650n/C5650dn User’s Guide
Replace an Image Drum • 63
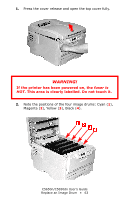
1.
Press the cover release and open the top cover fully.
c53_02_opencvr.jpg
2.
Note the positions of the four image drums: Cyan (
1
),
Magenta (
2
), Yellow (
3
), Black (
4
).
c53_09_lidup.jpg
WARNING!
If the printer has been powered on, the
fuser is
HOT
. This area is clearly labelled. Do not touch it.