Optoma ZW210ST User's Manual - Page 13
Mode or Laser, Brightness, Freeze, S-Video, Contrast, Number Keys, AV mute, Four Directional, R Button
 |
View all Optoma ZW210ST manuals
Add to My Manuals
Save this manual to your list of manuals |
Page 13 highlights
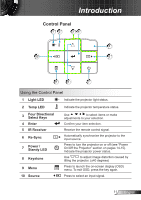
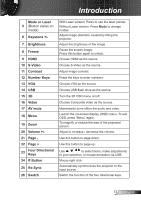
Introduction Mode or Laser 5 (Button varies on model) 6 Keystone +/- 7 Brightness 8 Freeze 9 HDMI 10 S-Video 11 Contrast 12 Number Keys 13 VGA 14 USB 15 3D 16 Video 17 AV mute 18 Menu 19 Zoom 20 Volume +/- 21 Page - 22 Page + 23 Four Directional Keys 24 R Button 25 Re-Sync 26 Switch With Laser version: Press to use the laser pointer. Without Laser version: Press Mode to change modes. Adjust image distortion caused by tilting the projector. Adjust the brightness of the image. Pause the screen image. Press this button again to unlock. Choose HDMI as the source. Choose S-Video as the source. Adjust image contrast. Press the keys to enter numbers. Choose VGA as the source. Choose USB flash drive as the source. Turn the 3D OSD menu on/off. Choose Composite video as the source. Momentarily turns off/on the audio and video. Launch the on-screen display (OSD) menu. To exit OSD, press "Menu" again. To magnify or reduce the size of the projected screen. Adjust to increase / decrease the volume. Use this button to page down. Use this button to page up. Use to select items, make adjustments to your selection, or mouse emulation via USB. Mouse right click. Automatically synchronizes the projector to the input source. Switch the function of the four directional keys. 13 English
-
 1
1 -
2
-
3
-
4
-
5
-
6
-
7
-
 8
8 -
 9
9 -
 10
10 -
 11
11 -
 12
12 -
 13
13 -
 14
14 -
 15
15 -
 16
16 -
 17
17 -
 18
18 -
19
-
20
-
21
-
22
-
23
-
24
-
25
-
26
-
27
-
28
-
29
-
30
-
31
-
32
-
33
-
34
-
35
-
36
-
37
-
38
-
39
-
40
-
41
-
42
-
43
-
44
-
45
-
46
-
47
-
48
-
49
-
50
-
51
-
52
-
53
-
54
-
55
-
56
-
57
-
58
-
59
-
60
-
61
-
62
-
63
-
64
-
65
-
66
-
67
-
68
-
69
-
70
-
71
-
72
-
73
-
74
-
75
-
76
-
77
-
78
-
79
-
80
-
81
-
82
-
83
-
84
-
85
-
86
-
87
-
88
-
89
-
90
-
91
-
92
-
93
-
94
-
95
-
96
-
97
-
98
-
99
-
100
-
101
-
102
-
103
-
104
-
105
-
106
-
107
-
108
-
109
-
110
-
111
-
112
-
113
-
114
-
115
-
116
-
117
-
118
 |
 |
