Optoma ZW210ST User's Manual - Page 66
Network Display mode, Activating Network Display Mode
 |
View all Optoma ZW210ST manuals
Add to My Manuals
Save this manual to your list of manuals |
Page 66 highlights
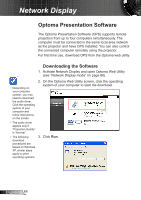
Network Display Network Display mode In Network Display mode, the projector supports remote projection from computers, tablets, and mobile phones when connected to an Ethernet or wireless network. Alternatively, you can control the computer remotely through the projector. You can connect to the Optoma Web Utility page for conference projection using a web browser or download the Optoma Presenter Software for wireless projection right on your computer desktop. You can also control and adjust the projection settings using the Crestron RoomView. Activating Network Display Mode 1. Connect to the network (see "Connect to Network" on page 16). 2. The projector automatically detects the connection. If not, repeatedly press on the control panel or the Source key on the remote control to switch the input source. 3. Once the projector detects the connection, the Network Display screen appears. LOGIN CODE: 7272 The IP address generated by the projector varies depending on your local area network connection settings. OOppttoommaa PPrreesseennttaattiioonn SSyysstteemm Quick Guide 1. Make sure your WLAN is enabled, and connect to Optoma Presentation System. 2. Open your browser, or enter the IP address (refer to below server IP address) 3. Click on "Download", and execute the installation program. 4. Make sure your personal firewall allows OPS software to pass through! 5. Enter the LOGIN CODE to start projection! Server IP: 192.168.100.10 Resolution: 1024x768 Version: 0.0.1.2 SSID: Network Display Channel: 8 Security: OFF 4. Take note of the Login Code and IP Address. You will need them to connect to Optoma Web Utility page (see "Open Optoma Web Utility" on page 67). English 66
-
 1
1 -
2
-
3
-
4
-
5
-
6
-
7
-
8
-
9
-
10
-
11
-
12
-
13
-
14
-
15
-
16
-
17
-
18
-
19
-
20
-
21
-
22
-
23
-
24
-
25
-
26
-
27
-
28
-
29
-
30
-
31
-
32
-
33
-
34
-
35
-
36
-
37
-
38
-
39
-
40
-
41
-
42
-
43
-
44
-
45
-
46
-
47
-
48
-
49
-
50
-
51
-
52
-
53
-
54
-
55
-
56
-
57
-
58
-
59
-
60
-
 61
61 -
 62
62 -
 63
63 -
 64
64 -
 65
65 -
 66
66 -
 67
67 -
 68
68 -
 69
69 -
 70
70 -
 71
71 -
72
-
73
-
74
-
75
-
76
-
77
-
78
-
79
-
80
-
81
-
82
-
83
-
84
-
85
-
86
-
87
-
88
-
89
-
90
-
91
-
92
-
93
-
94
-
95
-
96
-
97
-
98
-
99
-
100
-
101
-
102
-
103
-
104
-
105
-
106
-
107
-
108
-
109
-
110
-
111
-
112
-
113
-
114
-
115
-
116
-
117
-
118
 |
 |
