Panasonic AGHMC150PJ User Manual - Page 18
Remote control, Recharging the battery, Recharging
 |
View all Panasonic AGHMC150PJ manuals
Add to My Manuals
Save this manual to your list of manuals |
Page 18 highlights
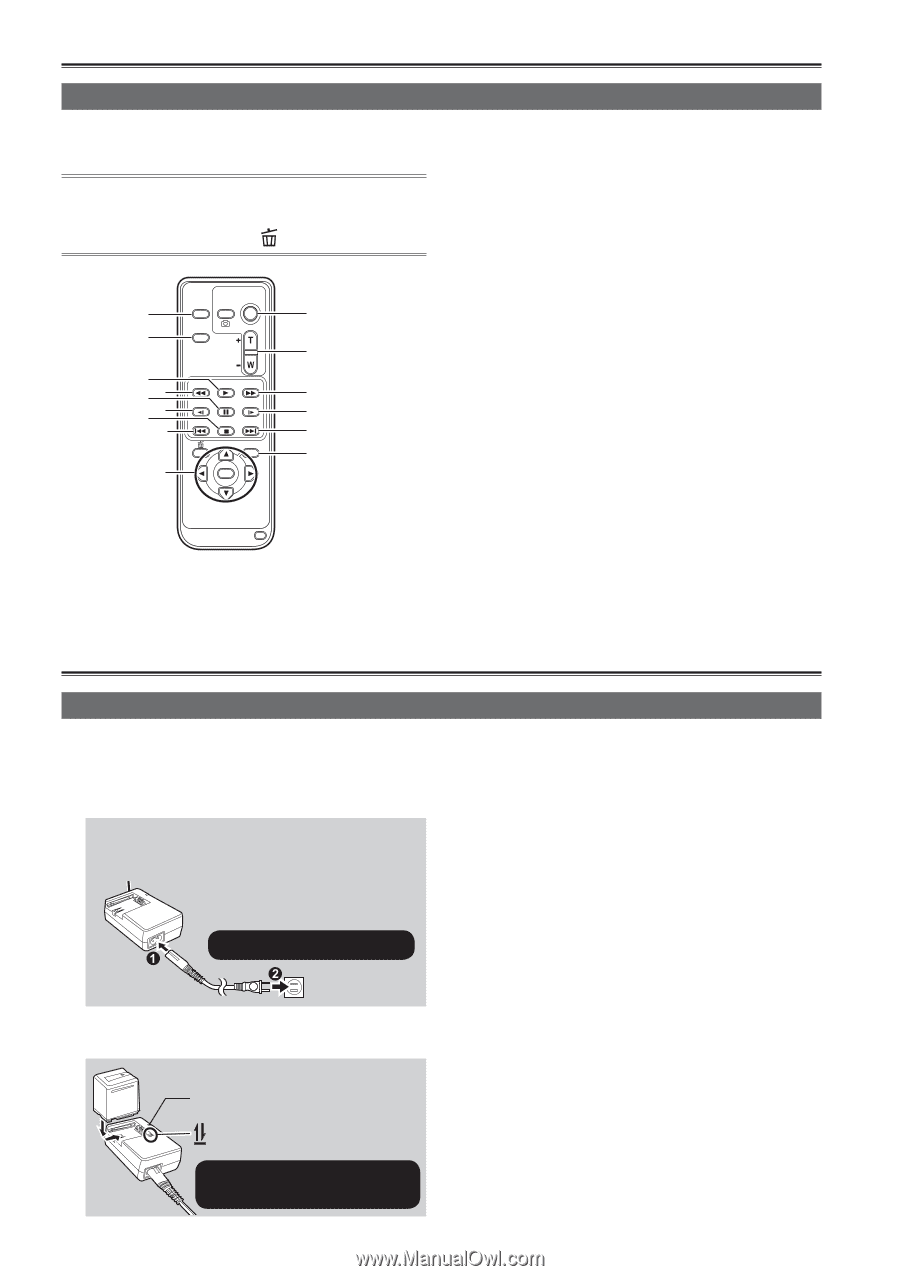
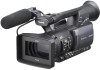
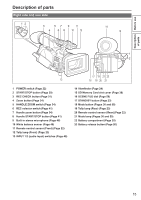
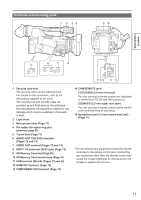
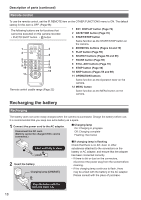
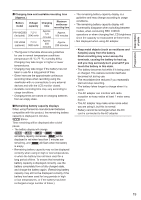
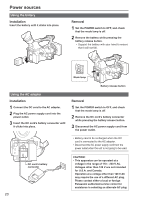
Description of parts (continued) Remote control To use the remote control, set the IR REMOTE item on the OTHER FUNCTIONS menu to ON. The default setting for this item is OFF. (Page 98) The following buttons are for functions that cannot be executed on this camera-recorder. • PHOTO SHOT button • button 1 2 5 7 6 98 10 11 START/ EXT PHOTO STOP DISPLAY SHOT DATE/ TIME ZOOM VOL SEARCH PLAY SEARCH STILL ADV PAUSE STILL ADV SKIP STOP SKIP MENU ENTER 3 4 6 8 10 12 1 EXT. DISPLAY button (Page 70) 2 DATE/TIME button (Page 70) 3 START/STOP button Same function as the START/STOP button on the camera. 4 ZOOM/VOL buttons (Pages 34 and 70) 5 PLAY button (Page 59) 6 SEARCH buttons (Pages 59 and 69) 7 PAUSE button (Page 59) 8 STILL ADV buttons (Page 70) 9 STOP button (Page 59) 10 SKIP buttons (Pages 59 and 69) 11 OPERATION buttons Same function as the Operation lever on the camera. Remote control usable range (Page 22) 12 MENU button Same function as the MENU button on the camera. Recharging the battery Recharging The battery does not come ready charged when the camera is purchased. Charge the battery before use. It is recommended that you keep one extra battery as a spare. 1 Connect the power cord to the AC adapter. Disconnect the DC cord. (Battery cannot be charged if DC cord is connected.) ■ Charging lamp On: Charging in progress Off: Charging complete Flashing: See below Insert until fully in place. 2 Insert the battery. Charging lamp [CHARGE] ■ If charging lamp is flashing Check that there is no dirt, dust, or other substances attached to the connectors on the battery or AC adapter, and ensure that the adapter has been connected correctly. • If there is dirt or dust on the connectors, disconnect the power plug from the socket before cleaning. • If the charging lamp continues to flash, there may be a fault with the battery or the AC adapter. Please consult with the place of purchase. Align the battery with the mark and insert fully. 18
-
 1
1 -
2
-
3
-
4
-
5
-
6
-
7
-
8
-
9
-
10
-
11
-
12
-
 13
13 -
 14
14 -
 15
15 -
 16
16 -
 17
17 -
 18
18 -
 19
19 -
 20
20 -
 21
21 -
 22
22 -
 23
23 -
24
-
25
-
26
-
27
-
28
-
29
-
30
-
31
-
32
-
33
-
34
-
35
-
36
-
37
-
38
-
39
-
40
-
41
-
42
-
43
-
44
-
45
-
46
-
47
-
48
-
49
-
50
-
51
-
52
-
53
-
54
-
55
-
56
-
57
-
58
-
59
-
60
-
61
-
62
-
63
-
64
-
65
-
66
-
67
-
68
-
69
-
70
-
71
-
72
-
73
-
74
-
75
-
76
-
77
-
78
-
79
-
80
-
81
-
82
-
83
-
84
-
85
-
86
-
87
-
88
-
89
-
90
-
91
-
92
-
93
-
94
-
95
-
96
-
97
-
98
-
99
-
100
-
101
-
102
-
103
-
104
-
105
-
106
-
107
-
108
-
109
-
110
-
111
-
112
 |
 |