Panasonic AGHMC150PJ User Manual - Page 43
Optical Image Stabilizer, Adding effects to images, Using the USER buttons, Backlight compensation
 |
View all Panasonic AGHMC150PJ manuals
Add to My Manuals
Save this manual to your list of manuals |
Page 43 highlights
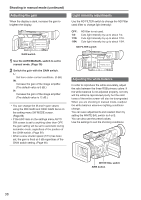
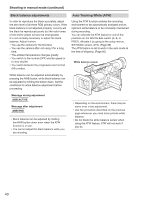
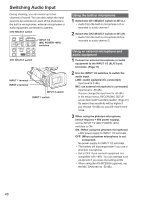
Shooting Optical Image Stabilizer Use the Optical Image Stabilizer (OIS) to reduce the effects of camera shake when shooting by hand. Press the OIS button to turn the function on and off. appears on the viewfinder and the LCD monitor when this function is on. Turn the function off when using a tripod for more natural images. BARS SHUTTER SPEED SELECT CH1 SELECT CH2 SELECT INPUT 1 INPUT 2 INT(L) INPUT1 INPUT2 INT(R) INPUT2 ON ON OFF OFF MIC POWER +48V AUDIO COUNTER RESET/TC SET ZEBRA OIS LCD EVF DTL WFM • This function will not be as effective when the vibration is severe or when tracking a moving subject. Adding effects to images Press the USER button you have allocated to the BLACKFADE or WHITEFADE feature to add fading effects to your images. The button's function is forcibly canceled during playback or REC CHECK and also when thumbnails are displayed. BLACKFADE: Press and hold to fade out to black. Audio also fades out. Fade-in starts when the button is released. WHITEFADE: Press and hold to fade out to white. Audio also fades out. Fade-in starts when the button is released. Using the USER buttons You can allocate one of eleven features to each of the three USER buttons. Use these buttons to change shooting settings quickly or add effects to the images you are shooting. The following features are allocated to the buttons at the time of shipping. USER1: WHITEFADE USER2: BACKLIGHT USER3: INDEX For details, see the setup menus, SW MODE screen, USER1 to 3. (Page 88) If you press a USER button to which one of the functions has been allocated and then turn off the power, the added effect to the image will not be retained. Backlight compensation Press the USER button you have allocated to the BACKLIGHT feature when shooting subjects lit from the back. BACK appears on the screen. Backlight compensation adjusts the iris so the subject doesn't come out dark. Press the same USER button to turn the feature off. (In the manual iris mode, the backlight compensation status is retained even if the backlight compensation is released.) Color bars Press the BARS button in the CAM mode to output a color bar screen to a television or monitor so you can adjust them. Press the button again to turn the feature off. • While the color bar is displayed, a test tone of 1 kHz will be output from the headphone terminal or the AUDIO OUT terminal. There will be no speaker output. • The color bar can be recorded by pressing the START/STOP button. • The BARS button does not work in the PB mode or PC mode. • The color bar display is canceled when the power is turned off. 43
-
 1
1 -
2
-
3
-
4
-
5
-
6
-
7
-
8
-
9
-
10
-
11
-
12
-
13
-
14
-
15
-
16
-
17
-
18
-
19
-
20
-
21
-
22
-
23
-
24
-
25
-
26
-
27
-
28
-
29
-
30
-
31
-
32
-
33
-
34
-
35
-
36
-
37
-
 38
38 -
 39
39 -
 40
40 -
 41
41 -
 42
42 -
 43
43 -
 44
44 -
 45
45 -
 46
46 -
 47
47 -
 48
48 -
49
-
50
-
51
-
52
-
53
-
54
-
55
-
56
-
57
-
58
-
59
-
60
-
61
-
62
-
63
-
64
-
65
-
66
-
67
-
68
-
69
-
70
-
71
-
72
-
73
-
74
-
75
-
76
-
77
-
78
-
79
-
80
-
81
-
82
-
83
-
84
-
85
-
86
-
87
-
88
-
89
-
90
-
91
-
92
-
93
-
94
-
95
-
96
-
97
-
98
-
99
-
100
-
101
-
102
-
103
-
104
-
105
-
106
-
107
-
108
-
109
-
110
-
111
-
112
 |
 |