Panasonic AGHMC150PJ User Manual - Page 56
Charging the built-in battery/Setting the time code, Recharging the built-in battery
 |
View all Panasonic AGHMC150PJ manuals
Add to My Manuals
Save this manual to your list of manuals |
Page 56 highlights
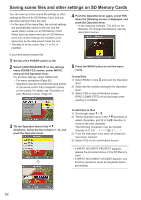
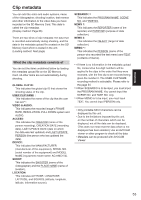
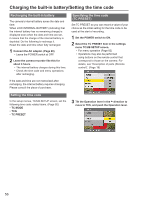
Charging the built-in battery/Setting the time code Recharging the built-in battery The camera's internal battery saves the date and time. When LOW INTERNAL BATTERY (indicating that the internal battery has no remaining charge) is displayed even when the date and time are set, it means that the charge of the internal battery is depleted. Do the following to recharge it. Reset the date and time when fully recharged. 1 Connect the AC adapter. (Page 20) • Leave the POWER switch at OFF. 2 Leave the camera-recorder like this for about 4 hours. • The internal battery charges during this time. • Check the time code and menu operations after recharging. If the date and time are not memorized after recharging, the internal battery requires changing. Please consult the place of purchase. Specifying the time code (TC PRESET) Set TC PRESET so you can record a value of your choice as the initial setting for the time code to be used at the start of recording. 1 Set the POWER switch to ON. 2 Select the TC PRESET item in the settings menu TC/UB SETUP screen. • For menu operation (Page 82) • Operations may also be performed using buttons on the remote control that correspond to those on the camera. For details, see "Description of parts (Remote control)". (Page 18) Setting the time code In the setup menus, TC/UB SETUP screen, set the following time code related items. (Page 92) • TC MODE • TCG • TC PRESET 3 Tilt the Operation lever in the direction to move to YES, and push the Operation lever. 56
-
 1
1 -
2
-
3
-
4
-
5
-
6
-
7
-
8
-
9
-
10
-
11
-
12
-
13
-
14
-
15
-
16
-
17
-
18
-
19
-
20
-
21
-
22
-
23
-
24
-
25
-
26
-
27
-
28
-
29
-
30
-
31
-
32
-
33
-
34
-
35
-
36
-
37
-
38
-
39
-
40
-
41
-
42
-
43
-
44
-
45
-
46
-
47
-
48
-
49
-
50
-
 51
51 -
 52
52 -
 53
53 -
 54
54 -
 55
55 -
 56
56 -
 57
57 -
 58
58 -
 59
59 -
 60
60 -
 61
61 -
62
-
63
-
64
-
65
-
66
-
67
-
68
-
69
-
70
-
71
-
72
-
73
-
74
-
75
-
76
-
77
-
78
-
79
-
80
-
81
-
82
-
83
-
84
-
85
-
86
-
87
-
88
-
89
-
90
-
91
-
92
-
93
-
94
-
95
-
96
-
97
-
98
-
99
-
100
-
101
-
102
-
103
-
104
-
105
-
106
-
107
-
108
-
109
-
110
-
111
-
112
 |
 |