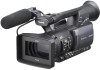
Panasonic AGHMC150PJ User Manual - Page 55
Using the Counter, Counter display, TC preset mode
 |
View all Panasonic AGHMC150PJ manuals
Add to My Manuals
Save this manual to your list of manuals |
Page 55 highlights
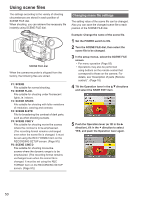
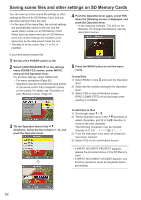
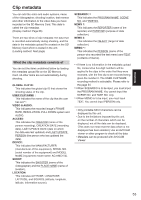
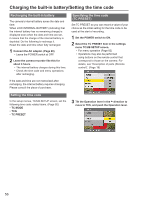
∗ The COUNT value is indicated as a four-digit number. The COUNT value is incremented each time a new clip is captured if clip metadata has been read in and TYPE2 has been selected as the recording method. The COUNT value can be reset using the following procedure. Press the MENU button, select META DATA→ CLIP COUNT RESET→YES, and push the Operation lever to reset the counter value to 1. Shooting Using the Counter Counter display You can display a counter that indicates how much time has elapsed during shooting or playback. 1 Press the COUNTER button. Each time you press the button, the display changes as follows. (Page 76) 0 : 00. 00 (CAM mode only) Counter value CLIP 0 : 00 . 00 Displayed when CLIP is selected in the REC COUNTER item on the settings menu DISPLAY SETUP screen. Values are automatically reset when recording is started, and counter values are displayed for each individual clip. TC 12 : 34 : 56 . 01 Time code value (Display time code frame digits in 24 frames when 24P is set, and in 30 frames when any other format is set.) UB 12 34 56 78 User information No display: Data is not displayed. Resetting the counter Press the RESET/TC SET button while the counter is displayed. TC preset mode When shooting using a multi-camera, you can synchronously set the initial values of time code. The camera used for synchronization is the MASTER and the camera being synchronized is the SLAVE. 1 Connect the TC PRESET IN/OUT terminals (VIDEO OUT terminals) on the two devices with a pin cable, and turn on the power. ■ MASTER settings 2 Check that the MASTER camera is set to the CAM mode, and set the EXT TC LINK item on the setting menu TC/UB SETUP screen to MASTER. OUTPUTTING LTC SIGNAL is displayed on the screen, and the time code is output from the TC PRESET IN/OUT terminal (VIDEO OUT terminal). • Select the same REC FORMAT setting for both the MASTER and SLAVE cameras, and set the TCG item on the TC/UB SETUP screen to FREE RUN. • To cancel the time code output, press the MENU button. ■ SLAVE settings 3 Set the EXT TC LINK item on the setting menu TC/UB SETUP screen to SLAVE. 4 Press the COUNTER - RESET/TC SET button. TCG values will be reset to the TC values inputted from the MASTER. • TC LINK OK will be displayed for approximately 2 seconds when the menu screen is closed. • If the TC values cannot be set correctly, LINK NG will be displayed. • If the SLAVE device is set to 24P, please set the TC MODE item on the MASTER device to NDF. • To cancel the SLAVE mode, press the MENU button. 55
-
 1
1 -
2
-
3
-
4
-
5
-
6
-
7
-
8
-
9
-
10
-
11
-
12
-
13
-
14
-
15
-
16
-
17
-
18
-
19
-
20
-
21
-
22
-
23
-
24
-
25
-
26
-
27
-
28
-
29
-
30
-
31
-
32
-
33
-
34
-
35
-
36
-
37
-
38
-
39
-
40
-
41
-
42
-
43
-
44
-
45
-
46
-
47
-
48
-
49
-
 50
50 -
 51
51 -
 52
52 -
 53
53 -
 54
54 -
 55
55 -
 56
56 -
 57
57 -
 58
58 -
 59
59 -
 60
60 -
61
-
62
-
63
-
64
-
65
-
66
-
67
-
68
-
69
-
70
-
71
-
72
-
73
-
74
-
75
-
76
-
77
-
78
-
79
-
80
-
81
-
82
-
83
-
84
-
85
-
86
-
87
-
88
-
89
-
90
-
91
-
92
-
93
-
94
-
95
-
96
-
97
-
98
-
99
-
100
-
101
-
102
-
103
-
104
-
105
-
106
-
107
-
108
-
109
-
110
-
111
-
112
 |
 |
