Panasonic AGHMC150PJ User Manual - Page 30
Basic shooting operations, Preparing for recording, Shooting in auto mode
 |
View all Panasonic AGHMC150PJ manuals
Add to My Manuals
Save this manual to your list of manuals |
Page 30 highlights
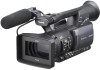
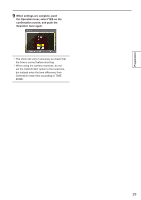
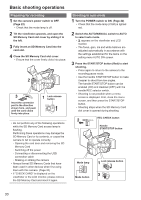
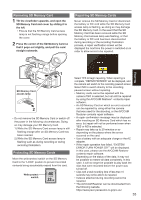
Basic shooting operations Preparing for recording 1 Set the camera's power switch to OFF. (Page 22) • Check that the mode lamp is off. 2 Tilt the viewfinder upwards, and open the SD Memory Card slot cover by sliding it to the left. 3 Fully insert an SD Memory Card into the card slot. 4 Close the SD Memory Card slot cover. • Ensure that the cover firmly clicks into place. 2 3 Insert the connector part in the direction shown here, and push until the card clicks firmly into place. 1 Lock release button POWER ON OFF • Do not perform any of the following operations while the SD Memory Card access lamp is flashing. Performing these operations may damage the SD Memory Card or its contents, or cause the camera to fail to operate correctly. · Opening the card door and removing the SD Memory Card · Switching off the power · Connecting or disconnecting the USB connection cable · Shaking or striking the camera • Always format SD Memory Cards that have been used in other devices when first using them with this camera. (Page 32) • If "CHECK CARD" is displayed on the viewfinder or the LCD monitor, please remove the SD Memory Card and insert it again. Shooting in auto mode 1 Turn the POWER switch to ON. (Page 22) • Check that the mode lamp (CAM) is lighted red. 2 Switch the AUTO/MANUAL switch to AUTO to select auto mode. • appears on the viewfinder and LCD monitor. • The focus, gain, iris and white balance are adjusted automatically in accordance with the settings established for the items on the setting menu AUTO SW screen. 3 Press the START/STOP button (Red) to start shooting. • Press again to return to the camera to the recording pause mode. • Use the handle START/STOP button to make it easier to shoot from low angles. The handle START/STOP button can be enabled (ON) and disabled (OFF) with the handle REC selector switch. • Shooting is not possible when a menu screen is displayed. First, close the menu screen, and then press the START/STOP button. • Shooting stops when the SD Memory Card slot cover is opened during shooting. REC CHECK button 2 AUTO MANUAL Handle START/STOP button Mode lamp PB Mode button 1 Lock release button POWER ON OFF 3 POWER ON OFF 30
-
 1
1 -
2
-
3
-
4
-
5
-
6
-
7
-
8
-
9
-
10
-
11
-
12
-
13
-
14
-
15
-
16
-
17
-
18
-
19
-
20
-
21
-
22
-
23
-
24
-
 25
25 -
 26
26 -
 27
27 -
 28
28 -
 29
29 -
 30
30 -
 31
31 -
 32
32 -
 33
33 -
 34
34 -
 35
35 -
36
-
37
-
38
-
39
-
40
-
41
-
42
-
43
-
44
-
45
-
46
-
47
-
48
-
49
-
50
-
51
-
52
-
53
-
54
-
55
-
56
-
57
-
58
-
59
-
60
-
61
-
62
-
63
-
64
-
65
-
66
-
67
-
68
-
69
-
70
-
71
-
72
-
73
-
74
-
75
-
76
-
77
-
78
-
79
-
80
-
81
-
82
-
83
-
84
-
85
-
86
-
87
-
88
-
89
-
90
-
91
-
92
-
93
-
94
-
95
-
96
-
97
-
98
-
99
-
100
-
101
-
102
-
103
-
104
-
105
-
106
-
107
-
108
-
109
-
110
-
111
-
112
 |
 |