Panasonic AGHMC150PJ User Manual - Page 66
Deleting and protecting clips (OPERATION)
 |
View all Panasonic AGHMC150PJ manuals
Add to My Manuals
Save this manual to your list of manuals |
Page 66 highlights
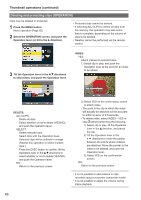
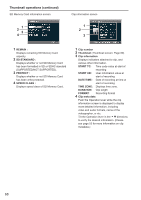
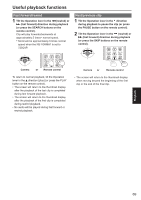
Thumbnail operations (continued) Deleting and protecting clips (OPERATION) Clips may be deleted or protected. 1 Press the MENU button. Menu operation (Page 82) 2 Select the OPERATION screen, and push the Operation lever (or tilt in the direction). • Protected clips cannot be deleted. • If selecting ALL CLIPS to delete all clips from the memory, this operation may take some time to complete, depending on the volume of clips to be deleted. • Deletion cannot be performed via the remote control. 3 Tilt the Operation lever in the directions to select item, and push the Operation lever. INDEX: YES: Attach indexes to selected clips. 1) Select clip to play, and push the Operation lever at the point for an index to be added. DELETE: ALL CLIPS: Delete all clips. Select whether or not to delete (YES/NO), and push the Operation lever. SELECT: Delete selected clips. Select clips with the Operation lever. Selected clips will be outlined in orange. (Repeat this operation to select multiple clips.) Press the EXEC button to confirm, tilt the Operation lever in the directions to select whether or not to delete (YES/NO), and push the Operation lever. NO: Return to the previous screen. 2) Select YES on the confirmation screen to attach index. • The point in the clip at which the index will actually be attached will be accurate to within an error of 0.5 seconds. • To delete index, select INDEX→YES in step 3 before performing the following. 1) Select clip to play, tilt the Operation lever in the direction, and pause the clip. 2) Tilt the Operation lever in the directions to move the pointer between the points where indexes are attached. Move the pointer to the index to be deleted, and push the Operation lever. 3) Select YES on the confirmation screen. NO: Return to the previous screen. • It is not possible to add indexes to clips recorded using a consumer camcorder model. • It is not possible to adjust the volume during index playback. 66
-
 1
1 -
2
-
3
-
4
-
5
-
6
-
7
-
8
-
9
-
10
-
11
-
12
-
13
-
14
-
15
-
16
-
17
-
18
-
19
-
20
-
21
-
22
-
23
-
24
-
25
-
26
-
27
-
28
-
29
-
30
-
31
-
32
-
33
-
34
-
35
-
36
-
37
-
38
-
39
-
40
-
41
-
42
-
43
-
44
-
45
-
46
-
47
-
48
-
49
-
50
-
51
-
52
-
53
-
54
-
55
-
56
-
57
-
58
-
59
-
60
-
 61
61 -
 62
62 -
 63
63 -
 64
64 -
 65
65 -
 66
66 -
 67
67 -
 68
68 -
 69
69 -
 70
70 -
 71
71 -
72
-
73
-
74
-
75
-
76
-
77
-
78
-
79
-
80
-
81
-
82
-
83
-
84
-
85
-
86
-
87
-
88
-
89
-
90
-
91
-
92
-
93
-
94
-
95
-
96
-
97
-
98
-
99
-
100
-
101
-
102
-
103
-
104
-
105
-
106
-
107
-
108
-
109
-
110
-
111
-
112
 |
 |
