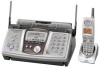
Panasonic KX-FPG391 Plain Paper Fax
Panasonic KX-FPG391 - Fax / Copier Manual
 |
UPC - 037988809707
View all Panasonic KX-FPG391 manuals
Add to My Manuals
Save this manual to your list of manuals |
Panasonic KX-FPG391 manual content summary:
- Panasonic KX-FPG391 | Plain Paper Fax - Page 1
5.8 GHz Expandable Cordless Phone System with FAX and Copier Operating Instructions Model No. KX-FPG391 FOR FAX ADVANTAGE ASSISTANCE: - PHONE CALL 1-800-HELP-FAX (1-800-435-7329) - E-MAIL TO [email protected] for customers in the U.S.A. or Puerto Rico - REFER TO www.panasonic.com for - Panasonic KX-FPG391 | Plain Paper Fax - Page 2
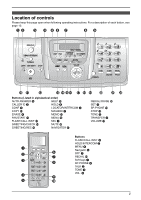
Location of Controls How to use the operating instructions When following operating instructions, always keep the front cover page (next page) open for easy reference to the buttons. OPEN i - Panasonic KX-FPG391 | Plain Paper Fax - Page 3
when following operating instructions. For a description of each button, see page 10. AB C D EF G HI JK L M N OP Q R S T UV Buttons (Listed in alphabetical order) AUTO ANSWER H HELP M CALLER ID C HOLD F CONF E LOCATOR/INTERCOM B COPY J MAILBOX G ERASE D MEMO O FAX/START K MENU - Panasonic KX-FPG391 | Plain Paper Fax - Page 4
fax machine, you should complete the instructions on page 31 to page 34. L Note that the images of copied or received documents will remain on the used ink film. Use discretion when disposing of the used ink film respective owners. Copyright: L This material is copyrighted by Panasonic Communications - Panasonic KX-FPG391 | Plain Paper Fax - Page 5
or health care facilities may be using equipment that could be sensitive to external RF (radio frequency) energy. Battery To reduce the risk of fire or injury to persons, read and follow these instructions. L Use only the battery(ies) specified. For Fax Advantage assistance, call 1-800-435-7329. 3 - Panasonic KX-FPG391 | Plain Paper Fax - Page 6
(ies) and/or the conductive material to overheat and cause burns. L Charge the battery(ies) provided with or identified for use with this product only in accordance with the instructions and limitations specified in this manual. WARNING: L To prevent the risk of fire or electrical shock, do not - Panasonic KX-FPG391 | Plain Paper Fax - Page 7
base unit. L If you use the handset near another cordless phone's base unit, noise may be heard. Move away from the other cordless phone's base unit and closer to your base basements should also be avoided. L Operating near 5.8 GHz electrical appliances may cause interference. Move away from the - Panasonic KX-FPG391 | Plain Paper Fax - Page 8
Expanding Your Phone Expanding Yyour pPhhoonnee Expanding your phone This unit includes 1 handset and 1 base unit. You can expand the system by adding up to 3 accessory handsets, sold separately. A maximum of 4 handsets can be registered to the base unit. See page 10 for accessory information. + Up - Panasonic KX-FPG391 | Plain Paper Fax - Page 9
the Controls 1.3 Description of base unit buttons ....... 10 1.4 Description of handset buttons......... 11 1.5 Overview 13 Installation (Base Unit) 1.6 Ink film 14 1.7 Paper tray 16 1.8 Recording paper 17 Installation (Handset) 1.9 Battery installation 18 1.10 Battery replacement 18 1.11 Belt - Panasonic KX-FPG391 | Plain Paper Fax - Page 10
82 8.6 Direct commands for handset programming features 88 9. Option Handset Registration 9.1 Canceling the handset registration... 90 9.2 Re-registering the handset 90 10.Help Error Messages 10.1 Error messages - Reports 92 10.2 Error messages - Display 92 Troubleshooting 10.3 When a function - Panasonic KX-FPG391 | Plain Paper Fax - Page 11
3 Cordless handset ---------- 1 4 Battery cover PQKK10142Z1 1 5 Battery HHR-P104 1 6 Belt clip PQKE10377Z1 1 7 Charger unit Charger:PQLV30024YM 1 AC adaptor:KX-TCA1-G (KX-TCA1) 8 Paper tray PFKS1088Z1 1 9 Ink film (10 meters long) ---------- 1 j Operating instructions PFQX2058Y - Panasonic KX-FPG391 | Plain Paper Fax - Page 12
by fax and telephone. - Replacement film*1 (KX-FA92): 35 m (114') × 2 rolls (Each roll will print about 113 lettersized pages.) - Battery (HHR-P104) - Headset (KX-TCA60, KX-TCA86, KXTCA88, KX-TCA88HA, KX-TCA91, KXTCA92, KX-TCA98): Allows hands-free telephone conversations. - Additional handset*2 (KX - Panasonic KX-FPG391 | Plain Paper Fax - Page 13
calls (page 35, 37). C {SP-PHONE} L For speakerphone operation (page 35, 37). D {TONE} L To change from pulse to tone temporarily during dialing when your line has rotary pulse services. E {HOLD/INTERCOM} L To put a call on hold (page 36). L To page or locate another handset (page 49). L To transfer - Panasonic KX-FPG391 | Plain Paper Fax - Page 14
telephone services such handset or base unit, or the answering machine base unit and other handsets cannot join your conversation. 5 Battery icon L This icon shows the battery strength (page 22). 6 Extension number L The extension number of your handset Fax Advantage assistance, call 1-800-435-7329. - Panasonic KX-FPG391 | Plain Paper Fax - Page 15
1.5 Overview 1.5.1 Base unit 12 34 5 67 1. Introduction and Installation 1.5.2 Handset 1 2 3 6 4 5 1 Ringer/Message alert indicator 2 Antenna 3 Receiver 4 Headset socket 5 Microphone 6 Speaker 89 j kl m 1 Antennas 2 Document guides 3 Paper tray 4 Metal recording paper guide 5 Recording paper - Panasonic KX-FPG391 | Plain Paper Fax - Page 16
1. Introduction and Installation Installation (Base Unit) 1.6 Ink film The included film roll is a starter ink film. 1.6.1 Installing the ink film Important: L Remove all the blue shipping tape from the unit before installation. 1 Open the front cover by pulling up the center part. 3 Open the back - Panasonic KX-FPG391 | Plain Paper Fax - Page 17
in the direction of the arrow until the ink film is tight (2). 1. Introduction and Installation Incorrect The ink film is not wrapped around the blue core. Slack/ at both ends (1). 1 2 L Make sure that the ink film is wrapped around the blue core (3) at least once. Correct 7 Close the front - Panasonic KX-FPG391 | Plain Paper Fax - Page 18
of non-Panasonic replacement film. 1 Open the covers (see steps 1 to 3 on page 14). 2 Remove the used core (1) and used ink film (2). 1.7 the new ink film (3). 2 1 To use A4 size paper Insert the tab on the A4 paper guide (1) into the slot on the paper tray (2) and push the guide until it clicks - Panasonic KX-FPG391 | Plain Paper Fax - Page 19
(1). 2 Fan the paper to prevent paper jams. 1 L If the paper is not inserted correctly, readjust the paper, or the paper may jam. Correct Incorrect Installation (Handset) For Fax Advantage assistance, call 1-800-435-7329. 17 - Panasonic KX-FPG391 | Plain Paper Fax - Page 20
6 HRS" and 68885 are displayed, the battery needs to be replaced. Please use only Panasonic batteries. See page 10 for accessory information. L Only use rechargeable batteries. If you install non-rechargeable batteries and start charging them, the batteries may leak electrolyte. 1 Press the notch - Panasonic KX-FPG391 | Plain Paper Fax - Page 21
-free phone conversations. Please use only a Panasonic headset. See page 10 for accessory information. To connect an optional headset to the handset To remove the belt clip While pressing the top of the clip (1), pull the right edge in the direction of the arrow (2). 2 1 L Model shown is KX-TCA88 - Panasonic KX-FPG391 | Plain Paper Fax - Page 22
the product and easily accessible. 2.1.1 Base unit 1 Telephone line cord L filter (1) to the telephone line cord of the fax machine. 1 2.1.2 Charger unit 1 AC adaptor L service Fax transmission/reception may be disturbed, noise interference may be heard during telephone conversation, or Caller ID - Panasonic KX-FPG391 | Plain Paper Fax - Page 23
(2), slide it down (3), then slide down to the right (4) until it is secured. 2.45 cm (31/32") 1 2 3 4 2. Preparation Wall Template 2.45 cm (31/32") For Fax Advantage assistance, call 1-800-435-7329. 21 - Panasonic KX-FPG391 | Plain Paper Fax - Page 24
and/or 0688754 flashes. This will maximize the battery life. Recharge Recharge the battery when: - "Recharge battery" is shown and/or 0688754 flashes on the handset display. - the handset beeps intermittently while it is in use. L Recharge the handset battery for more than 15 minutes, or the display - Panasonic KX-FPG391 | Plain Paper Fax - Page 25
the way you prefer to use your fax machine in Quick Setup feature #00. You can print out the Quick Setup Guide as a reference. - Case 1: TAM/FAX (Telephone Answering Machine/Fax) (page 24) - Case 2: Distinctive Ring (1 phone line with 2 or more phone numbers) (page 25) - Case 3: TEL ONLY (page - Panasonic KX-FPG391 | Plain Paper Fax - Page 26
subscribe to a voice mail service, call Panasonic Fax Advantage assistance at 1-800-435-7329 for more information. 2.5.3 How phone calls and faxes are received When receiving calls, the unit works as a fax and answering machine. L If the call is a phone call, the fax machine will record the caller - Panasonic KX-FPG391 | Plain Paper Fax - Page 27
8 Press {MENU}. Note: L You can change the ring setting in TAM/FAX mode (feature #06 on page 75, or page 84). 2.6.3 How phone calls and faxes are received If the number assigned for phone calls is called, the fax machine will ring and record a voice message automatically. If the number assigned for - Panasonic KX-FPG391 | Plain Paper Fax - Page 28
base unit, handset or an extension telephone. AUTO ANSWER With the base unit 1. Press {SP-PHONE} to answer the call. 2. When: - document reception is required, - a fax calling tone (slow beep) is heard, or - no sound is heard, press {FAX/START}. L The fax machine will start fax reception. {FAX - Panasonic KX-FPG391 | Plain Paper Fax - Page 29
Note: L To receive fax documents using the extension telephone, make sure remote fax activation is turned ON (feature #41 on page 77) beforehand. The default setting is ON. 2. Preparation For Fax Advantage assistance, call 1-800-435-7329. 27 - Panasonic KX-FPG391 | Plain Paper Fax - Page 30
wish to use the fax machine only for fax reception/transmission. 2.8.2 How to setup AUTO ANSWER {STOP} {A}{B} {SET} {MENU} 1 Press {MENU}. 2 Press {#} then {0}{0}. QUICK SETUP PRESS SET 3 Press {SET} PRINT SETUP? YES:SET/NO:STOP 4 Press {SET} again to print the Quick Setup Guide. L If you do - Panasonic KX-FPG391 | Plain Paper Fax - Page 31
machine. Fax sending/receiving: Help with problems sending/receiving faxes. Copier: How to use the copier function. Q and A: Frequently asked questions and answers. Errors: Explanation of error messages shown on the display. Reports: List of available reports. Caller ID: How to use the Caller ID - Panasonic KX-FPG391 | Plain Paper Fax - Page 32
levels (high to low) are available. While using {SP-PHONE}, press {v} or {e}. 2.11 Adjusting base unit volume {SET} {A}{B} Ringer volume 4 levels (high/ Fax voice guidance volume 9 levels (high to off) are available. While listening to fax voice guidance, press {A} or {B}. Answering machine - Panasonic KX-FPG391 | Plain Paper Fax - Page 33
PM 0-9=Date&Time =AM/PM SAVE 6 Press the soft key ({SAVE}). L If the handset beeps 3 times, the setting is not correct. Start again from step 4. 7 Press {OFF , and make the correction. 2.12.2 With the base unit {SET} {} {MENU} 1 Press {MENU}. SYSTEM SETUP PRESS NAVI.[( )] 2 Press {} - Panasonic KX-FPG391 | Plain Paper Fax - Page 34
displayed. L If 3 beeps sound, the setting is not correct. Start again from step 4. 7 Press {MENU} to exit. Note: L The other party's fax machine will print the date and make the correction. If you have subscribed to a Caller ID service The date and time will be automatically set according to the - Panasonic KX-FPG391 | Plain Paper Fax - Page 35
characters using {A} or {B}. 1. Press {B} repeatedly to display the desired character. Characters will be displayed in the following order: 1 Lowercase letters 2 Number 3 Symbol 4 Uppercase letters For Fax Advantage assistance, call 1-800-435-7329. 33 - Panasonic KX-FPG391 | Plain Paper Fax - Page 36
all of the numbers, press and hold {STOP}. {STOP} {} {SET} {MENU} {FLASH/CALL WAIT} 1 Press {MENU}. SYSTEM SETUP PRESS NAVI.[( )] 2 Press {} repeatedly to display the following. YOUR FAX NO. PRESS SET 3 Press {SET}. L The cursor (|) will appear on the display. NO.=| 4 Enter your - Panasonic KX-FPG391 | Plain Paper Fax - Page 37
When this feature is turned ON automatically or manually, battery life will be shortened (page 22). L The maximum number of extensions which can be used at a time may be decreased. Making hands-free phone calls 1. Lift the handset and press {SP-PHONE}. 2. Dial the telephone number. 3. When the other - Panasonic KX-FPG391 | Plain Paper Fax - Page 38
} or {SP- PHONE} on the handset or {SP-PHONE} on the base unit. L If you do not press a button for more than 6 minutes, beeps will start to sound handset Press {TALK} or {SP-PHONE}, then press {REDIAL}. To redial using the redial list (Memory redial) The last 5 phone numbers dialed from the handset - Panasonic KX-FPG391 | Plain Paper Fax - Page 39
3.2.1 With the handset 3. Telephone 3.2.2 With the base unit {TALK} {SP-PHONE} 1 {OFF} {e}{v} 1 Lift the handset and press {TALK}. L You can also answer a call by pressing any button except {v}, {e} or {OFF} (Any key talk feature). 2 When finished talking, press {OFF} or place the handset on the - Panasonic KX-FPG391 | Plain Paper Fax - Page 40
book can be copied between a handset and a base unit, or between 2 handsets (page 41). L If you register additional handsets (page 6), each handset has its own phone book. 3.3.1 With the handset {PAUSE}{} {v} {OFF} Make sure the handset and base unit are not being used - Panasonic KX-FPG391 | Plain Paper Fax - Page 41
for instructions). 4 Press {SET}. 5 Enter the telephone number, up to 32 digits. 6 Press {SET}. L To program other items, repeat steps 3 to 6. 7 Press {MENU}. Helpful hints: L For your convenience, HELP-FAX (1-800- 435-7329) has been stored in the base unit phone book. If you cannot solve a problem - Panasonic KX-FPG391 | Plain Paper Fax - Page 42
dialed after it. 3.4.2 With the base unit 1 Press {>}. 2 Press {A} or {B} repeatedly to display the desired item. 3 Press {SP-PHONE}. L The unit will start the front cover page open for button locations. 3.5.1 With the handset Make sure the handset is not being used. 1 Press the soft key ({C}). 2 - Panasonic KX-FPG391 | Plain Paper Fax - Page 43
book copy, copying will be stopped. You will need to copy the item(s) later. 3.7.1 From a handset to the base unit or another handset Copying one phone book item 1 Press {MENU}. 2 Scroll to "Copy phone book" by pressing {v} or {e}, then press the soft key ({SELECT}). 3 Press the soft key ({SELECT - Panasonic KX-FPG391 | Plain Paper Fax - Page 44
, "Complete" will be displayed and a beep will sound. L The destination unit display will show "PHONE BOOK RECEIVING", then "PHONE BOOK RECEIVED". L To copy items to another extension, repeat steps 3 to 5. 6 Press {OFF}. 3.7.2 From the base unit to a handset Copying one phone book item 1 Press {MENU - Panasonic KX-FPG391 | Plain Paper Fax - Page 45
ID list (page 111). L If the unit is connected to a PBX (Private Branch Exchange) system fax document. L Please contact your telephone company for details and availability of this service in your area. Talking Caller ID feature You can set the Talking Caller ID feature ON/OFF for the handset and base - Panasonic KX-FPG391 | Plain Paper Fax - Page 46
Service users, see page 43). L Names may not always be pronounced as expected. L The unit will announce each letter of abbreviations, such as "Co." and "Inc.". L Caller ID supports the caller's name. The TAM/FAX ring setting can be changed by 3.9.1 With the handset {CID} {TALK} {SP-PHONE} {EDIT} - Panasonic KX-FPG391 | Plain Paper Fax - Page 47
"×2" to "×9" will be replaced with a ",". To stop handset storing procedure on page 48. Note: L The unit provides an auto edit feature for Caller ID numbers. For details, see page 46. 3. Telephone 3.9.2 With the base unit {CALLER ID} {STOP} {FAX/START} {A}{B} {SP-PHONE} 1 Press {CALLER ID - Panasonic KX-FPG391 | Plain Paper Fax - Page 48
checking "×2" to "×9" will be replaced with a ",". To stop reset to pattern 3. Phone numbers from the 4 most recently edited area codes will be automatically edited. This feature can be turned ON using either the handset or the base unit. The default setting is ON. 3.10.1 Turning ON the Caller ID - Panasonic KX-FPG391 | Plain Paper Fax - Page 49
sure the handset is not being used. 1 Press the soft key ({CID}), {v} or {e} to display "Caller list". 2 Press {v} or {e} repeatedly to display the desired item. 3 Press the soft key ({ERASE}). L To erase other items, repeat from step 2. 4 Press {OFF}. With the base unit 1 Press {CALLER ID}. 2 Press - Panasonic KX-FPG391 | Plain Paper Fax - Page 50
then press the soft key ({SAVE}). L To continue storing other items, repeat from step 2. 4 Press {OFF} to exit. 3.12.2 Into the base unit 1 Press {CALLER ID}. 2 Press {A} or {B} repeatedly to display the desired item. 3 Press {MENU}. 4 Press {SET}. 5 Press {SET}. Note: L You can confirm the items - Panasonic KX-FPG391 | Plain Paper Fax - Page 51
OFF} or place the handset on the charger. Base unit You can also locate a misplaced handset by paging it (Handset locator). 1 Press {LOCATOR/INTERCOM}. 2 To page one handset, enter its extension number ({1} to {4}). L The handset will beep for 1 minute. L To stop paging, press {SP-PHONE} or {LOCATOR - Panasonic KX-FPG391 | Plain Paper Fax - Page 52
, only the handset user who answers first can take the transferred call. To answer a transferred call with the handset: - If the paging party announces the transfer, the paging extension's number is displayed. Press {TALK}, {SP-PHONE} or {HOLD/INTERCOM} to answer the page. Example: Base unit is - Panasonic KX-FPG391 | Plain Paper Fax - Page 53
on hold can resume the full conference; by pressing the soft key ({CONF}) on the handset or {CONF} on the base unit. L One more extension conversation (Call share feature) Handset: Press {TALK} or {SP-PHONE}. Base unit: Press {SP-PHONE}. 3.16.2 To prevent other users from joining your conversation ( - Panasonic KX-FPG391 | Plain Paper Fax - Page 54
enter its extension number ({1} to {4}). L The base unit will start to monitor the room through the handset. L The monitored unit will display "Room monitor" then the duration time. 3 To end monitoring, press {LOCATOR/INTERCOM} or {SP-PHONE}. L The monitored handset user can stop being monitored by - Panasonic KX-FPG391 | Plain Paper Fax - Page 55
4SeFnadxing Faxes 4.1 Sending a fax manually 1 {HELP} {STOP} {A}{B} {FAX/START} {SET} {SP-PHONE} {REDIAL/PAUSE} 1 Adjust the width of the document guides (1) to fit the actual size of the document. 2 Insert the document (up to 10 pages) FACE DOWN until a single beep is heard and the unit grasps - Panasonic KX-FPG391 | Plain Paper Fax - Page 56
reports, make sure feature #04 is activated (page 75). For an explanation of error messages, see page 92. Printing a journal report A journal report provides you with a printed record of the 30 most recent faxes. To print it manually, see page 111. To print it automatically after every 30 new - Panasonic KX-FPG391 | Plain Paper Fax - Page 57
, and that the number is a fax number. L Confirm that the other party's fax machine is answering by turning ON the connecting tone feature (feature #76 on page 79). 4.4 Broadcast transmission By storing the base unit's phone book items (page 39) into the broadcast memory, you can send the same - Panasonic KX-FPG391 | Plain Paper Fax - Page 58
4. Fax 4.4.3 Erasing a stored item from the broadcast memory 1 Press {>}. 2 Press {A} or {B} repeatedly to display "". of pages that the unit can send will decrease. L If the document exceeds the memory capacity, transmission will be canceled. L If a party is busy or does not answer - Panasonic KX-FPG391 | Plain Paper Fax - Page 59
telephone rings, lift the handset of the extension telephone. 2. When: - document reception is required, - a fax calling tone (slow beep) is heard, or - no sound is heard, press {*}{#}{9} (default fax activation code) firmly. L The fax machine will start reception. 3. Replace the handset. 57 - Panasonic KX-FPG391 | Plain Paper Fax - Page 60
#41 on page 77) beforehand. The default setting is ON. 4.6 Receiving a fax automatically - Auto answer ON 4.6.1 Activating TAM/FAX mode (Telephone Answering Machine/Fax mode) 1 Make sure feature #77 is set to "TAM/FAX" (page 80) beforehand. 2 Press {AUTO ANSWER} repeatedly to display the following - Panasonic KX-FPG391 | Plain Paper Fax - Page 61
If the unit announces "Memory full" and "ALL MAILBOX FULL" is displayed on the base unit, erase unnecessary messages (page 68, page 70). How phone calls and faxes are received When receiving calls, the unit works as an answering machine and/or fax. L If the call is a phone call, the unit will record - Panasonic KX-FPG391 | Plain Paper Fax - Page 62
callers) If you subscribe to Caller ID service, this feature prevents fax reception from calls that do not show caller information. Additionally, faxes originating from numbers that match a programmable junk fax prohibitor list will not be accepted by the fax machine (page 60). L Keep the front - Panasonic KX-FPG391 | Plain Paper Fax - Page 63
for Distinctive Ring, you can make the fax machine automatically start fax reception when a call comes to the fax number. To use this service, you must subscribe to the Distinctive Ring service offered by your local telephone company. 5.2 Using two or more phone numbers on a single telephone line - Panasonic KX-FPG391 | Plain Paper Fax - Page 64
#32 "C" 1st ring 2nd ring Other triple ring (short- "D" short-long rings) 1st ring 2nd ring 5.4 Programming the ring pattern assigned for fax L Keep the front cover page open for button locations. 1 Set feature #31 to "ON" (page 61). 2 Press {MENU}. 3 Press {#}, then {3}{2}. 4 Press {A} or - Panasonic KX-FPG391 | Plain Paper Fax - Page 65
until a single beep is heard and the unit grasps the document. L If the document guides are not adjusted to Note: L Any document which can be sent as a fax can also be copied (page 54). To select the resolution memory. The unit will then print the data. If the document exceeds the memory capacity - Panasonic KX-FPG391 | Plain Paper Fax - Page 66
4-page original document 4 3 2 1 4 3 2 1 1 1 2 2 3 3 4 4 Collated pages Uncollated pages Note: L The unit will store the documents into memory while collating the copies. If memory becomes full while storing, the unit will only print out the stored pages. L After copying, the collating feature - Panasonic KX-FPG391 | Plain Paper Fax - Page 67
phone can leave a message in a specific mailbox by entering a mailbox number. Callers who use rotary phones base unit programming (page 78). L You can also program a password using the handset (page 85). 3 Set the unit to TAM/FAX by up to 3 minutes. 7. Answering Machine L A maximum of 64 messages ( - Panasonic KX-FPG391 | Plain Paper Fax - Page 68
recording time is set to "1 MIN", "2 MIN" or "3 MIN": "Hello! We are unable to answer right now. To send a fax, please start transmission. To leave a voice message, please speak after the beep. Thank you." - When the recording time is set to "GREETING ONLY": "Hello! We are unable to answer right now - Panasonic KX-FPG391 | Plain Paper Fax - Page 69
turned ON. - The mailbox icons which contain new messages will flash on the base unit display. If only old messages exist in a mailbox: - The {AUTO } {ERASE} {STOP} {MAILBOX} {}{A}{B} AUTO ANSWER {SP-PHONE} 7. Answering Machine {HOLD/INTERCOM} Press the {MAILBOX} button whose icon is - Panasonic KX-FPG391 | Plain Paper Fax - Page 70
} on the handset or press {TRANSFER} on the base unit during a call. L The call will be put on hold. 2 Press {9} to hang up the call. L After you press {9}, the caller can then access a mailbox and leave a message there (page 65). Note: L Even if you subscribed to a Caller ID service (page 43 - Panasonic KX-FPG391 | Plain Paper Fax - Page 71
received, the unit will ring and playback will stop. To answer the call, press {TALK} or {SP-PHONE}. For playback, start again from the beginning after hanging up. L If the unit announces "Memory full" after playback, erase unnecessary messages (page 70). Voice menu If you do not press any keys at - Panasonic KX-FPG391 | Plain Paper Fax - Page 72
will be set to FAX ONLY or TAM/FAX mode, depending on the setting of feature #77 (page 80). For Caller ID service users (page 43) During beeps sound and the unit announces "Your message was not recorded. Record your message again.", start again. L If 6 beeps sound and the unit announces "Memory full - Panasonic KX-FPG391 | Plain Paper Fax - Page 73
answering machine. Important: L Program the remote operation ID beforehand (feature #11 on page 75, or page 85). L Set the unit to TAM/FAX mode are no new messages Voice guide: "Mailbox (no.), no new messages." When voice memory is full Voice guide: "Memory full" Erase any unnecessary messages. - Panasonic KX-FPG391 | Plain Paper Fax - Page 74
in the mailbox are erased. L A long beep will sound and the unit will announce "Mailbox (no.), no messages.". {0} To turn OFF the answering machine L The unit hangs up and will not answer receiving mode will be set to FAX ONLY or TAM/FAX mode, depending on the setting of feature #77 (page 80). - Panasonic KX-FPG391 | Plain Paper Fax - Page 75
7.6.4 Interrupting remote operation If you mistakenly answer the call while a user is accessing a mailbox from a remote location: 1 Press {HOLD/INTERCOM} on the handset or {TRANSFER} on the base unit. 2 Press {9}. L The user can then access a mailbox by entering the remote code or the mailbox - Panasonic KX-FPG391 | Plain Paper Fax - Page 76
8. Programmable Features 8FePartougrerasm(BmaasbeleUFneita) tures 8.1 Base unit programming {SET} {MENU} {}{A}{B} 8.1.1 Programming basic features 1 Press {MENU}. 2 Select the feature you wish to program. Press {} repeatedly to display the desired feature. L The - Panasonic KX-FPG391 | Plain Paper Fax - Page 77
99). L The default ID is "11". 4. Press {SET}. 5. Press {MENU}. Note: L You can also program this feature with the handset (page 85). Code #13: Setting the dialing mode DIALING MODE MODE=TONE [±] If you cannot make calls, change this setting depending on your telephone line service. "TONE" (default - Panasonic KX-FPG391 | Plain Paper Fax - Page 78
with the handset (page 83). L To set the handset ringer tone, see page 83. L If you have downloaded ringer melodies using the openLCR service, they can also be selected. See page 109 for details. 76 8.3 Advanced features Code #21: Activating the Talking Caller ID feature TALK CALLER ID MODE=ON - Panasonic KX-FPG391 | Plain Paper Fax - Page 79
ID list will be printed automatically each time the base unit logs 30 different callers (page 43). "OFF" (default): The Caller ID it into memory first, then handset display contrast, see page 86. Code #41: Changing the fax activation code FAX ACTIVATION MODE=ON [±] If you wish to use a handset - Panasonic KX-FPG391 | Plain Paper Fax - Page 80
beeping sound when a received fax document is stored into memory due to some existing problem. The slow beeps will continue until you clear the printing problem feature with the handset (page 85). Code #52: Setting the mailbox 3 password BOX3 PASSWORD ID= To prevent other users from retrieving your - Panasonic KX-FPG391 | Plain Paper Fax - Page 81
time for your TAM/FAX greeting message GREETING TIME MODE=16s [±] "16s" (default): Maximum recording time is 16 seconds. "60s": Maximum recording time is 60 seconds. See page 66 for details. Code #59: Copying phone book data from the base unit to a handset COPY PHONE BOOK =1 ITEM [±] See - Panasonic KX-FPG391 | Plain Paper Fax - Page 82
the AUTO ANSWER setting AUTO ANSWER MODE=TAM/FAX [±] "TAM/FAX" (default): Telephone Answering Machine/Fax mode (page 58) "FAX ONLY": Fax only mode (page 59) Code #80: Resetting advanced features to their default settings SET DEFAULT RESET=NO [±] To reset the advanced features: 1. Press {MENU - Panasonic KX-FPG391 | Plain Paper Fax - Page 83
1 - {9}: Downloaded melody pattern 2 {#}{2}{1} Talking Caller ID - {1}: "ON" (default) - {2}: "OFF" {#}{2}{2} Automatic journal report - {1}: "ON" (default) - {2}: "OFF" {#}{2}{3} Overseas mode - {1}: "NEXT FAX" - {2}: "OFF" - {3}: "ERROR" (default) {#}{2}{5} Delayed send - {1}: "ON" - {2}: "OFF - Panasonic KX-FPG391 | Plain Paper Fax - Page 84
menu Ringer setting Date and time (page 31) Voice enhancer (page 35) Caller IQ Copy phone book Talking Caller ID (page 84) Sub-menu Ringer volume (page 29) Ringer tone (page 83) Incoming call (for handset) (page 84) ---------- ---------- View info.? (page 109) Get new info.? (page 109) Turn CIQ off - Panasonic KX-FPG391 | Plain Paper Fax - Page 85
) (page 87) L Talking Caller ID (for base unit) (page 84) Registration L HS registration (page 90) L Deregistration (page 90) Change language (page 87) 8. Programmable Features 8.5.2 Programmable functions Setting ringer tone for outside calls To set the handset ringer tone from one of 7 patterns - Panasonic KX-FPG391 | Plain Paper Fax - Page 86
Press the soft key ({SAVE}). 5. Press {OFF}. - Base unit Talking Caller ID Use the handset 84 1. Press {MENU}. 2. Scroll to "Initial setting" OFF}. Changing the ring setting in TAM/FAX mode To change the number of rings before the unit answers a call in TAM/FAX mode. You can select "2", "3" (default - Panasonic KX-FPG391 | Plain Paper Fax - Page 87
can also program this feature with the base unit (feature #11 on page 75). Setting the mailbox 2 or 3 password To prevent other users from retrieving your messages, program a the Ringer/Message alert indicator on the handset will flash when new messages have been recorded (page 67). The default setting - Panasonic KX-FPG391 | Plain Paper Fax - Page 88
Note: L To change the base unit display contrast, see feature # . Includes confirmation tones and error tones. The default setting handset off the charger without pressing {TALK} or {SP-PHONE ID service and want to view the caller's information on the handset display after lifting up the handset - Panasonic KX-FPG391 | Plain Paper Fax - Page 89
(feature #62 on page 79). Setting the room monitor feature See page 52 for details. To turn ON the base unit room monitor feature using the handset, program as follows: 1. Press {MENU}. 8. Programmable Features 2. Scroll to "Initial setting" by pressing {v} or {e}, then press the soft key ({SELECT - Panasonic KX-FPG391 | Plain Paper Fax - Page 90
pattern 1 - {9}: Downloaded melody pattern 2 {1}{3} Incoming call tone (handset) - {1}: "On" - {2}: "2" (default) - {0}: . L You must subscribe to the openLCR service beforehand (page 108). L After pressing {7}, {9} Talking Caller ID - {1}: "On" (default) - {0}: "Off" {#}{1} Copy phone book (1 item - Panasonic KX-FPG391 | Plain Paper Fax - Page 91
" - {0}: "Off" (default) {0}{0}{1} Handset registration L Press {LOCATOR/INTERCOM} on the base unit until "HS REGISTRATION" is displayed. See page 90 for details. {0}{0}{2} Handset deregistration L Press {3}{3}{5}. See page 90 for details. {0}{*}{4} Talking Caller ID (base unit) - {1}: "On" (default - Panasonic KX-FPG391 | Plain Paper Fax - Page 92
" is displayed. 2 Press the desired extension number you want to cancel ({1} to {4}). 3 Press {SET}. L A beep will sound and the registration memory will be erased on the base unit only. Note: L After canceling registration, the handset cannot be used. If you want to use it again, re-register the - Panasonic KX-FPG391 | Plain Paper Fax - Page 93
unit (page 90), the handset number still remains in that base unit's memory. To erase the handset number from the previous base unit, see the base unit's operating instructions. For this base unit: 1. Press and hold {LOCATOR/INTERCOM} until a beep sounds. 2. Enter the handset number that you do not - Panasonic KX-FPG391 | Plain Paper Fax - Page 94
59, 70) L A transmission or reception error occurred because of a problem with the other party's fax machine. Check with the other party. JUNK FAX PROH. REJECT L The junk fax prohibitor feature of this unit rejected fax reception. MEMORY FULL L The memory is full of received documents due to a lack - Panasonic KX-FPG391 | Plain Paper Fax - Page 95
was set to OFF (page 52). ERROR!! L A handset tried to copy phone book items (page 41) but the copy has been stopped. FAX IN MEMORY memory capacity of the unit. Send the entire document manually FILM EMPTY b COVER OPEN L The ink film is empty. Replace the ink film with a new one (page 16 - Panasonic KX-FPG391 | Plain Paper Fax - Page 96
10. Help OPEN CABINET CHECK FILM SLACK b OPEN CABINET CHECK FILM TYPE L Please use genuine Panasonic replacement film (page 10). L The ink film is slack. Tighten it (see step 5 on page 15). L The fax machine is positioned near appliances such as TVs or speakers which generate an intense magnetic - Panasonic KX-FPG391 | Plain Paper Fax - Page 97
unit phone book, see page 41. L If "Phone book full" is not displayed, copying was stopped for another reason, such as: - the destination handset was out of range, or - the destination unit user pressed {TALK}, {SP-PHONE} on the handset or {SPPHONE} on the base unit Invalid For Fax Advantage - Panasonic KX-FPG391 | Plain Paper Fax - Page 98
Phone book full L There is no space to store new items in phone book. Erase unnecessary items (page 41). Phone book No items stored L The battery needs to be charged. Recharge the battery (page 22). System is busy. Please try again later. L The handset has lost communication with the base - Panasonic KX-FPG391 | Plain Paper Fax - Page 99
every page that comes out of the machine is considered a full page. L Turn OFF the following features: - sending report: feature #04 on page 75. - journal report: feature #22 on page 76. - Caller ID list: feature #26 on page 77. The unit beeps. L Recording paper/ink film has run out. Press {STOP} to - Panasonic KX-FPG391 | Plain Paper Fax - Page 100
than one other user is using the handsets and base unit, you may not be able to page. Try again later. The unit does not display the caller's name and/or telephone number. L You need to subscribe to a Caller ID service. L Other telephone equipment may be interfering with your phone. Disconnect it - Panasonic KX-FPG391 | Plain Paper Fax - Page 101
while programming. L Move closer to the base unit. L While another user is listening to messages or the telephone answering machine is answering a call, you cannot program. Try again later. I cannot register a handset to the base unit. L Fully charge the battery (page 22). L The maximum number of - Panasonic KX-FPG391 | Plain Paper Fax - Page 102
#36 (page 77). L The other party placed the document in their fax machine facing the wrong way. Check with the other party. The printing quality is poor. Please do not reuse the ink film! Please use genuine Panasonic replacement film. Refer to page 10 for further details. L The thermal head is - Panasonic KX-FPG391 | Plain Paper Fax - Page 103
guides to fit the actual size of the document. The printing quality is poor. Please do not reuse the ink film! Please use genuine Panasonic replacement film. Refer to page 10 for further details. Original Copy ABC L The thermal head is dirty. Clean it (page 106). L Some paper has instructions - Panasonic KX-FPG391 | Plain Paper Fax - Page 104
10. Help Caller ID information does not arrangements should be made for access to emergency services. L Fax transmission and reception will be interrupted. L If sent after power is restored. L If any fax documents are stored in the memory, they will be lost. When power is restored, a - Panasonic KX-FPG391 | Plain Paper Fax - Page 105
of the blue core (1) in the direction of the arrow until the ink film is tight (2). 1 4 Remove the jammed recording paper (1). 1 2 L Make sure that the ink film is wrapped around the blue core (3) at least once. Correct 3 1 turn Tight For Fax Advantage assistance, call 1-800-435-7329. 103 - Panasonic KX-FPG391 | Plain Paper Fax - Page 106
10. Help Incorrect The ink film is not wrapped around the blue core. Slack/Crease 8 Remove the recording paper and straighten. Pull the tension insert the paper. Push the tension plate back, then press {START} to clear the message. 104 {START} 1 For Fax Advantage assistance, call 1-800-435-7329. - Panasonic KX-FPG391 | Plain Paper Fax - Page 107
document when sending or copying. 1 Disconnect the power cord and the telephone line cord. 2 Open the front cover by pulling up the center part. For Fax Advantage assistance, call 1-800-435-7329. 105 - Panasonic KX-FPG391 | Plain Paper Fax - Page 108
the front cover by pulling up the center part. 3 4 Close the front cover securely. 5 Connect the power cord and the telephone line cord. 106 For Fax Advantage assistance, call 1-800-435-7329. - Panasonic KX-FPG391 | Plain Paper Fax - Page 109
can also release the back cover by pushing in the green lever (2). 5 Remove the ink film (1). 10. Help 2 4 Open the back cover. 1 1 6 Clean the thermal cloth and do not touch the thermal head directly. 1 7 Reinstall the ink film and close the covers (see steps 4 to 7 on page 14). 8 Connect the - Panasonic KX-FPG391 | Plain Paper Fax - Page 110
for the Caller IQ feature This unit is compatible with service provided by openLCR. L If you have any questions regarding the openLCR service, visit www.openLCR.com or call openLCR at 1866-openLCR (1-866-6736527). L NEITHER PANASONIC COMMUNICATIONS CO., LTD. NOR MATSUSHITA ELECTRIC CORPORATION OF - Panasonic KX-FPG391 | Plain Paper Fax - Page 111
and a phone number of up to 32 digits. Ringer melodies: L The unit stores up to 2 ringer melodies in the handset and base unit separately instruction (page 109). L If occurs again contact openLCR (page 108). The unit beeps 3 times and/or displays "Download incomplete. Phone book full.". L The phone - Panasonic KX-FPG391 | Plain Paper Fax - Page 112
11. Caller IQ Feature L Erase items that do not exist on the web from the phone book of the unit (see page 41). L From the web (www.openLCR.com) enter phone book data. L Follow download instruction (page 109). 11.4 Turning the Caller IQ OFF / ON {e}{v} {SELECT}{YES} {OFF} 1 Press {MENU}. 2 - Panasonic KX-FPG391 | Plain Paper Fax - Page 113
phone book of the base unit. Journal report: Keeps a record of fax transmission and reception. This report can be printed automatically after every 30 fax memory (page 55). Caller ID list: Keeps a record of the last 30 different callers of the base unit after subscribing to a Caller ID service. - Panasonic KX-FPG391 | Plain Paper Fax - Page 114
Base on plain paper Data compression system: Modified Huffman (MH), machine are inferior to your unit, the transmission speed may be lower. *3 If an error occurs during fax reception, such as a paper jam or if the recording paper runs out, the fax and subsequent faxes will be retained in memory - Panasonic KX-FPG391 | Plain Paper Fax - Page 115
printed from this unit for double-sided printing with other copiers or printers. This may cause a paper jam. Information 12.2.2 Handset Operating environment: 5 °C - 40 °C (41 °F - 104 °F) Frequency: 5.76 GHz - 5.84 GHz Dimensions: Approx. instructions may vary slightly from the actual product. 113 - Panasonic KX-FPG391 | Plain Paper Fax - Page 116
. If trouble is experienced with this equipment, for repair or warranty information, please contact a Factory Servicenter or other Authorized Servicer. If the equipment is causing harm to the telephone network, the telephone company may request that you disconnect the equipment until the problem is - Panasonic KX-FPG391 | Plain Paper Fax - Page 117
accordance with the instructions, may cause equipment off and on, the user is encouraged to try to base of the cordless telephone should not be placed near or on top of a TV or VCR. If interference is experienced, move the cordless be avoided. The base and handset units must not be co - Panasonic KX-FPG391 | Plain Paper Fax - Page 118
to repair or replace will be made by the warrantor. FAX categories Thermal Transfer Facsimile Laser Facsimile Parts 6 Months 1 (one) Year Labor 6 Months 1 (one) Year Batteries, antennas, optional accessories (such as additional handsets), ink film, toner cartridge, drum unit, and ink cartridge - Panasonic KX-FPG391 | Plain Paper Fax - Page 119
servicenter. For out of Limited Warranty technical and troubleshooting support: Panasonic offers two value based, cost effective, solutions: 1. Panasonic Continued Services 900 fee based support: 1-900-FAX-HELP (1-900-3294357) This exceptional service is charged directly to your telephone bill at - Panasonic KX-FPG391 | Plain Paper Fax - Page 120
hearing or speech impaired TTY users, TTY: 1-866-605-1277 Service in Puerto Rico Matsushita Electric of Puerto Rico, Inc. Panasonic Sales Company Factory Servicenter: Ave. 65 de Infantería, Km. 9.5, San Gabriel Industrial Park, Carolina, Puerto Rico 00985 Phone (787) 750-4300 Fax (787) 768-2910 118 - Panasonic KX-FPG391 | Plain Paper Fax - Page 121
A4 paper guide: 16 Belt clip: 19 Paper tray: 16 Advanced features: 76 AUTO ANSWER setting: 80 Auto talk feature: 37, 86 B Basic features: 75 13. Index Battery Charge: 22 Installation: 18 Replacement: 18 Broadcast transmission: 55 Button description Base unit: 10 Handset: 11 C Caller ID Calling back - Panasonic KX-FPG391 | Plain Paper Fax - Page 122
: 53, 63 Ringer tone Base unit: 76 Handset: 83 Ring pattern for Distinctive Ring: 62 Ring setting FAX ONLY (Base unit): 75 TAM/FAX (Base unit): 75 TAM ring setting (Handset): 84 Room monitor: 52, 87 S Sending faxes Broadcast: 56 From memory: 53 Manually: 53 Phone book: 55 Sending report: 54 - Panasonic KX-FPG391 | Plain Paper Fax - Page 123
W Wall mounting: 21 13. Index 121 - Panasonic KX-FPG391 | Plain Paper Fax - Page 124
122 - Panasonic KX-FPG391 | Plain Paper Fax - Page 125
123 - Panasonic KX-FPG391 | Plain Paper Fax - Page 126
KX-FPG391 Proof of Purchase Panasonic FAX ADVANTAGE PROGRAM Free peace of mind, direct from Panasonic NO EXTRA COST FAX ADVANTAGE PROGRAM I 6-month limited warranty1: parts, labor, and toll-free help line2 I Free replacement3 and repair program The Panasonic Fax Advantage Consumer Service
-
 1
1 -
 2
2 -
 3
3 -
 4
4 -
 5
5 -
 6
6 -
 7
7 -
8
-
9
-
10
-
11
-
12
-
13
-
14
-
15
-
16
-
17
-
18
-
19
-
20
-
21
-
22
-
23
-
24
-
25
-
26
-
27
-
28
-
29
-
30
-
31
-
32
-
33
-
34
-
35
-
36
-
37
-
38
-
39
-
40
-
41
-
42
-
43
-
44
-
45
-
46
-
47
-
48
-
49
-
50
-
51
-
52
-
53
-
54
-
55
-
56
-
57
-
58
-
59
-
60
-
61
-
62
-
63
-
64
-
65
-
66
-
67
-
68
-
69
-
70
-
71
-
72
-
73
-
74
-
75
-
76
-
77
-
78
-
79
-
80
-
81
-
82
-
83
-
84
-
85
-
86
-
87
-
88
-
89
-
90
-
91
-
92
-
93
-
94
-
95
-
96
-
97
-
98
-
99
-
100
-
101
-
102
-
103
-
104
-
105
-
106
-
107
-
108
-
109
-
110
-
111
-
112
-
113
-
114
-
115
-
116
-
117
-
118
-
119
-
120
-
121
-
122
-
123
-
124
-
125
-
126
 |
 |
Please read these Operating
Instructions before using the unit
and save for future reference.
This model is designed to be
used only in the U.S.A.
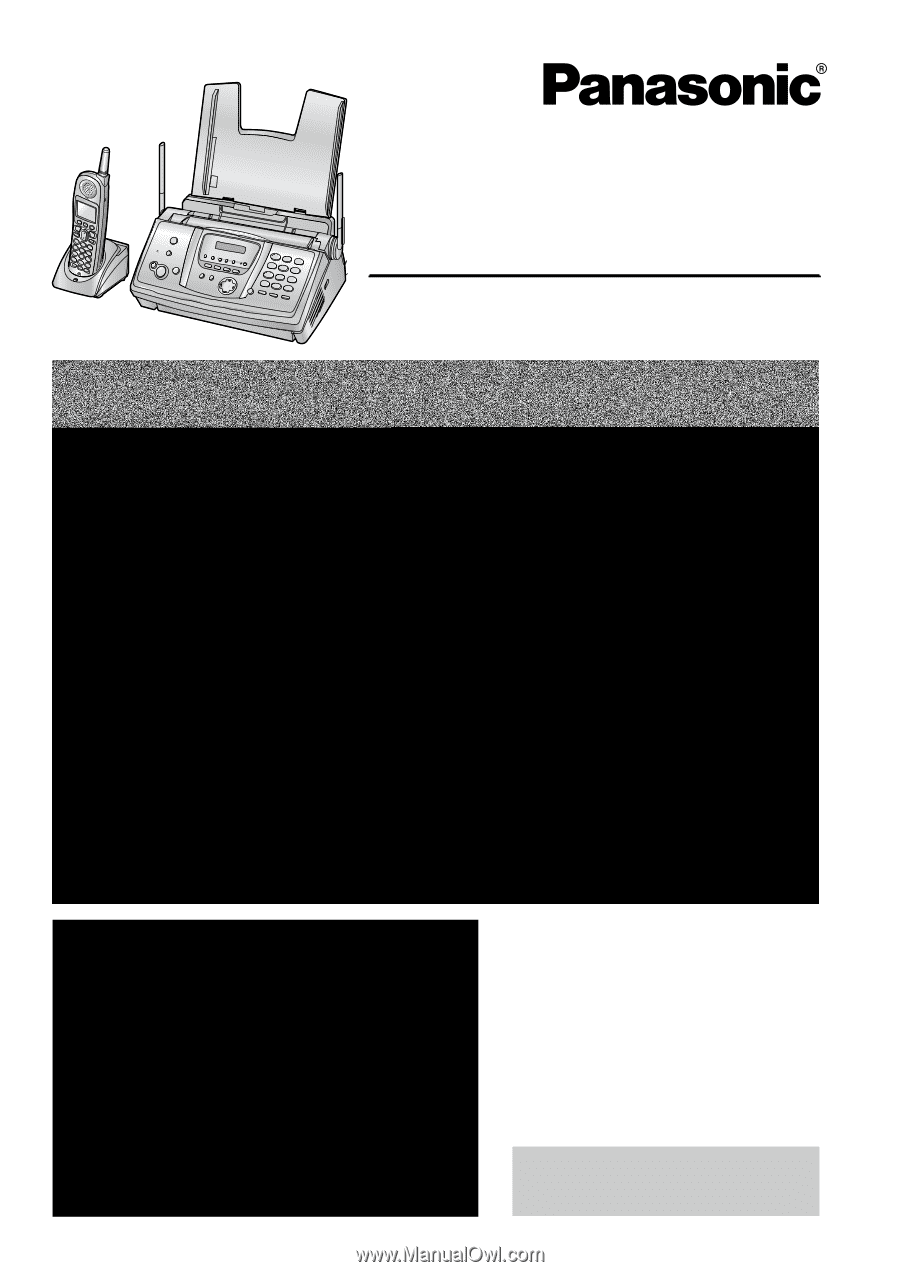
5.8 GHz Expandable
Cordless Phone System with FAX and Copier
Operating Instructions
Model No.
KX-FPG391
FOR FAX ADVANTAGE ASSISTANCE:
— PHONE CALL
1-800-HELP-FAX (1-800-435-7329)
— E-MAIL TO
for customers in the U.S.A. or Puerto
Rico
— REFER TO
www.panasonic.com
for customers in the U.S.A. or Puerto
Rico
This unit is compatible with
Caller ID. To use this feature,
you must subscribe to the
appropriate service of your
service provider.