Panasonic WVCU650 WJSX150 User Guide - Page 8
Changing to Black and White, Images, Camera Panning Function, BW Mode, On Off Auto1 Auto2, Auto Mode
 |
UPC - 791871504277
View all Panasonic WVCU650 manuals
Add to My Manuals
Save this manual to your list of manuals |
Page 8 highlights
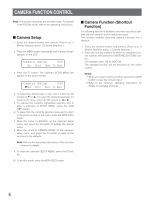
■ Camera Panning Function There are three panning modes available as follows: sequence mode, sort mode, and auto pan. (Refer to the operating instructions of matrix switcher.) 1. Select the desired monitor and camera. (Refer to p. 3 Monitor Selection and p. 3 Camera Selection.) 2. Press the MENU button repeatedly until "Auto Mode" appears on the LCD. Auto Mode 009 Seq Sort Pan Patrol 3. Press the assigned function button to activate the panning function of the selected camera. The LCD will indicate the selected mode as follows. F1: "Seq" (Activates SEQUENCE PAN.) F2: "Sort" (Activates SORT PAN.) F3: "Pan" (Activates AUTO PAN.) Note: The AUTO MODE parameter, previously set in the camera's SETUP MENU, will be automatically replaced to the activated function parameter. 4. To exit the mode, press the MON (ESC) button. ■ Changing to Black and White Images This function gets the clear camera images on the monitor while shooting the objects under low light conditions. 1. Select the desired monitor and camera. (Refer to p. 3 Monitor Selection and p. 3 Camera Selection.) 2. Press the MENU button repeatedly until "BW Mode" appears on the LCD. BW Mode 010 On Off Auto1 Auto2 3. Press the F1 button to change the image from the color mode to the BW (black and white) mode on the active monitor. 4. Press the F2 button to change the BW image to the color image on the active monitor. 5. Press the MON (ESC) button to exit the mode. 8
-
 1
1 -
2
-
 3
3 -
 4
4 -
 5
5 -
 6
6 -
 7
7 -
 8
8 -
 9
9 -
 10
10 -
 11
11 -
 12
12 -
 13
13 -
14
-
15
-
16
-
17
-
18
-
19
-
20
-
21
-
22
-
23
-
24
-
25
-
26
-
27
-
28
-
29
-
30
-
31
-
32
-
33
-
34
-
35
-
36
-
37
-
38
-
39
-
40
-
41
-
42
-
43
-
44
-
45
-
46
-
47
-
48
 |
 |
