RCA HD50LPW165 User Guide & Warranty - Page 18
How to Connect: TV + Satellite Receiver + VCR, Go
 |
View all RCA HD50LPW165 manuals
Add to My Manuals
Save this manual to your list of manuals |
Page 18 highlights
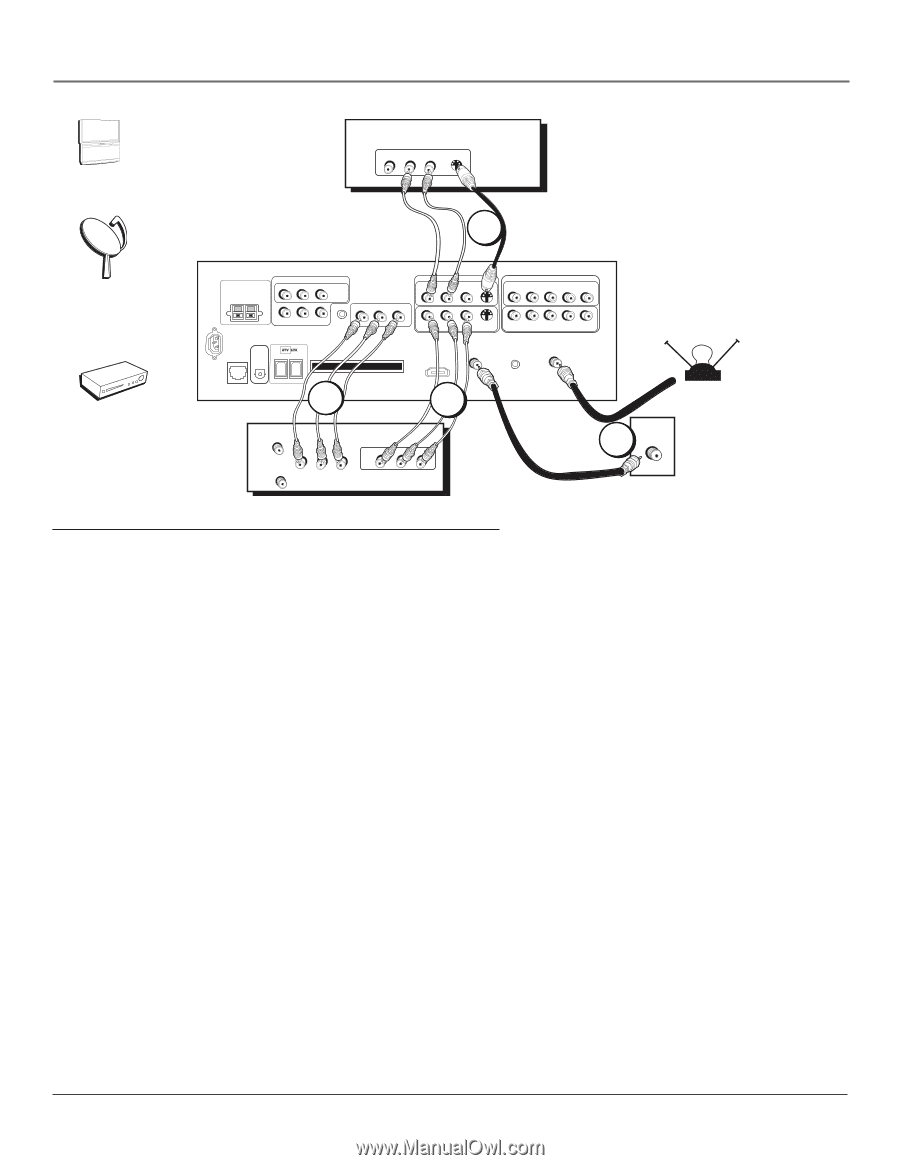
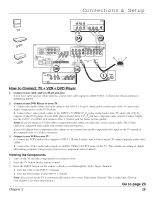
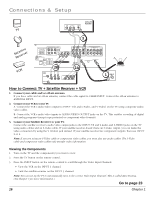
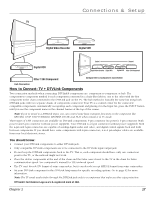
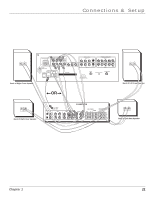
Connections & Setup POWER VOL + VOL - CH MENU CH TV VIDEO R AUDIO L S-VIDEO SATELLITE RECEIVER 3 SRateecleliitveer VCR TV CENTER SPEAKER INPUT EXTERNAL AMP MAX POWER RATING! (60 WATTS into 8 OHMS) FIXED/VARIABLE AUDIO OUTPUTS CENTER R REAR L REAR MATRIX SURROUND OUTPUTS AUDIO/VIDEO OUTPUT POWER (AC 120V~60Hz) SUBWOOFER R L WIRED IR R L V DIGITAL AUDIO ETHERNET OUTPUT CableCARD™ COMPOSITE INPUTS INPUT 3 R L V S-VIDEO COMPONENT/COMPOSITE INPUTS Use menu for composite video. INPUT 4 R L PR PB Y/VIDEO R L V S-VIDEO INPUT 1 R L PR PB Y/VIDEO INPUT 2 CABLE INPUT ANTENNA INPUT For Factory Use Only 2B HDMI/DVI INPUT Use menu for DVI audio. 2A OFF-AIR ANTENNA VCR ANTENNA IN R AUDIO L IN ANTENNA OUT VIDEO R AUDIO L OUT O VIDEO 1 CABLE How to Connect: TV + Satellite Receiver + VCR 1. Connect your cable and/or off-air antenna. If you have cable and an off-air antenna, connect the cable signal to CABLE INPUT. Connect the off-air antenna to ANTENNA INPUT. 2. Connect your VCR to your TV. A. Connect the VCR's audio/video outputs to INPUT 1 (R and L-Audio, and V-Video) on the TV using composite audio/ video cables. B. Connect the VCR's audio/video inputs to AUDIO/VIDEO OUTPUT jacks on the TV. This enables recording of digital and analog programs (except copy protected or component video formats). 3. Connect your Satellite Receiver to your TV. Connect the satellite receiver's audio/video output jacks to the INPUT 3 R and L Audio and S-VIDEO jacks on the TV using audio cables and an S-Video cable. If your satellite receiver doesn't have an S-Video output, you can make the video connection by using the V (Video) jack instead. If your satellite receiver has component outputs, then use INPUT 2 or 4. Note: If you are using an S-Video cable or component video cables, you must also use audio cables. The S-Video cable and component video cables only transfer video information. Viewing the Components 1. Turn on the TV and the component(s) you want to view. 2. Press the TV button on the remote control. 3. Press the INPUT button on the remote control to scroll through the Video Input Channels. • View the VCR on the INPUT 1 channel. • View the satellite receiver on the INPUT 3 channel. Note: You can set up the TV to automatically tune to the correct Video Input Channel. This is called Auto Tuning. (See Chapter 3 for more information.) Go to page 23 16 Chapter 1
-
 1
1 -
2
-
3
-
4
-
5
-
6
-
7
-
8
-
9
-
10
-
11
-
12
-
 13
13 -
 14
14 -
 15
15 -
 16
16 -
 17
17 -
 18
18 -
 19
19 -
 20
20 -
 21
21 -
 22
22 -
 23
23 -
24
-
25
-
26
-
27
-
28
-
29
-
30
-
31
-
32
-
33
-
34
-
35
-
36
-
37
-
38
-
39
-
40
-
41
-
42
-
43
-
44
-
45
-
46
-
47
-
48
-
49
-
50
-
51
-
52
-
53
-
54
-
55
-
56
-
57
-
58
-
59
-
60
-
61
-
62
-
63
-
64
-
65
-
66
-
67
-
68
-
69
-
70
-
71
-
72
-
73
-
74
-
75
-
76
-
77
-
78
-
79
-
80
-
81
-
82
-
83
-
84
-
85
-
86
-
87
-
88
-
89
-
90
-
91
-
92
-
93
-
94
-
95
-
96
 |
 |