Samsung ML-3712DW User Manual (user Manual) (ver.1.02) (English) - Page 126
Setting up the printer
 |
View all Samsung ML-3712DW manuals
Add to My Manuals
Save this manual to your list of manuals |
Page 126 highlights
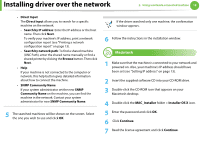
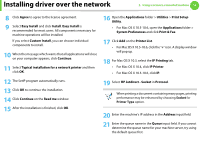
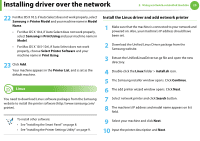
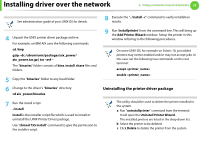
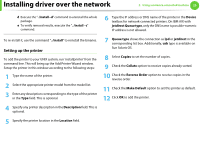
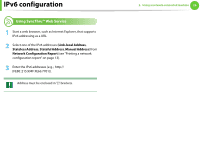
Installing driver over the network 2. Using a network-connected machine 23 d Execute the ". /install -d" command to uninstall the whole package. e To verify removal results, execute the ". /install -c" command. 6 Type the IP address or DNS name of the printer in the Device textbox for network-connected printers. On IBM AIX with jetdirect Queue type, only the DNS name is possible-numeric IP address is not allowed. To re-install it, use the command ". /install" to reinstall the binaries. Setting up the printer To add the printer to your UNIX system, run 'installprinter' from the command line. This will bring up the Add Printer Wizard window. Setup the printer in this window according to the following steps: 1 Type the name of the printer. 2 Select the appropriate printer model from the model list. 3 Enter any description corresponding to the type of the printer in the Type field. This is optional. 7 Queue type shows the connection as lpd or jetdirect in the corresponding list box. Additionally, usb type is available on Sun Solaris OS. 8 Select Copies to set the number of copies. 9 Check the Collate option to receive copies already sorted. 10 Check the Reverse Order option to receive copies in the reverse order. 11 Check the Make Default option to set this printer as default. 12 Click OK to add the printer. 4 Specify any printer description in the Description field. This is optional. 5 Specify the printer location in the Location field.
-
 1
1 -
2
-
3
-
4
-
5
-
6
-
7
-
8
-
9
-
10
-
11
-
12
-
13
-
14
-
15
-
16
-
17
-
18
-
19
-
20
-
21
-
22
-
23
-
24
-
25
-
26
-
27
-
28
-
29
-
30
-
31
-
32
-
33
-
34
-
35
-
36
-
37
-
38
-
39
-
40
-
41
-
42
-
43
-
44
-
45
-
46
-
47
-
48
-
49
-
50
-
51
-
52
-
53
-
54
-
55
-
56
-
57
-
58
-
59
-
60
-
61
-
62
-
63
-
64
-
65
-
66
-
67
-
68
-
69
-
70
-
71
-
72
-
73
-
74
-
75
-
76
-
77
-
78
-
79
-
80
-
81
-
82
-
83
-
84
-
85
-
86
-
87
-
88
-
89
-
90
-
91
-
92
-
93
-
94
-
95
-
96
-
97
-
98
-
99
-
100
-
101
-
102
-
103
-
104
-
105
-
106
-
107
-
108
-
109
-
110
-
111
-
112
-
113
-
114
-
115
-
116
-
117
-
118
-
119
-
120
-
 121
121 -
 122
122 -
 123
123 -
 124
124 -
 125
125 -
 126
126 -
 127
127 -
 128
128 -
 129
129 -
 130
130 -
 131
131 -
132
-
133
-
134
-
135
-
136
-
137
-
138
-
139
-
140
-
141
-
142
-
143
-
144
-
145
-
146
-
147
-
148
-
149
-
150
-
151
-
152
-
153
-
154
-
155
-
156
-
157
-
158
-
159
-
160
-
161
-
162
-
163
-
164
-
165
-
166
-
167
-
168
-
169
-
170
-
171
-
172
-
173
-
174
-
175
-
176
-
177
-
178
-
179
-
180
-
181
-
182
-
183
-
184
-
185
-
186
-
187
-
188
-
189
-
190
-
191
-
192
-
193
-
194
-
195
-
196
-
197
-
198
-
199
-
200
-
201
-
202
-
203
-
204
-
205
-
206
-
207
-
208
-
209
-
210
-
211
-
212
-
213
-
214
-
215
-
216
-
217
-
218
-
219
-
220
-
221
-
222
-
223
-
224
-
225
-
226
-
227
-
228
-
229
-
230
-
231
-
232
-
233
-
234
-
235
-
236
-
237
-
238
-
239
-
240
-
241
-
242
-
243
-
244
-
245
 |
 |