Samsung SCX4521F User Manual (ENGLISH) - Page 20
Turning the Machine On, Changing the Display Language and Country - printer
 |
UPC - 635753616040
View all Samsung SCX4521F manuals
Add to My Manuals
Save this manual to your list of manuals |
Page 20 highlights
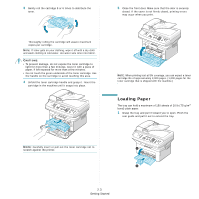
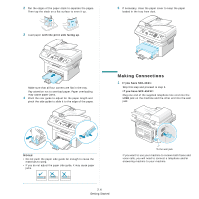
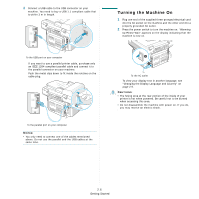
2 Connect a USB cable to the USB connector on your machine. You need to buy a USB 1.1 compliant cable that is within 3 m in length. To the USB port on your computer If you want to use a parallel printer cable, purchase only an IEEE-1284 compliant parallel cable and connect it to the parallel connector on your machine. Push the metal clips down to fit inside the notches on the cable plug. To the parallel port on your computer NOTES: • You only need to connect one of the cables mentioned above. Do not use the parallel and the USB cables at the same time. Turning the Machine On 1 Plug one end of the supplied three-pronged electrical cord into the AC socket on the machine and the other end into a properly grounded AC outlet. 2 Press the power switch to turn the machine on. "Warming Up Please Wait" appears on the display indicating that the machine is now on. To the AC outlet To view your display text in another language, see "Changing the Display Language and Country" on page 2.9. CAUTIONS: • The fusing area at the rear portion of the inside of your printer is hot when powered. Be careful not to be burned when accessing this area. • Do not disassemble the machine with power on. If you do, you may receive an electric shock. 2.6 Getting Started
-
 1
1 -
2
-
3
-
4
-
5
-
6
-
7
-
8
-
9
-
10
-
11
-
12
-
13
-
14
-
 15
15 -
 16
16 -
 17
17 -
 18
18 -
 19
19 -
 20
20 -
 21
21 -
 22
22 -
 23
23 -
 24
24 -
 25
25 -
26
-
27
-
28
-
29
-
30
-
31
-
32
-
33
-
34
-
35
-
36
-
37
-
38
-
39
-
40
-
41
-
42
-
43
-
44
-
45
-
46
-
47
-
48
-
49
-
50
-
51
-
52
-
53
-
54
-
55
-
56
-
57
-
58
-
59
-
60
-
61
-
62
-
63
-
64
-
65
-
66
-
67
-
68
-
69
-
70
-
71
-
72
-
73
-
74
-
75
-
76
-
77
-
78
-
79
-
80
-
81
-
82
-
83
-
84
-
85
-
86
-
87
-
88
-
89
-
90
-
91
-
92
-
93
-
94
-
95
-
96
-
97
-
98
-
99
-
100
-
101
-
102
-
103
-
104
-
105
-
106
-
107
-
108
-
109
-
110
-
111
-
112
-
113
-
114
-
115
-
116
-
117
 |
 |
