Samsung SCX4521F User Manual (ENGLISH) - Page 59
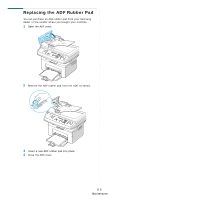
Exit Misfeed, Clearing Paper Jams, In the Tray, In the Manual Tray - cartridge
 |
UPC - 635753616040
View all Samsung SCX4521F manuals
Add to My Manuals
Save this manual to your list of manuals |
Page 59 highlights
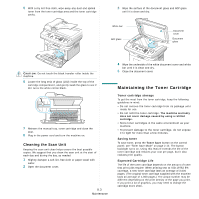
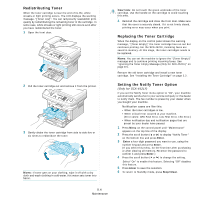
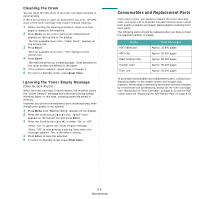
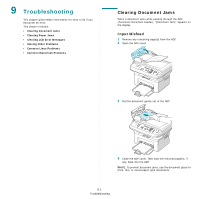
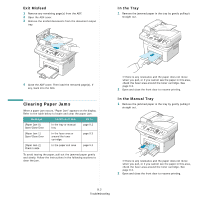
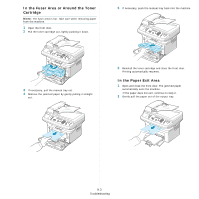
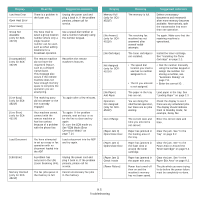
Exit Misfeed 1 Remove any remaining page(s) from the ADF. 2 Open the ADF cover. 3 Remove the misfed documents from the document output tray. In the Tray 1 Remove the jammed paper in the tray by gently pulling it straight out. 4 Close the ADF cover. Then load the removed page(s), if any, back into the ADF. Clearing Paper Jams When a paper jam occurs, "Paper Jam" appears on the display. Refer to the table below to locate and clear the paper jam. Message Location of Jam Go to [Paper Jam 0] Open/Close Door In the tray or manual tray page 9.2 [Paper Jam 1] Open/Close Door In the fuser area or around the toner cartridge. page 9.3 [Paper Jam 2] Check Inside In the paper exit area page 9.3 To avoid tearing the paper, pull out the jammed paper gently and slowly. Follow the instructions in the following sections to clear the jam. If there is any resistance and the paper does not move when you pull, or if you cannot see the paper in this area, check the fuser area around the toner cartridge. See page 9.3. 2 Open and close the front door to resume printing. In the Manual Tray 1 Remove the jammed paper in the tray by gently pulling it straight out. If there is any resistance and the paper does not move when you pull, or if you cannot see the paper in this area, check the fuser area around the toner cartridge. See page 9.3. 2 Open and close the front door to resume printing. 9.2 Troubleshooting
-
 1
1 -
2
-
3
-
4
-
5
-
6
-
7
-
8
-
9
-
10
-
11
-
12
-
13
-
14
-
15
-
16
-
17
-
18
-
19
-
20
-
21
-
22
-
23
-
24
-
25
-
26
-
27
-
28
-
29
-
30
-
31
-
32
-
33
-
34
-
35
-
36
-
37
-
38
-
39
-
40
-
41
-
42
-
43
-
44
-
45
-
46
-
47
-
48
-
49
-
50
-
51
-
52
-
53
-
 54
54 -
 55
55 -
 56
56 -
 57
57 -
 58
58 -
 59
59 -
 60
60 -
 61
61 -
 62
62 -
 63
63 -
 64
64 -
65
-
66
-
67
-
68
-
69
-
70
-
71
-
72
-
73
-
74
-
75
-
76
-
77
-
78
-
79
-
80
-
81
-
82
-
83
-
84
-
85
-
86
-
87
-
88
-
89
-
90
-
91
-
92
-
93
-
94
-
95
-
96
-
97
-
98
-
99
-
100
-
101
-
102
-
103
-
104
-
105
-
106
-
107
-
108
-
109
-
110
-
111
-
112
-
113
-
114
-
115
-
116
-
117
 |
 |
