Sharp XG-P10XU XGP10XU Operation Manual - Page 15
Connecting, RS-232C - projector manual
 |
View all Sharp XG-P10XU manuals
Add to My Manuals
Save this manual to your list of manuals |
Page 15 highlights
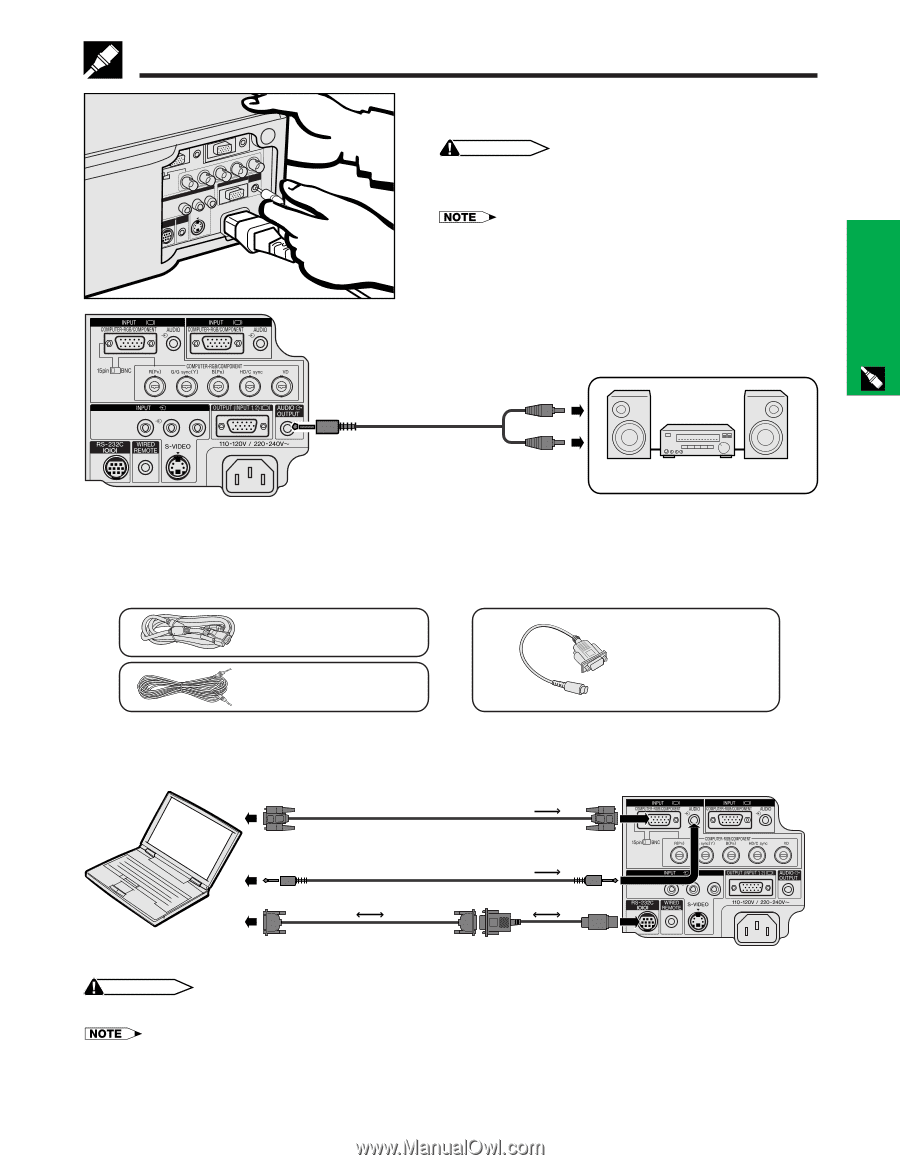
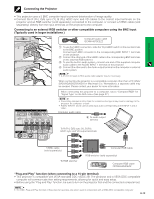
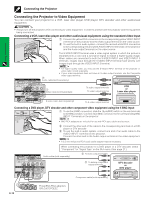
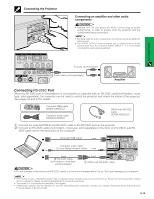
Connecting the Projector 1 2 Connecting an amplifier and other audio components CAUTION • Always turn off the projector while connecting to audio components, in order to protect both the projector and the components being connected. • By using external audio components, the volume can be amplified for better sound. • The AUDIO OUTPUT terminal allows you to output audio to audio components from the selected AUDIO INPUT 1, 2 or 3 terminals connected to audiovisual equipment. Setup & Connections 3 L AUDIO R VIDEO MONITOR To audio input terminals Audio cable (sold separately) Amplifier Connecting RS-232C Port When the RS-232C port on the projector is connected to a computer with an RS-232C cable (null modem, cross type, sold separately), the computer can be used to control the projector and check the status of the projector. See pages 52 and 53 for details. Computer RGB cable QCNW-5304CEZZ Computer audio cable QCNW-4870CEZZ DIN-D-sub RS-232C cable QCNW-5288CEZZ 1 Connect the supplied DIN-D-sub RS-232C cable to the RS-232C port on the projector. 2 Connect an RS-232C cable (null modem, cross type, sold separately) to the other end of DIN-D-sub RS- 232C cable and to the serial port on the computer. Computer RGB cable 1 2 Computer audio cable (3.5 mm stereo minijack cable) 3 L AUDIO R VIDEO MONITOR 2 RS-232C cable (null modem, cross type, sold separately) 1 DIN-D-sub RS-232C cable CAUTION • Do not connect or disconnect an RS-232C cable to or from the computer while it is on. This may damage your computer. • The wireless mouse or RS-232C function may not operate if your computer port is not correctly set up. Please refer to the operation manual of the computer for details on setting up/installing the correct mouse driver. • The arrows (→, ↔) indicate the direction of the signals. • A Macintosh adaptor may be required for use with some Macintosh computers. Contact your nearest Authorized Sharp Industrial LCD Products Dealer or Service Center. E-14
-
 1
1 -
2
-
3
-
4
-
5
-
6
-
7
-
8
-
9
-
 10
10 -
 11
11 -
 12
12 -
 13
13 -
 14
14 -
 15
15 -
 16
16 -
 17
17 -
 18
18 -
 19
19 -
 20
20 -
21
-
22
-
23
-
24
-
25
-
26
-
27
-
28
-
29
-
30
-
31
-
32
-
33
-
34
-
35
-
36
-
37
-
38
-
39
-
40
-
41
-
42
-
43
-
44
-
45
-
46
-
47
-
48
-
49
-
50
-
51
-
52
-
53
-
54
-
55
-
56
-
57
-
58
-
59
-
60
-
61
-
62
-
63
-
64
-
65
 |
 |