Singer One Instruction Manual 4 - Page 12
Changing, Needle, Spool, Holder
 |
View all Singer One manuals
Add to My Manuals
Save this manual to your list of manuals |
Page 12 highlights
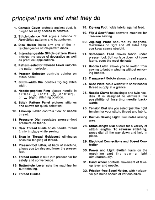
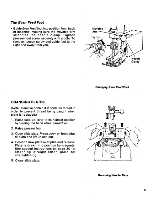
Style 2020 Style 2025 Regular Needle Style 2045 Twin-Needle Ball Point Yellow Band Needle Needle Bar Needle-clamp Screw Needle Clamp Flat Side to Back v Changing the Needle To Hold Small Tubes To Hold Small Spools To Hold Large Spools needles The needle you use should be straight and not bent to ensure perfect stitch formation and needle penetration through the fabric. The needle should also be fine enough to prevent the fabric from being marred with large punctures, yet heavy enough to pierce the fabric without being bent or deflected. Remember, too, that the eye of the needle must be large enough for the thread to pass through freely; too fine a needle will cause the thread to fray. IMPORTANT: Your SINGER sewing machine has been designed to obtain best results with SINGER* needles. You should follow the recommendations in this instruction book and on the needle package for correct style and size of needle for different types and weights of fabric. • Style 2020 (15x1) needles, for all-purpose sewing. • Style 2045 ball-point Yellow Band* needles, for sewing synthetic knits and stretch fabrics. • Style 2025 needle, for twin-needle decorative stitching. CHANGING THE NEEDLE 1. Raise needle to its highest point by turning the hand wheel toward you. Loosen needleclamp screw, and remove the needle. 2. Insert new needle in clamp, with the flat side of the needle to the back; push it up as far as it will go. 3. Tighten needle-clamp screw. SPOOL HOLDER Place spool or tube of thread on horizontal spool pin. If spool has a retaining slit, the slit should be placed against the spool cushion to the right. Select correct spool holder according to the type and diameter of spool being used. The diameter of the end of the spool holder should always be larger than that of the spool itself. Press holder firmly against spool to prevent it from turning. 6
-
 1
1 -
2
-
3
-
4
-
5
-
6
-
 7
7 -
 8
8 -
 9
9 -
 10
10 -
 11
11 -
 12
12 -
 13
13 -
 14
14 -
 15
15 -
 16
16 -
 17
17 -
18
-
19
-
20
-
21
-
22
-
23
-
24
-
25
-
26
-
27
-
28
-
29
-
30
-
31
-
32
-
33
-
34
-
35
-
36
-
37
-
38
-
39
-
40
-
41
-
42
-
43
-
44
-
45
-
46
-
47
-
48
-
49
-
50
-
51
-
52
-
53
-
54
-
55
-
56
-
57
-
58
-
59
-
60
-
61
-
62
-
63
-
64
-
65
-
66
-
67
-
68
-
69
-
70
-
71
-
72
-
73
-
74
-
75
-
76
-
77
 |
 |
