Singer One Instruction Manual 4 - Page 44
lightweight
 |
View all Singer One manuals
Add to My Manuals
Save this manual to your list of manuals |
Page 44 highlights
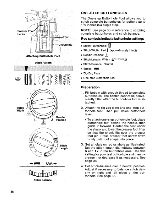
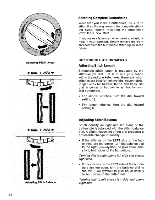
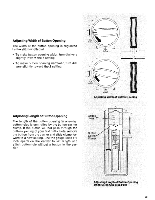
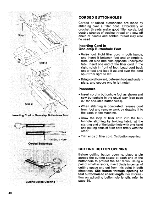
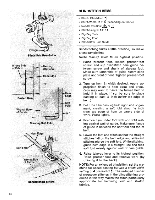
Adjusting Stitch Length 4- WAN( I MM AWM I MM Adjusting Stitch Balance 38 Stitching Complete Buttonholes Whenever you make a buttonhole, be sure to stitch it all the way around (to complete stitching cycle) before re-setting the buttonhole lever for a new start. If you make a false start when sewing a buttonhole in your garment, simply remove the work and complete the buttonhole stitching on scrap fabric. BUTTONHOLE ADJUSTMENTS Adjusting Stitch Length Buttonhole stitch length is regulated by the stitch-length dial. Set it to suit your fabric within the red bracketed area. Generally, short stitches are best for lightweight, woven fabric; longer ones for heavier fabric and knits. Set dial in center of buttonhole symbol for your test buttonhole. • For shorter stitches, turn the dial toward setting 15. • For longer stitches, turn the dial toward setting 6. Adjusting Stitch Balance Stitch density on right and left sides of the buttonhole is balanced with the stitch-balance dial. A slight movement of the dial produces a noticeable change in density. • If the stitches on the LEFT side of the buttonhole are too dense, turn the balance dial to the right (mm-.symbol) to give equal density to both sides of the buttonhole. Turning dial to right opens left side and closes right side. • If the stitches on the LEFT side of the buttonhole are too open, turn the balance dial to the left (4- wm symbol) to give equal density to both sides of the buttonhole. Turning dial to left closes left side and opens right side.
-
 1
1 -
2
-
3
-
4
-
5
-
6
-
7
-
8
-
9
-
10
-
11
-
12
-
13
-
14
-
15
-
16
-
17
-
18
-
19
-
20
-
21
-
22
-
23
-
24
-
25
-
26
-
27
-
28
-
29
-
30
-
31
-
32
-
33
-
34
-
35
-
36
-
37
-
38
-
 39
39 -
 40
40 -
 41
41 -
 42
42 -
 43
43 -
 44
44 -
 45
45 -
 46
46 -
 47
47 -
 48
48 -
 49
49 -
50
-
51
-
52
-
53
-
54
-
55
-
56
-
57
-
58
-
59
-
60
-
61
-
62
-
63
-
64
-
65
-
66
-
67
-
68
-
69
-
70
-
71
-
72
-
73
-
74
-
75
-
76
-
77
 |
 |
