Singer One Instruction Manual 4 - Page 48
Position:&or
 |
View all Singer One manuals
Add to My Manuals
Save this manual to your list of manuals |
Page 48 highlights
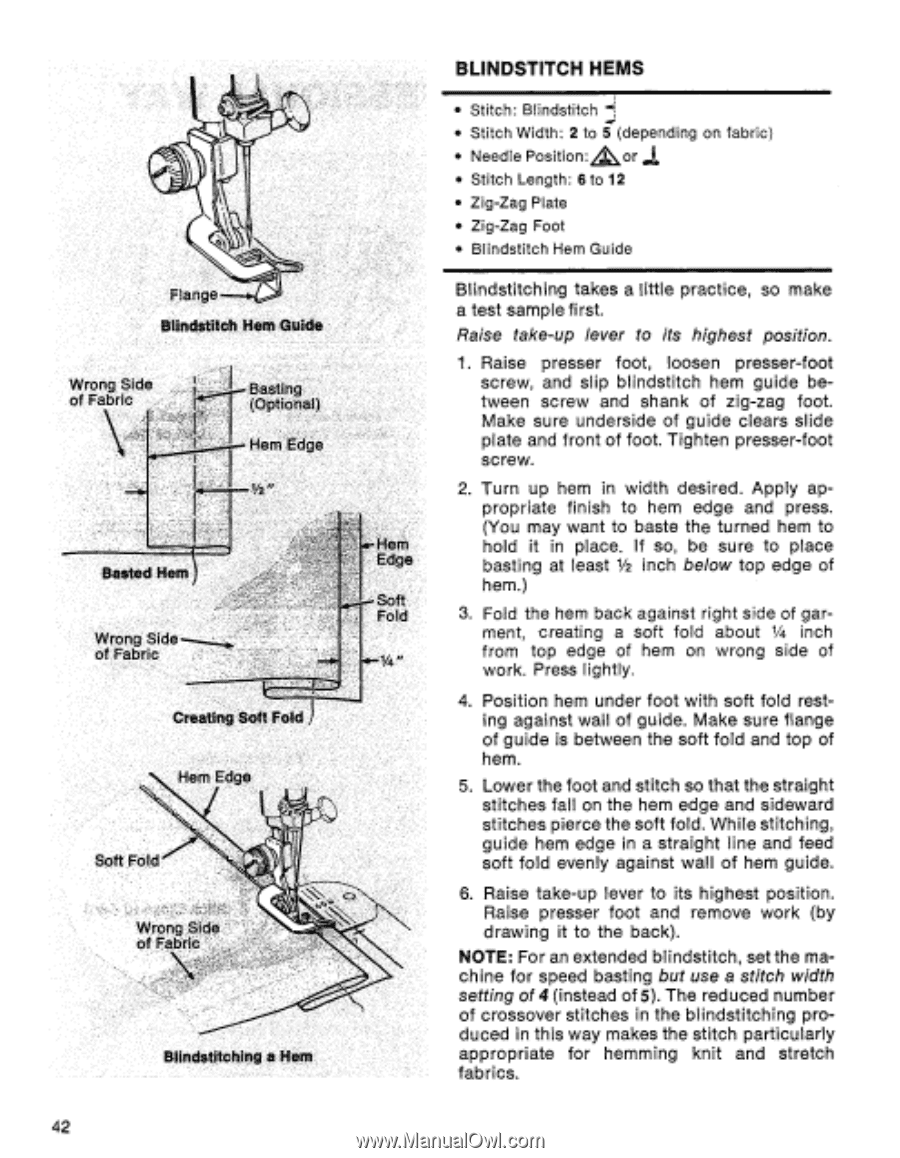
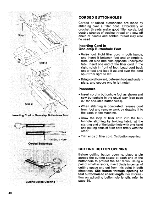
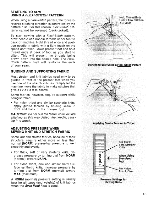
Flange-' Blindstitch Hem Guide Wrong Side of Fabric Basted Hem Wrong Sideof Fabric Basting (Optional) Hem Edge 12/ a- Hem Edge Soft Fold 1/4 Creating Soft Fold Hem Edge Soft Fold Wrong Side of Fabric Blindstitching a Hem BLINDSTITCH HEMS • Stitch: Blindstitch • Stitch Width: 2 to 5 (depending on fabric) • Needle Position:&or • Stitch Length: 6 to 12 • Zig-Zag Plate • Zig-Zag Foot • Blindstitch Hem Guide Blindstitching takes a little practice, so make a test sample first. Raise take-up lever to its highest position. 1. Raise presser foot, loosen presser-foot screw, and slip blindstitch hem guide between screw and shank of zig-zag foot. Make sure underside of guide clears slide plate and front of foot. Tighten presser-foot screw. 2. Turn up hem in width desired. Apply appropriate finish to hem edge and press. (You may want to baste the turned hem to hold it in place. If so, be sure to place basting at least 12/ inch below top edge of hem.) 3. Fold the hem back against right side of garment, creating a soft fold about 14/ inch from top edge of hem on wrong side of work. Press lightly. 4. Position hem under foot with soft fold resting against wall of guide. Make sure flange of guide is between the soft fold and top of hem. 5. Lower the foot and stitch so that the straight stitches fall on the hem edge and sideward stitches pierce the soft fold. While stitching, guide hem edge in a straight line and feed soft fold evenly against wall of hem guide. 6. Raise take-up lever to its highest position. Raise presser foot and remove work (by drawing it to the back). NOTE: For an extended blindstitch, set the machine for speed basting but use a stitch width setting of 4 (instead of 5). The reduced number of crossover stitches in the blindstitching produced in this way makes the stitch particularly appropriate for hemming knit and stretch fabrics. 42
-
 1
1 -
2
-
3
-
4
-
5
-
6
-
7
-
8
-
9
-
10
-
11
-
12
-
13
-
14
-
15
-
16
-
17
-
18
-
19
-
20
-
21
-
22
-
23
-
24
-
25
-
26
-
27
-
28
-
29
-
30
-
31
-
32
-
33
-
34
-
35
-
36
-
37
-
38
-
39
-
40
-
41
-
42
-
 43
43 -
 44
44 -
 45
45 -
 46
46 -
 47
47 -
 48
48 -
 49
49 -
 50
50 -
 51
51 -
 52
52 -
 53
53 -
54
-
55
-
56
-
57
-
58
-
59
-
60
-
61
-
62
-
63
-
64
-
65
-
66
-
67
-
68
-
69
-
70
-
71
-
72
-
73
-
74
-
75
-
76
-
77
 |
 |