Singer One Instruction Manual 4 - Page 13
operating, machine
 |
View all Singer One manuals
Add to My Manuals
Save this manual to your list of manuals |
Page 13 highlights
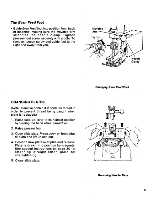
operating machine CONNECTING MACHINE Before plugging in your machine, be sure that the voltage and number of amperes indicated at the right end of the machine, conform to your electrical power supply. • Push the machine plug into the machine socket. • Connect the power-line plug to your electrical outlet. To turn on the machine and set speed range, push the power and light switch to desired speed. This will also turn on the sewing light. • The MIN. setting A (switch pressed in halfway) allows for maximum control. Use this setting for special jobs where intricate construction details require close control. The speed range this setting provides is appropriate for almost all of your sewing needs. • The MAX. setting B (switch pressed in all the way) allows for full speed capacity of the machine. It is best for long, straight seams, and easy-to-handle fabrics. To run the machine, press the foot or knee speed controller, The harder you press, the faster the machine will sew within the selected speed range. The lighter you press, the slower the machine will sew within the selected speed range. CAUTION: Switch off the power and light switch when changing needles, feet or needle plates or when leaving the machine unattended. This eliminates the possibility of starting the machine by accidentally pressing the speed controller. Connecting and Operating Machine Power-Line Plug Machine Plug Speed Controller Power and Light Switch OFF A Machine Socket 7
-
 1
1 -
2
-
3
-
4
-
5
-
6
-
7
-
 8
8 -
 9
9 -
 10
10 -
 11
11 -
 12
12 -
 13
13 -
 14
14 -
 15
15 -
 16
16 -
 17
17 -
 18
18 -
19
-
20
-
21
-
22
-
23
-
24
-
25
-
26
-
27
-
28
-
29
-
30
-
31
-
32
-
33
-
34
-
35
-
36
-
37
-
38
-
39
-
40
-
41
-
42
-
43
-
44
-
45
-
46
-
47
-
48
-
49
-
50
-
51
-
52
-
53
-
54
-
55
-
56
-
57
-
58
-
59
-
60
-
61
-
62
-
63
-
64
-
65
-
66
-
67
-
68
-
69
-
70
-
71
-
72
-
73
-
74
-
75
-
76
-
77
 |
 |
