Singer One Instruction Manual 4 - Page 43
Procedure
 |
View all Singer One manuals
Add to My Manuals
Save this manual to your list of manuals |
Page 43 highlights
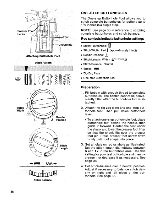
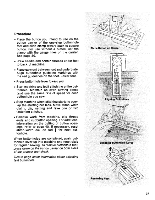
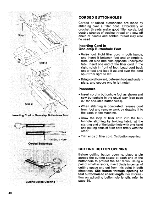
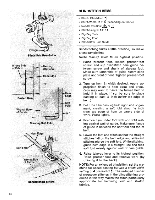
Procedure • Place the button you intend to use on the button carrier of the one-step buttonhole foot and slide clamp toward back to secure button. For use without a button, set the clamp with the gauge lines on the carrier. See page 39. • Draw needle and bobbin threads under foot to back of machine. • Place garment between foot and underplate. Align buttonhole guideline markings with the red guidelines on the foot. Lower foot. • Press buttonhole lever toward you. • Start machine and let it stitch the entire buttonhole. Maintain an even sewing speed (and use the same rate of speed for each buttonhole you sew). • Stop machine when stitching starts to overlap the starting bar tack. Move stitch-width dial to /\ setting and take one or two fastening stitches. • Remove work from machine, clip thread ends, and cut button opening. For additional information on the cutting of button openings, refer to page 40. If necessary, reset stitch-width dial on red ( for next buttonhole. When buttonholes are completed, push buttonhole lever up into machine and reset dials for regular sewing. To remove buttonhole foot, press down on the button carrier on both sides of the presser foot shank. Turn to page 38 for information about adjusting test buttonhole. Place Button on Carrier Aligning Guidelines Engaging Buttonhole Lever Removing Foot 37
-
 1
1 -
2
-
3
-
4
-
5
-
6
-
7
-
8
-
9
-
10
-
11
-
12
-
13
-
14
-
15
-
16
-
17
-
18
-
19
-
20
-
21
-
22
-
23
-
24
-
25
-
26
-
27
-
28
-
29
-
30
-
31
-
32
-
33
-
34
-
35
-
36
-
37
-
 38
38 -
 39
39 -
 40
40 -
 41
41 -
 42
42 -
 43
43 -
 44
44 -
 45
45 -
 46
46 -
 47
47 -
 48
48 -
49
-
50
-
51
-
52
-
53
-
54
-
55
-
56
-
57
-
58
-
59
-
60
-
61
-
62
-
63
-
64
-
65
-
66
-
67
-
68
-
69
-
70
-
71
-
72
-
73
-
74
-
75
-
76
-
77
 |
 |
