Singer One Instruction Manual 4 - Page 52
EiR,IESseE0.SIPOSiE
 |
View all Singer One manuals
Add to My Manuals
Save this manual to your list of manuals |
Page 52 highlights
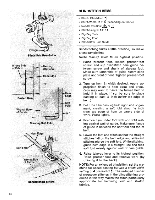
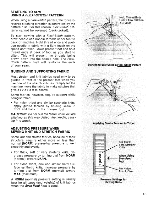
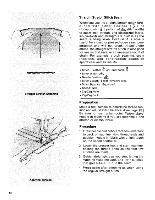
EiR,IESseE0.SIPOSiE, Straight Stretch Stitching Applying Tension 46 Straight Stretch Stitch Seam When you use the straight stretch stitch (produced with either Feather ( ) or Honeycomb ( ) pattern at Q stitch width) to seam knit, stretch, and elasticized fabric, s-t-r-e-t-c-h and strength are built in as the seam is being sewn. Because it is equally useful for closed or pressed-open seam construction and will not break thread under stress, the straight stretch stitch is also good for seams that receive an unusual amount of strain. For example: crotch seaming, seam insertion, and construction seams in sportswear and swimsuits. • Stitch: Feather or Honeycomb A • Stitch Width: A • Needle Position: • Stitch Length: 6 to 8 (in yellow area) • Stitch Balance: Equalized • Speed: MIN • Zig-Zag Plate • Zig-Zag Foot Preparation Make a test sample to determine thread tension and adjust stitch balance. (See page 23.) Be sure to insert a ball-point Yellow Band needle in machine if you are stitching a knit stretch or elastic fabric. Procedure 1. Draw needle and bobbin threads under foot to back of machine. Hold thread ends and position needle in fabric with a light touch on the speed controller. 2. Lower the presser foot and start machine, holding the thread ends as the first few stitches are made. 3. Guide fabric lightly as you sew, letting the machine make the back-and-forth stitches that give s-t-r-e-t-c-h to the seam. 4. Press seam after stitching as when using the regular straight stitch.
-
 1
1 -
2
-
3
-
4
-
5
-
6
-
7
-
8
-
9
-
10
-
11
-
12
-
13
-
14
-
15
-
16
-
17
-
18
-
19
-
20
-
21
-
22
-
23
-
24
-
25
-
26
-
27
-
28
-
29
-
30
-
31
-
32
-
33
-
34
-
35
-
36
-
37
-
38
-
39
-
40
-
41
-
42
-
43
-
44
-
45
-
46
-
 47
47 -
 48
48 -
 49
49 -
 50
50 -
 51
51 -
 52
52 -
 53
53 -
 54
54 -
 55
55 -
 56
56 -
 57
57 -
58
-
59
-
60
-
61
-
62
-
63
-
64
-
65
-
66
-
67
-
68
-
69
-
70
-
71
-
72
-
73
-
74
-
75
-
76
-
77
 |
 |
