Singer One Instruction Manual 4 - Page 39
Removing, Stitching, Fabric, Chainstitch, Accessories
 |
View all Singer One manuals
Add to My Manuals
Save this manual to your list of manuals |
Page 39 highlights
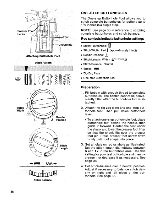
REMOVING STITCHING FROM FABRIC Chainstitching can be removed smoothly and cleanly in seconds by freeing the last stitch formed in the fabric. 1. Simply cut the last loop formed on the underside of the fabric. 2. Pick up the free thread end from the top of the fabric. 3. Pull the free thread end, removing entire line of stitching. REMOVING THE CHAINSTITCH ACCESSORIES • Raise take-up lever to its highest position and raise presser foot. • Open slide plate and remove the straightstitch plate. • Move bobbin latch to left and lift out the bobbin-case insert by pushing down post and lifting insert out on an angle. • Replace bobbin and zig-zag or straight stitch plate (see page 5). Close slide plate. • Unthread chainstitch eyelet in take-up lever and rethread for regular sewing. ICa t, ) 541 1\ lil t 143G, (7, \\\\ Removing the Stitching c. Cutting Last Loop 2 Picking Up Free Thread End 3 Post Removing Straight-stitch Plate after Chainstitching Removing Line of Stitching 33
-
 1
1 -
2
-
3
-
4
-
5
-
6
-
7
-
8
-
9
-
10
-
11
-
12
-
13
-
14
-
15
-
16
-
17
-
18
-
19
-
20
-
21
-
22
-
23
-
24
-
25
-
26
-
27
-
28
-
29
-
30
-
31
-
32
-
33
-
 34
34 -
 35
35 -
 36
36 -
 37
37 -
 38
38 -
 39
39 -
 40
40 -
 41
41 -
 42
42 -
 43
43 -
 44
44 -
45
-
46
-
47
-
48
-
49
-
50
-
51
-
52
-
53
-
54
-
55
-
56
-
57
-
58
-
59
-
60
-
61
-
62
-
63
-
64
-
65
-
66
-
67
-
68
-
69
-
70
-
71
-
72
-
73
-
74
-
75
-
76
-
77
 |
 |
