Singer One Instruction Manual 4 - Page 42
Singer One Manual
 |
View all Singer One manuals
Add to My Manuals
Save this manual to your list of manuals |
Page 42 highlights
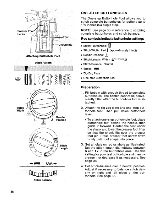
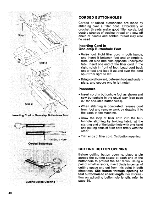
Presser Foot Screw fft Foot Underplate Attaching Buttonhole Foot Stitch Pattern Stitch Width Needle o Position Stitch , Length 4- WAM I tM Stitch Balance ONE-STEP BUTTONHOLES The One-step Buttonhole Foot allows you to stitch complete buttonholes for buttons up to 1 V2 inches in a single step. NOTE: See page 38 in reference to stitching complete buttonholes and stitch balance. Red symbols indicate buttonhole settings • Stitch: Buttonhole II • Stitch Width: Red' (approximately 1 to 2) • Needle Position: • Stitch Length: Within C • Stitch Balance: Neutral • Speed: MIN • Zig-Zag Plate • One-step Buttonhole Foot Preparation 1. Fill bobbin with enough thread to complete buttonholes. The bobbin cannot be conveniently filled after the buttonhole foot is attached. 2. Attach the zig-zag plate and one-step buttonhole foot. Then pull down buttonhole lever. • To attach one-step buttonhole foot, place buttonhole foot behind the needle, then guide it forward. Center the foot under the shank and lower the presser foot lifter so that the shank fits over the presser foot pin. Press presser foot screw down firmly until foot snaps into place. 3. Set all dials on red symbols as illustrated. Set the stitch-length dial midway between 6 and 12 in the buttonhole area. Use this setting for your test buttonhole and then increase it or decrease it as necessary. See page 38. 4. Set stitch-balance dial in neutral position. Adjust if necessary to balance stitch density on right and left sides of the buttonhole. See page 38. 36
-
 1
1 -
2
-
3
-
4
-
5
-
6
-
7
-
8
-
9
-
10
-
11
-
12
-
13
-
14
-
15
-
16
-
17
-
18
-
19
-
20
-
21
-
22
-
23
-
24
-
25
-
26
-
27
-
28
-
29
-
30
-
31
-
32
-
33
-
34
-
35
-
36
-
 37
37 -
 38
38 -
 39
39 -
 40
40 -
 41
41 -
 42
42 -
 43
43 -
 44
44 -
 45
45 -
 46
46 -
 47
47 -
48
-
49
-
50
-
51
-
52
-
53
-
54
-
55
-
56
-
57
-
58
-
59
-
60
-
61
-
62
-
63
-
64
-
65
-
66
-
67
-
68
-
69
-
70
-
71
-
72
-
73
-
74
-
75
-
76
-
77
 |
 |
