Singer One Instruction Manual 4 - Page 66
stitch, centering
 |
View all Singer One manuals
Add to My Manuals
Save this manual to your list of manuals |
Page 66 highlights
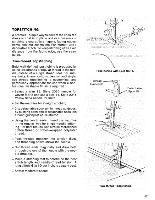
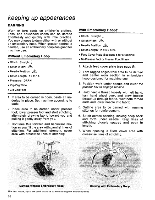
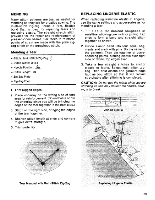
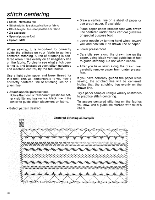
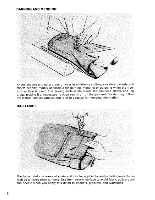
stitch centering • Stitch: stitch desired • Stitch width: to suit application or fabric • Stitch length: to suit application or fabric • Zig-zag plate • Special purpose foot • Speed: MIN When sewing, it is important to correctly guide the stitches on your fabric to achieve centered stitching. A line of stitching is centered when it lies evenly on an imaginary line on the fabric. To clearly see what stitch centering is, and to practice even stitch guidance and machine control, try the test below. Use a light color upper and lower thread for this test. This will demonstrate to you how a correctly centered line of stitching lies on a given line. • Attach special purpose foot. Notice that foot is transparent plastic for better visibility and has vertical black line in the center to guide stitch placement on fabric. • Select pattern desired. • Draw a vertical line on a sheet of paper or use graph paper, if available. • Place paper under presser foot with drawn line centered under black vertical guideline of special purpose foot. • Lower needle by turning hand wheel toward you, and position it on drawn line of paper. • Lower presser foot. • Carefully sew along the drawn line on the paper, using black vertical guideline of foot to guide stitching. Do not watch needle. • After you have sewn along the drawn line, carefully remove paper from under presser foot. If you have correctly guided the paper while sewing, the stitched line will be centered. Notice that the stitching lies evenly on the drawn line. Try a paper sampler using a variety of stitches to practice stitch centering. To assure centered stitching on the fabrics you sew, use a guideline marked with tailor's chalk. Centered Stitching on Sampler \ / •-•.> - / \ \ / \ / / \ / \ \ / \ / \ / MMASV747116,,.., / \ / \ / \ \ / \ / 1,07,07,07Agli2177, vs, / \ 60
-
 1
1 -
2
-
3
-
4
-
5
-
6
-
7
-
8
-
9
-
10
-
11
-
12
-
13
-
14
-
15
-
16
-
17
-
18
-
19
-
20
-
21
-
22
-
23
-
24
-
25
-
26
-
27
-
28
-
29
-
30
-
31
-
32
-
33
-
34
-
35
-
36
-
37
-
38
-
39
-
40
-
41
-
42
-
43
-
44
-
45
-
46
-
47
-
48
-
49
-
50
-
51
-
52
-
53
-
54
-
55
-
56
-
57
-
58
-
59
-
60
-
 61
61 -
 62
62 -
 63
63 -
 64
64 -
 65
65 -
 66
66 -
 67
67 -
 68
68 -
 69
69 -
 70
70 -
 71
71 -
72
-
73
-
74
-
75
-
76
-
77
 |
 |
