Singer One Instruction Manual 4 - Page 40
buttons
 |
View all Singer One manuals
Add to My Manuals
Save this manual to your list of manuals |
Page 40 highlights
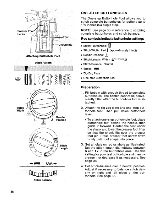
Attaching a Button I Needle in Groove of Button Foot Pull Needle Threads to Back of Button Thread Shank Completed Forming Thread Shank d buttons • Stitch: Plain Zig-Zag • Stitch Width: 0 and 4 • Needle Position: I • Feed Cover Plate (See page 5 for attaching) • Button Foot The space between the holes in the button determines stitch-width settings. The 0 setting must always be used to position the button and to fasten stitching. For buttons with standard hole spacing, settings 0 and 4 are usually satisfactory. For buttons with unusual hole spacing, use setting 0 and increase or decrease the width setting (4) as necessary. 1. Position button under button foot and lower the needle into center of left hole. Lower the foot. Turn hand wheel toward you until the needle rises out of the button and is just above the foot. 2. Set stitch width at 4. Turn hand wheel toward you until needle is just above the right hole. Increase or decrease stitch width, if required, so that needle will enter the right hole of button. Take six or more zig-zag stitches at this setting, ending on left side. 3. To fasten stitching, return to stitch-width setting 0 and take about three stitches. FORMING A THREAD SHANK Buttons sewn on coats and jackets should have a thread shank to make them stand away from the fabric. To form a thread shank, sew over the blade of a regular machine needle. • Position button and lower button foot. Place needle in groove of foot so that point enters the hole in the foot. The farther in you push the needle, the longer the shank will be. • After stitching, remove needle from groove. Remove work from under presser foot, cutting threads about six inches from fabric. Pull needle-thread ends to back of button and form a firm shank between button and fabric by winding threads tightly around attaching stitches. Tie thread ends securely. 34
-
 1
1 -
2
-
3
-
4
-
5
-
6
-
7
-
8
-
9
-
10
-
11
-
12
-
13
-
14
-
15
-
16
-
17
-
18
-
19
-
20
-
21
-
22
-
23
-
24
-
25
-
26
-
27
-
28
-
29
-
30
-
31
-
32
-
33
-
34
-
 35
35 -
 36
36 -
 37
37 -
 38
38 -
 39
39 -
 40
40 -
 41
41 -
 42
42 -
 43
43 -
 44
44 -
 45
45 -
46
-
47
-
48
-
49
-
50
-
51
-
52
-
53
-
54
-
55
-
56
-
57
-
58
-
59
-
60
-
61
-
62
-
63
-
64
-
65
-
66
-
67
-
68
-
69
-
70
-
71
-
72
-
73
-
74
-
75
-
76
-
77
 |
 |
