Singer One Instruction Manual 4 - Page 49
Position:A
 |
View all Singer One manuals
Add to My Manuals
Save this manual to your list of manuals |
Page 49 highlights
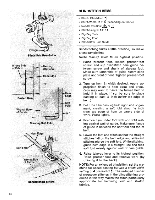
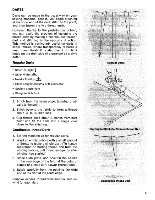
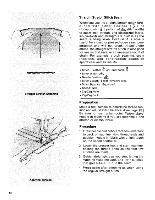
DARTS Darts can be made in the usual way on your sewing machine. That is, you begin stitching at the wide end of the dart, stitch to the point, and then fasten the two thread ends. However, thanks to the push-button bobbin, you can avoid the problem of fastening the thread ends by making a "continuous-thread" dart and stitching in the opposite direction. This method is particularly useful for darts in sheer fabrics, where transparency requires a neat, clean finish. It is also useful for darts made on the right side of a garment as a style detail. Regular Darts • Stitch: Straight • Stitch Width: • Needle Position:A • Stitch Length: About 12 or to suit fabric • Straight-stitch Plate • Straight-stitch Foot 1. Stitch from the seam edge, tapering gradually to the point. 2. Stitch beyond the fabric to form a thread chain 12/ to 3/4 inch long. 3. Clip thread ends about 2 inches from dart point and tie the ends into a single knot close to the stitching. Continuous-thread Darts 1. Set the machine as for regular darts. 2. Wind an empty bobbin with a small amount of thread to make a single dart. (To hasten separation of starting thread end from the winding bobbin, pull thread end gently after winding has started.) 3. Close slide plate, and position the needle in the very edge of the fold, at the point of basted or pinned dart. Lower presser foot. 4. Stitch carefully from the point to the wide end of the dart at the seam edge. Remove excess thread from bobbin and rewind for each dart. Regular Darts Starting to Stitch Continuous-thread Dart Continuous-thread Dart 43
-
 1
1 -
2
-
3
-
4
-
5
-
6
-
7
-
8
-
9
-
10
-
11
-
12
-
13
-
14
-
15
-
16
-
17
-
18
-
19
-
20
-
21
-
22
-
23
-
24
-
25
-
26
-
27
-
28
-
29
-
30
-
31
-
32
-
33
-
34
-
35
-
36
-
37
-
38
-
39
-
40
-
41
-
42
-
43
-
 44
44 -
 45
45 -
 46
46 -
 47
47 -
 48
48 -
 49
49 -
 50
50 -
 51
51 -
 52
52 -
 53
53 -
 54
54 -
55
-
56
-
57
-
58
-
59
-
60
-
61
-
62
-
63
-
64
-
65
-
66
-
67
-
68
-
69
-
70
-
71
-
72
-
73
-
74
-
75
-
76
-
77
 |
 |
