Singer One Instruction Manual 4 - Page 53
Singer One Manual
 |
View all Singer One manuals
Add to My Manuals
Save this manual to your list of manuals |
Page 53 highlights
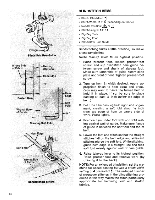
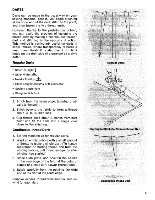
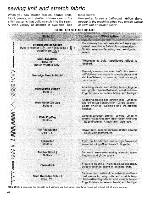
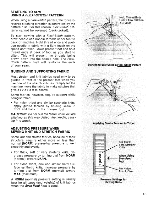
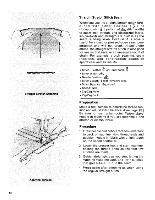
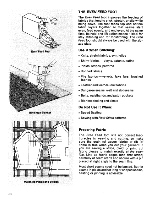
Maxi- Topstitching When you use the maxi-topstitch produced with Flexi-Stitch Disc 69, you can produce bold topstitching to enhance sporty garments with that professionally tailored look. • Stitch: Maxi-Stretch ill Disc 69 • Stitch Width: 5 only l" • Needle Position: A • Stitch Length: 6 to 12 • Stitch Balance: Equalized • Speed: MIN • Zig-Zag Plate only • Zig-Zag Foot only NOTE: Do not use the EvenFeedFoot Incorrect Correct Incorrect Adjusting Stitch Balance Preparation Make a test sample first to determine the best stitch length, stitch balance and tension settings for your fabric. Be sure to use a ballpoint Yellow Band needle if you are stitching a knit or stretch fabric and adjust pressure as instructed on page 45. Adjusting Stitch Length Maxi-topstitch length is adjusted in the same way as regular straight stitch length. See page 15. Stitch lengths from 6 to 12 are recommended. Adjusting Stitch Balance The balance of the maxi-topstitch is adjusted in the same way as other Flexi-Stitch patterns. See page 23. For good appearance, forward and reverse stitches should be of equal length. Procedure • Line up pattern start symbols on disc and machine. See page 25. • Draw needle and bobbin threads under foot to back of machine. Hold thread ends and, with a light touch on the speed controller, position needle in fabric a scant 14 inch in from starting edge. • Lower presser foot and start machine, holding thread ends at back of foot as first few stitches are made. Maxi-Topstitched Jacket • Guide fabric lightly, letting the machine make the back-and-forth stitches that form the maxi-topstitch. When stitching across folds and seam joinings, hold fabric taut in front and back of the presser foot, to assist feeding. This type of support is essential for heavy or dense fabrics. CAUTION: Do not pull fabric while you apply gentle or firm tension, as this may deflect needle, causing it to break. 47
-
 1
1 -
2
-
3
-
4
-
5
-
6
-
7
-
8
-
9
-
10
-
11
-
12
-
13
-
14
-
15
-
16
-
17
-
18
-
19
-
20
-
21
-
22
-
23
-
24
-
25
-
26
-
27
-
28
-
29
-
30
-
31
-
32
-
33
-
34
-
35
-
36
-
37
-
38
-
39
-
40
-
41
-
42
-
43
-
44
-
45
-
46
-
47
-
 48
48 -
 49
49 -
 50
50 -
 51
51 -
 52
52 -
 53
53 -
 54
54 -
 55
55 -
 56
56 -
 57
57 -
 58
58 -
59
-
60
-
61
-
62
-
63
-
64
-
65
-
66
-
67
-
68
-
69
-
70
-
71
-
72
-
73
-
74
-
75
-
76
-
77
 |
 |
