Sony RDR GX257 Operating Instructions
Sony RDR GX257 Manual
 |
UPC - 027242731318
View all Sony RDR GX257 manuals
Add to My Manuals
Save this manual to your list of manuals |
Sony RDR GX257 manual content summary:
- Sony RDR GX257 | Operating Instructions - Page 1
3-876-081-12(1) DVD Recorder Operating Instructions RDR-GX257 © 2008 Sony Corporation - Sony RDR GX257 | Operating Instructions - Page 2
of the unit. Record the serial number in the space provided below. Refer to them whenever you call upon your Sony dealer regarding this product. Model No. RDR-GX257 Serial No CAUTION You are cautioned that any change or modifications not expressly approved in this manual could void your authority - Sony RDR GX257 | Operating Instructions - Page 3
as DVD , listed at the top of each explanation indicate what kind of media can be used with the function being explained. For details, see "Recordable and Playable Discs" on page 74. • Instructions in this manual describe the controls on the remote. You can also use the controls on the recorder if - Sony RDR GX257 | Operating Instructions - Page 4
2 Guide to Parts and Controls 6 Hookups and Settings 10 Hooking Up the Recorder 10 Step 1: Connecting the Cable Box/Satellite Receiver (Tuner 10 Step 2: Connecting the Video Cords/HDMI Cord 12 Step 3: Connecting the Audio Cords/HDMI Cord 14 Step 4: Connecting the Mains Lead (Power Cord 15 - Sony RDR GX257 | Operating Instructions - Page 5
64 Audio Settings 65 Parental Control Settings (Lock 66 Recording Settings (Video 67 Disc Settings 68 Resetting the Recorder (Factory Set 69 Additional Information 70 Troubleshooting 70 Recordable and Playable Discs 74 Playable Discs 76 Language Code List 78 Area Code List 78 Notes About - Sony RDR GX257 | Operating Instructions - Page 6
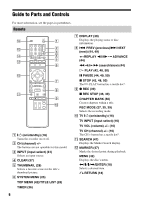
Guide to Parts and Controls For more information, see the pages in parentheses. Remote 123 456 789 0 A [/1 (on/standby) (18) Turns the recorder on or off. B CH (channel) +/- The buttons are not operable for this model. C INPUT (input select) (41) Selects an input source. D CLEAR (37) E THUMBNAIL - Sony RDR GX257 | Operating Instructions - Page 7
) ZOOM (45) Zooms an image during playback or pause mode. N AUDIO (44) The AUDIO button has a tactile dot*. O Number buttons (46) The number 5 button has a tactile dot*. P Z OPEN/CLOSE (26) Opens or closes the disc tray. * Use the tactile dot as a reference when operating the recorder. ,continued 7 - Sony RDR GX257 | Operating Instructions - Page 8
is in TV tuner mode. PM: Indicates afternoon. : Indicates when the recorder is in timer recording or a timer recording is programmed. : Shows the current status of the recorder (clock, channel, etc.). D (remote sensor) (16) E Z (open/close) (26) Opens or closes the disc tray. F N (play) (42, 48 - Sony RDR GX257 | Operating Instructions - Page 9
OUT A AC IN terminal (15) B COMPONENT VIDEO OUT (Y, PB, PR) jacks (12) C LINE 1 IN (VIDEO/AUDIO L/R) jacks (11, 23) D SET TOP BOX CONTROL jack (11) E HDMI OUT (high-definition multimedia interface out) jack (12) F LINE OUT (VIDEO/AUDIO L/R) jacks (12, 14) G AUDIO OUT (L/R) jacks (14) H DIGITAL - Sony RDR GX257 | Operating Instructions - Page 10
to prevent unwanted noise. • Refer to the instructions supplied with the components to be connected. • You cannot connect this recorder to a TV that does not have a video input jack. • Be sure to disconnect the mains lead (the power cord) of each component before connecting. Step 1: Connecting - Sony RDR GX257 | Operating Instructions - Page 11
~AC IN COMPONENT Y VIDEO OUT PB PR PCM/DTS/ MPEG/ DOLBY DIGITAL COAXIAL DIGITAL OUT L - AUDIO - R AUDIO OUT VIDEO LINE 1 IN L - AUDIO - R SET TOP BOX CONTROL VIDEO L - AUDIO - R LINE OUT : Signal flow SET TOP BOX CONTROL to SET TOP BOX CONTROL HDMI OUT DVD recorder 11 - Sony RDR GX257 | Operating Instructions - Page 12
OUT L - AUDIO - R AUDIO OUT VIDEO LINE 1 IN L - AUDIO - R SET TOP BOX CONTROL VIDEO L - AUDIO - R LINE OUT to COMPONENT VIDEO OUT (blue) (red) DVD recorder HDMI OUT to HDMI OUT Component video cord (not supplied) (green) (blue) (red) B TV, projector, or audio component : Signal flow - Sony RDR GX257 | Operating Instructions - Page 13
case of 525 progressive scan picture problems, it is recommended that the user switch the connection to the 'Standard Definition' output. If there are questions regarding our TV set compatibility with this model 525p DVD recorder, please contact our customer service center. • You cannot connect the - Sony RDR GX257 | Operating Instructions - Page 14
- R SET TOP BOX CONTROL VIDEO L - AUDIO - R LINE OUT to LINE OUT (AUDIO L/R) HDMI OUT VIDEO L - AUDIO - R LINE OUT (red) (white) DVD recorder B (white) Audio cord (supplied) (red) : speaker location, refer to the operating instructions supplied with the connected components. 14 - Sony RDR GX257 | Operating Instructions - Page 15
*1 Step 4: Connecting the Mains Lead (Power Cord) Connect the supplied mains lead (the power cord) to the AC IN terminal of the recorder. Then plug the recorder and TV mains leads (AC power cords) into the AC outlet. After you connect the mains lead (the power cord), you must wait for a short while - Sony RDR GX257 | Operating Instructions - Page 16
not be able to control your TV with some or all of the buttons below. • If you enter a new code number, the code number previously entered will be erased. Number buttons 123 456 789 0 b Notes • If the supplied remote interferes with your other Sony DVD recorder or player, change the command mode - Sony RDR GX257 | Operating Instructions - Page 17
source. If you have a Sony DVD player or more than one Sony DVD recorder If the supplied remote interferes with your other Sony DVD recorder or player, set the command mode number for this recorder and the supplied remote to one that differs from the other Sony DVD recorder or player after you have - Sony RDR GX257 | Operating Instructions - Page 18
recorder using the remote You can change channels of the recorder using the number buttons. Example: for channel 50 Press "5," "0," then press ENTER. Step 6: Initial Setup Make the basic adjustments by following the onscreen instructions control, make the necessary settings and check that the - Sony RDR GX257 | Operating Instructions - Page 19
cable box/satellite receiver control setting 1 Select [Test] in step 8 above and press ENTER. 2 Check the overall connection and press ENTER. 3 Check that the cable box/satellite receiver is turned on, and press ENTER. 4 Press - Sony RDR GX257 | Operating Instructions - Page 20
place the set top box controller near the remote sensor on the cable box/ satellite receiver (page 11). If your cable box or satellite receiver still does not operate with this recorder, contact your cable or satellite company to see if they can provide you with a compatible cable box or satellite - Sony RDR GX257 | Operating Instructions - Page 21
the recorder's mains lead (the power cord) from the AC outlet, connect a VCR or similar recording device to the LINE IN jacks of this recorder. Use the DV IN jack on the front panel if the equipment has a DV output jack (i.LINK jack) (page 59). See also the operating instructions supplied - Sony RDR GX257 | Operating Instructions - Page 22
one type of video cord between the recorder and your TV at the same time. • Pictures containing copy protection signals that prohibit any copying cannot be recorded. • If you pass the recorder signals via the VCR, you may not receive a clear image on your TV screen. DVD recorder VCR TV Be sure - Sony RDR GX257 | Operating Instructions - Page 23
OUT to LINE OUT (VIDEO/AUDIO) VIDEO LINE 1 IN L - AUDIO - R SET TOP BOX CONTROL VIDEO L - AUDIO - R LINE OUT VIDEO L - AUDIO - R LINE OUT HDMI OUT DVD recorder Audio cord (supplied) : Signal flow Video cord (supplied) TV INPUT L AUDIO R VIDEO z Hint You do not need to turn on the - Sony RDR GX257 | Operating Instructions - Page 24
the MP3 audio tracks or JPEG image files. Refer to the operating instructions supplied with the USB memory before connecting. For details about playing the inserted USB memory, see "Playing from the USB memory" on page 43. DVD recorder b Notes • This recorder supports only USB memory with FAT16 or - Sony RDR GX257 | Operating Instructions - Page 25
. [Music]: Displays the Music Jukebox on DATA DVD, DATA CD, or USB memory. You can select JPEG image files or MP3 audio tracks on a DATA CD/DATA DVD or USB memory. Select a file type and press ENTER. Then select a media type, [Disc] or [USB]. Timer Record (page 36) Displays the Timer List. Used - Sony RDR GX257 | Operating Instructions - Page 26
press ENTER. Format DVD Finalize Input Disc Name Protect Disc PBC Start Labeled side facing up 5 Press Z OPEN/CLOSE to close the disc tray. After "REAd" disappears from the front panel display, the display asks for confirmation. • For a DVD-R, the recorder automatically formats. 6 While [Start - Sony RDR GX257 | Operating Instructions - Page 27
box/satellite receiver turned on and do not change the channel you are recording. z REC REC MODE To stop recording Press x REC STOP. Note that it may take a few seconds for recording to stop. z Hint This recorder can record on various discs. Select the disc type according to your needs (page 74 - Sony RDR GX257 | Operating Instructions - Page 28
Press REC MODE repeatedly to show the remaining time in each of the recording modes. D Title's thumbnail picture: Press - Sony RDR GX257 | Operating Instructions - Page 29
picture. b Notes • The Title List may not appear for discs created on other DVD recorders. • Letters that cannot be displayed appear as corrupt characters. • Title thumbnail pictures are displayed only on this recorder. • It may take a few seconds for the thumbnail pictures to be displayed. • After - Sony RDR GX257 | Operating Instructions - Page 30
titles and chapters b Note When playing a title recorded over 12 hours by other DVD equipment, time display may not appear correctly. (Titles create a Playlist title longer than "19:59:59," the front panel counter is reset to "10:00:00" and restarts counting. Notes on Surround effect • The function - Sony RDR GX257 | Operating Instructions - Page 31
Input) +RW -RWVR -RWVideo +R -R The titles recorded on a disc are named sequentially ([Title 1], [Title see page 28. 2 Select a title and press ENTER. The sub-menu appears. For DVD-RWs (Video mode)/DVD-Rs, select [Title] and press ENTER. The display for entering characters in step 4 appears - Sony RDR GX257 | Operating Instructions - Page 32
Setup] and press ENTER. The Setup display appears. 4 Select [Disc] and press ,. 5 Select [Input Disc Name] and press ,. Format DVD Finalize Input Disc Name Edit Protect Disc PBC 6 While [Edit] is selected, press ENTER. The display for entering characters appears. To enter characters, see page - Sony RDR GX257 | Operating Instructions - Page 33
need to finalize the disc for certain DVD equipment, or if the recording time is short. You can edit or record on the disc even after finalizing. Finalizing is necessary when playing on any equipment other than this recorder. Playable only on VR mode compatible players. After finalizing, you cannot - Sony RDR GX257 | Operating Instructions - Page 34
the discs are finalized. • The recorder may not be able to finalize the disc if it was recorded on another recorder. • If the recording time is short, the disc may not be playable on some DVD players. Format DVD Finalize Input Disc Name Protect Disc PBC Finalize Unfinalize 6 Select [Finalize] and - Sony RDR GX257 | Operating Instructions - Page 35
stops recording. Copy control signals Copy-Free Recordable discs +RW +R -RWVR -RWVideo -R Copy-Once -RWVR Ver.1.1, Ver.1.2 with CPRM* Copy-Never None * The recorded disc can be played only on CPRM compatible equipment. b Note Even if you erase a scene that contains a copy protection signal - Sony RDR GX257 | Operating Instructions - Page 36
M/m or the number buttons. • When not using the cable box/satellite receiver control, select [OFF] by pressing CLEAR. Be sure to select the channel on the connected cable box/satellite receiver's side before the timer recording starts. If you make a mistake, select the item and change the setting - Sony RDR GX257 | Operating Instructions - Page 37
Leave the cable box/satellite receiver turned on. Do not change the channel selected on the cable box/satellite receiver during recording. To stop recording during timer recording Switch the input selector on your TV so that the confirmation appears on the TV screen. Press x REC STOP. Press ENTER - Sony RDR GX257 | Operating Instructions - Page 38
program has finished. 7:00 8:00 9:00 10:00 A will be cut off B ◆When the recordings start at the same time The program that is set first has priority. In this example, timer setting A is set after B, so the first part of timer setting A will not be recorded. 7:00 8:00 9:00 10:00 A B 38 - Sony RDR GX257 | Operating Instructions - Page 39
can turn off the TV. b Notes • After pressing z REC, it may take a short while to start recording. • You cannot change the recording mode while recording or during recording pause. • If there is a power failure, the program you are recording may be erased. • You cannot change the input source during - Sony RDR GX257 | Operating Instructions - Page 40
Chapter] in the [Video] setup (page 67). z Hints • You can create chapters manually when playing a DVD+RW, DVD-RW (VR mode), or DVD+R (page 56). • When recording in ULP mode, chapter marks are inserted at 10-minute intervals. Overwriting a recorded title +RW You can use the Title List to make a new - Sony RDR GX257 | Operating Instructions - Page 41
an explanation of how to record from the DV IN jack. b Notes • When recording a video game image, the screen may not be clear. • Any program that contains a Copy-Never copy guard signal cannot be recorded. The recorder automatically stops recording after a few seconds. Recording z REC REC MODE - Sony RDR GX257 | Operating Instructions - Page 42
Title List, see "Viewing the Recorded Program (Title List)" (page 28). Example: DVD-RW (VR mode) Title List Original 1/7 DVD-VR 2hour 45min SP Remain Title chapter. To use the DVD's Menu When you play a DVD VIDEO, or a finalized DVD+RW, DVD-RW (Video mode), DVD+R, or DVD-R, you can display the - Sony RDR GX257 | Operating Instructions - Page 43
settings on the recorder. - you make a recording. - you disconnect the mains lead (the power cord). z Hint For DVD VIDEOs, the recorder stores the stop point even if you open the disc tray or turn off the recorder. To play restricted DVDs (Parental Control) If you play a restricted DVD, the message - Sony RDR GX257 | Operating Instructions - Page 44
Playback options Z OPEN/CLOSE AUDIO SUBTITLE 123 456 789 0 ANGLE REPLAY c/C ADVANCE . PREV/> NEXT m/M CLEAR ZOOM PLAY MODE NEXT (fast reverse/fast forward) Operations Stops playing and opens the disc tray. Pauses - Sony RDR GX257 | Operating Instructions - Page 45
-angles) for a scene are recorded on the disc, " " appears in the front panel display. DVD To resume normal playback, press recorded on this recorder, angles and subtitles cannot be changed. • For a Super VCD, you cannot select audio track 2 if one is recorded on the disc. To enlarge a video image - Sony RDR GX257 | Operating Instructions - Page 46
recorder user should take proper precautions when the LINE OUT (AUDIO L/R)/AUDIO OUT (L/ R) jacks of the recorder recorder. • Set DVDs with a DTS sound track DTS audio signals are output only through the DIGITAL OUT (COAXIAL) jack. When you play a DVD +R VCD -R DVD You can start DVD 1/1 DVD - Sony RDR GX257 | Operating Instructions - Page 47
number buttons to select the number of the title, chapter, time code, etc., you want. For example: Time search To find a title using the Title List (page 29). Marking a favorite scene You can have the recorder store specific portions of the disc in memory and play immediately whenever you want. Up to - Sony RDR GX257 | Operating Instructions - Page 48
system, the user should take proper precautions when the LINE OUT (AUDIO L/R)/AUDIO OUT (L/ R) jacks of the recorder are connected to 49). Notes on playing DVDs with a DTS sound track DTS audio signals are output only through the DIGITAL OUT (COAXIAL) jack. When you play a DVD with DTS sound tracks - Sony RDR GX257 | Operating Instructions - Page 49
]: repeats the current track. [Folder]: repeats the current folder (DATA CD/ DATA DVD only). [All]: repeats all the tracks on the disc (CD only). [Off]: point (point B), press ENTER. [A-B] appears and the recorder starts repeating this specific portion. To return to normal playback, press PLAY MODE - Sony RDR GX257 | Operating Instructions - Page 50
Playing JPEG Image Files DATA DVD DATA CD You can play JPEG image files on DATA CDs/ DATA DVDs and USB memory. For details about JPEG image files, see to turn on/off the button guide at the bottom of the screen. Enjoying a slide show 1 After step 4 of "Playing JPEG Image Files" (page 50), select [ - Sony RDR GX257 | Operating Instructions - Page 51
or recording can be made on a finalized disc. • If a message appears and indicates that the disc's control information is full, erase unnecessary titles. Edits for Video mode titles/original titles +RW -RWVR -RWVideo +R -R For Video mode titles on DVD+RWs/DVD-RWs (Video mode)/DVD+Rs/ DVD-Rs - Sony RDR GX257 | Operating Instructions - Page 52
are the actual recordings on the disc. If you want to edit a DVD-RW (VR mode Erasing a section of a title (A-B Erase) (page 53). - Protecting a title (page 54). - Dividing a title (page 54). - - Hiding a chapter (page 56). - Creating chapters manually (page 56). - Creating a Playlist title (page 57 - Sony RDR GX257 | Operating Instructions - Page 53
53). For effects on disc capacity, see page 51. [Protect]: Protects the title from erasure or alteration (page 54). [Edit]: Displays • After erasing a title on a DVD+RW, the title name is displayed as erased in the Title List menu. You can select it to record over (page 40). Erasing a section of - Sony RDR GX257 | Operating Instructions - Page 54
Protecting a title from erasure or alteration +RW -RWVR +R Select [Protect] in step 3 of "Erasing and Editing Titles," and press ENTER. The title is protected is erased. b Notes • Images or sound may be momentarily point. The 1st point is set. To reset the point, select [Cancel] and repeat from - Sony RDR GX257 | Operating Instructions - Page 55
title contents by chapter. TITLE LIST 123 456 789 0 - Sony RDR GX257 | Operating Instructions - Page 56
Repeat the steps above and select [Show]. b Notes • Images or sound may be momentarily interrupted at the point where you hide the chapter. • On other Sony DVD equipment, hidden chapters will play without being skipped. Creating chapters manually +RW -RWVR +R You can create chapters within a title - Sony RDR GX257 | Operating Instructions - Page 57
edit. Editing a Playlist -RWVR Playlist edit allows you to edit or re-edit without changing the actual recordings. This section explains edit options available only for Playlist titles. Edits explained in the previous sections are also applicable if so indicated. b Notes • If you - Sony RDR GX257 | Operating Instructions - Page 58
to the new location. To change the scene order more, repeat the steps above. If you want to rename the title, see page 53. . b Note Images or sound may be momentarily interrupted at the point where the chapters change. 58 - Sony RDR GX257 | Operating Instructions - Page 59
video camera even if it has an i.LINK jack. - the images on the tape contain copy protection signals, which limit recording. • If you want to play the disc on other DVD equipment, finalize the disc (page 33). • The recorder does not support HDV mode. Connecting a Digital Video Camera to the DV IN - Sony RDR GX257 | Operating Instructions - Page 60
a DV/Digital8 Format Tape to a DVD +RW -RWVR -RWVideo +R -R You can record a DV/Digital8 format tape onto a disc. The recorder controls the digital video camera. You can fast forward, rewind, and stop the tape to select a scene using the recorder's remote control. ◆How chapters are created The - Sony RDR GX257 | Operating Instructions - Page 61
to play the disc on other DVD equipment, finalize the disc (page 33). • You cannot connect more than one piece of digital video equipment to the recorder. • You cannot control the recorder using another device or another recorder of the same model. • You cannot record date, time, or the contents of - Sony RDR GX257 | Operating Instructions - Page 62
may work. SYSTEM MENU 123 456 789 0 O RETURN - Sony RDR GX257 | Operating Instructions - Page 63
helps you to make clock and other settings for the recorder. Select [General] in the Setup Display. To use the display, see "Using the Setup Displays" (page 62). The default settings are underlined. Clock Setting TV Type Power and press ,. Clock Setting TV Type Power Save Factory Set Date 12 / 4 - Sony RDR GX257 | Operating Instructions - Page 64
buttons to enter a fourdigit code number from "Language Code List" (page 78) and press ENTER. Turns off the subtitles. b Note If you select a language in [Disc Menu], [Disc Subtitle], or [Disc Audio] that is not recorded on the DVD VIDEO, one of the recorded languages will be automatically selected - Sony RDR GX257 | Operating Instructions - Page 65
Select this when the recorder is connected to an audio component without a built-in Dolby Digital decoder. Select this when the recorder is connected to an to equipment not compatible with 96 kHz signals, select [96kHz → 48kHz]. [Audio DRC] (Dynamic Range Control) (Dolby Digital DVDs only) Makes the - Sony RDR GX257 | Operating Instructions - Page 66
guide vocal on a multichannel DVD. Normally select this. Parental Control Settings (Lock) Playback of some DVD VIDEOs can be limited according to a predetermined level, such as the age of the users a new password appears. Parental Control Set Password Area Code Change DNeelwete Password Enter a - Sony RDR GX257 | Operating Instructions - Page 67
[Area Code] Selects a code for a geographic area as the playback rating level. See "Area Code List" (page 78). 1 Select [Area Code] and press Disc Record Mode DV Input Auto Chapter Set-Top Box Control Set-Top Box Edit HQ SP LP EP ULP [Disc Record Mode] Selects one of the following recording modes: - Sony RDR GX257 | Operating Instructions - Page 68
Disc Name Protect Disc PBC Start [Format DVD] You can manually re-format a DVD+RW or DVD-RW disc to make a blank disc. See page 26 for details. [Finalize] "Finalizing" makes discs playable on other DVD equipment. See page 33 for details. [Input Disc Name] Name or rename the recorded discs to - Sony RDR GX257 | Operating Instructions - Page 69
(Factory Set) Select this to reset the recorder to all its default settings. Note that Parental Control settings in the [Lock] setup remain unaffected. 1 Press SYSTEM MENU to turn on the System Menu. 2 Select [Setup] and press ENTER. 3 Select [General] and press ,. 4 - Sony RDR GX257 | Operating Instructions - Page 70
difficulties while using the recorder, use this troubleshooting guide to help remedy the problem before requesting repairs. Should any problem persist, consult your nearest Sony dealer. Power The power does not turn on. , Check that the mains lead (the power cord) is connected securely. Picture - Sony RDR GX257 | Operating Instructions - Page 71
DVD has an auto pause signal, the recorder stops playback at the auto pause signal. Recorded or played back audio is not stereo. , The TV is not stereo-compatible . , If the disc was recorded on another recorder and was not finalized (page 33), the recorder cannot play the disc. The language - Sony RDR GX257 | Operating Instructions - Page 72
power failure. Reset the clock (page 63). , Disconnect the mains lead (the power cord) from the AC outlet, and connect it again. , The program contains copy protection signals that restrict copying. , Another timer setting overlapped the timer setting (page 38). , There is no DVD inside the recorder - Sony RDR GX257 | Operating Instructions - Page 73
command mode (page 17). The default command mode setting for this recorder and the supplied remote is "3 (Default setting)." You can check the current command mode in the front panel display (page 17). Other Sony equipment responds to the remote. , The same command mode is set for both the equipment - Sony RDR GX257 | Operating Instructions - Page 74
Recordable and Playable Discs Type DVD+RW Disc Logo Icon used Formatting in this (new discs) manual Compatibility with other DVD players (finalising) +RW Automatically formatted in +VR mode (DVD+RW VIDEO) Playable on DVD+RW compatible players (finalization necessary) (page 33) DVD-RW VR mode - Sony RDR GX257 | Operating Instructions - Page 75
16x-speed or slower DVD-Rs (Ver.2.0, Ver.2.1 with CPRM*) "DVD+RW," "DVD-RW," "DVD+R," and "DVD-R" are trademarks. * CPRM (Content Protection for Recordable Media) is a coding technology that protects copyrights for images. Discs that cannot be recorded on • DVD-RAMs • DVD-R DL (Dual Layer)/+R DL - Sony RDR GX257 | Operating Instructions - Page 76
table above. • Data part of CD-Extras • BDs (Blu-ray Discs) • HD DVDs • Discs recorded with an AVCHD-compatible DVD video camera • DVD-ROMs/DVD+RWs/DVD-RWs/ DVD+Rs/DVD-Rs that do not contain DVD Video, JPEG image files, or MP3 audio tracks. • DVD Audio discs • Cartridge-only type DVD-RAMs • HD layer - Sony RDR GX257 | Operating Instructions - Page 77
code (DVD VIDEO only) Your recorder has a region code printed on the rear of the unit and will only play DVD VIDEOs (playback only) labeled with identical region codes. This system is used to protect copyrights. DVD VIDEOs labeled ALL will also play on this recorder. If you try to play any other DVD - Sony RDR GX257 | Operating Instructions - Page 78
CY Cyprus CZ Czech Republic DE Germany DK Denmark EC Ecuador EG Egypt Code Area ES Spain ET Ethiopia FI Finland FJ Fiji FR France GB Portugal PY Paraguay RO Romania RU Russian Federation SA Saudi Arabia SE Sweden Code Area SG Singapore SI Slovenia SK Slovak Republic SN Senegal SV El - Sony RDR GX257 | Operating Instructions - Page 79
played. On cleaning Clean the cabinet, panel, and controls with a soft cloth slightly moistened with a mild wet or spray types). These may cause the recorder to malfunction. Notes about the discs • To On replacement of parts In the event that this unit is repaired, repaired parts may be collected - Sony RDR GX257 | Operating Instructions - Page 80
audio tracks on DATA CDs (CD-ROMs/ CD-Rs/CD-RWs) or DATA DVDs (DVD-ROMs/ DVD-RWs/DVD-Rs/DVD+RWs/DVD+Rs/ DVD-RAMs) or play JPEG image files on DATA CDs (CD-ROMs/CD-Rs/CD-RWs) or DATA DVDs (DVD-ROMs/DVD-RWs/DVD-Rs). DATA DVDs must be recorded according to ISO9660 Level 1 or Level 2 format for the - Sony RDR GX257 | Operating Instructions - Page 81
this recorder, also refer to the instruction manuals for CONTROL: Mini jack HDMI OUT: HDMI™ Connector USB: USB jack Type A General Power requirements: 120 V AC, 60 Hz Power consumption: 20 W Dimensions (approx.): 430 × 53 × 258 mm (17 × 2 1/8 × 10 1/8 inch) (width/height/depth) incl. projecting parts - Sony RDR GX257 | Operating Instructions - Page 82
Supplied accessories: Power cord (1) Video cord (1) Audio cord (1) Remote commander (remote) (1) Size AA (R6) batteries (2) Set top box controller (1) Specifications and design are subject to change without notice. 82 - Sony RDR GX257 | Operating Instructions - Page 83
48 Angle 45 Area Code 67, 78 Audio 45, 65 Audio cord 14 [Audio DRC] 65 cords 12 Controlling TVs with the remote 16 Copy control signals 35 Copy-Free 35 Copy-Never 35 Copy-Once 35 CPRM 35, 75 Creating chapters 56 D DATA CD 76 DATA DVD 76 DIGITAL OUT (COAXIAL) 14 Digital video camera 59 [Disc Record - Sony RDR GX257 | Operating Instructions - Page 84
35 while watching another program 39 Region code 77 Remote 6, 16 Repeat Play 46, 49 Resetting the recorder 69 Resume Play 43 S [Search] 29 Searching fast forward 44, 49 fast reverse 44, 49 locating the beginning of the title/chapter/ track 44 [Set Password] 66 Set top box controller 11, 20 [Set-Top
-
 1
1 -
 2
2 -
 3
3 -
 4
4 -
 5
5 -
 6
6 -
 7
7 -
8
-
9
-
10
-
11
-
12
-
13
-
14
-
15
-
16
-
17
-
18
-
19
-
20
-
21
-
22
-
23
-
24
-
25
-
26
-
27
-
28
-
29
-
30
-
31
-
32
-
33
-
34
-
35
-
36
-
37
-
38
-
39
-
40
-
41
-
42
-
43
-
44
-
45
-
46
-
47
-
48
-
49
-
50
-
51
-
52
-
53
-
54
-
55
-
56
-
57
-
58
-
59
-
60
-
61
-
62
-
63
-
64
-
65
-
66
-
67
-
68
-
69
-
70
-
71
-
72
-
73
-
74
-
75
-
76
-
77
-
78
-
79
-
80
-
81
-
82
-
83
-
84
 |
 |
3-876-081-
12
(1)
© 2008 Sony Corporation
DVD Recorder
Operating Instructions
RDR-GX257