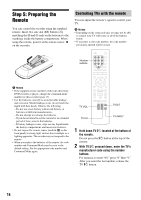
Sony RDR GX257 Operating Instructions - Page 13
If you are connecting to a VCR, HDMI input jack - problems
 |
UPC - 027242731318
View all Sony RDR GX257 manuals
Add to My Manuals
Save this manual to your list of manuals |
Page 13 highlights
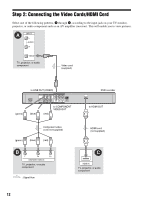
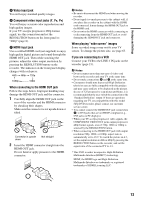
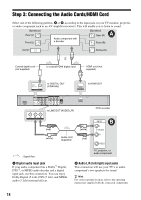
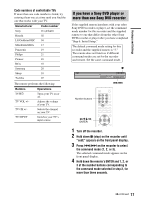
Hookups and Settings A Video input jack You will enjoy standard quality images. B Component video input jacks (Y, PB, PR) You will enjoy accurate color reproduction and high quality images. If your TV accepts progressive 480p format signal, use this connection and set the RESOLUTION button on the front panel to "480p" (page 8). C HDMI input jack Use a certified HDMI cord (not supplied) to enjoy high quality digital picture and sound through the HDMI OUT jack. Then while watching the pictures, adjust the video output resolution by pressing the RESOLUTION button on the recorder. The indicator on the front panel display changes with each press: 480i t 480p t 720p R R 1080p T 1080i When connecting to the HDMI OUT jack Follow the steps below. Improper handling may damage the HDMI OUT jack and the connector. 1 Carefully align the HDMI OUT jack on the rear of the recorder and the HDMI connector by checking their shapes. Make sure the connector is not upside down or tilted. HDMI OUT HDMI OUT Connector is upside down Not straight 2 Insert the HDMI connector straight into the HDMI OUT jack. Do not bend or apply pressure to the HDMI connector. HDMI OUT b Notes • Be sure to disconnect the HDMI cord when moving the recorder. • Do not apply too much pressure to the cabinet wall, if you place the recorder on the cabinet with the HDMI cord connected. It may damage the HDMI OUT jack or the HDMI cord. • Do not twist the HDMI connector while connecting to or disconnecting from the HDMI OUT jack to avoid damaging the HDMI OUT jack and connector. When playing "wide screen" images Some recorded images may not fit your TV screen. To change the picture size, see page 63. If you are connecting to a VCR Connect your VCR to the LINE 2 IN jacks on the recorder (page 21). b Notes • Do not connect more than one type of video cord between the recorder and your TV at the same time. • Do not make connections A and C at the same time. • Consumers should note that not all High Definition television sets are fully compatible with this product and may cause artifacts to be displayed in the picture. In case of 525 progressive scan picture problems, it is recommended that the user switch the connection to the 'Standard Definition' output. If there are questions regarding our TV set compatibility with this model 525p DVD recorder, please contact our customer service center. • You cannot connect the HDMI OUT jack (connection C) to DVI jacks that are not HDCP compliant (e.g., DVI jacks on PC displays). • When your TV accepts progressive video signals, the COMPONENT VIDEO OUT jacks output progressive 480p format signals, even if 720p, 1080i or 1080p is selected by the RESOLUTION button. • When connecting to the HDMI OUT jack with output resolution 720p, 1080i, or 1080p, aspect ratio is automatically set to 16:9. To watch the picture in 4:3, set the output resolution to 480i or 480p by pressing the RESOLUTION button on the recorder, and set the aspect ratio of the connected TV to 4:3. * This DVD recorder incorporates High-Definition Multimedia Interface (HDMI™) technology. HDMI, the HDMI logo and High-Definition Multimedia Interface are trademarks or registered trademarks of HDMI Licensing LLC. 13
-
 1
1 -
2
-
3
-
4
-
5
-
6
-
7
-
 8
8 -
 9
9 -
 10
10 -
 11
11 -
 12
12 -
 13
13 -
 14
14 -
 15
15 -
 16
16 -
 17
17 -
 18
18 -
19
-
20
-
21
-
22
-
23
-
24
-
25
-
26
-
27
-
28
-
29
-
30
-
31
-
32
-
33
-
34
-
35
-
36
-
37
-
38
-
39
-
40
-
41
-
42
-
43
-
44
-
45
-
46
-
47
-
48
-
49
-
50
-
51
-
52
-
53
-
54
-
55
-
56
-
57
-
58
-
59
-
60
-
61
-
62
-
63
-
64
-
65
-
66
-
67
-
68
-
69
-
70
-
71
-
72
-
73
-
74
-
75
-
76
-
77
-
78
-
79
-
80
-
81
-
82
-
83
-
84
 |
 |
