Sony RDR GX257 Operating Instructions - Page 60
Dubbing From a DV/Digital8 Format Tape to a DVD, into your digital video camera. - dvd recorder remote
 |
UPC - 027242731318
View all Sony RDR GX257 manuals
Add to My Manuals
Save this manual to your list of manuals |
Page 60 highlights
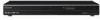
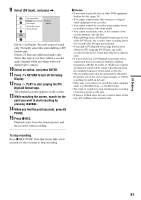
Dubbing From a DV/Digital8 Format Tape to a DVD +RW -RWVR -RWVideo +R -R You can record a DV/Digital8 format tape onto a disc. The recorder controls the digital video camera. You can fast forward, rewind, and stop the tape to select a scene using the recorder's remote control. ◆How chapters are created The dubbed contents become one title, and the title is divided into chapters. The recorder divides the title into chapters according to the setting in [Video] Setup (5 or 10-minute intervals, or does not divide at all) (page 67). Z OPEN/ CLOSE SYSTEM MENU 123 456 789 0 INPUT O RETURN m/M
-
 1
1 -
2
-
3
-
4
-
5
-
6
-
7
-
8
-
9
-
10
-
11
-
12
-
13
-
14
-
15
-
16
-
17
-
18
-
19
-
20
-
21
-
22
-
23
-
24
-
25
-
26
-
27
-
28
-
29
-
30
-
31
-
32
-
33
-
34
-
35
-
36
-
37
-
38
-
39
-
40
-
41
-
42
-
43
-
44
-
45
-
46
-
47
-
48
-
49
-
50
-
51
-
52
-
53
-
54
-
 55
55 -
 56
56 -
 57
57 -
 58
58 -
 59
59 -
 60
60 -
 61
61 -
 62
62 -
 63
63 -
 64
64 -
 65
65 -
66
-
67
-
68
-
69
-
70
-
71
-
72
-
73
-
74
-
75
-
76
-
77
-
78
-
79
-
80
-
81
-
82
-
83
-
84
 |
 |

60
Dubbing From a DV/Digital8
Format Tape to a DVD
You can record a DV/Digital8 format tape onto a
disc. The recorder controls the digital video
camera. You can fast forward, rewind, and stop
the tape to select a scene using the recorder’s
remote control.
◆
How chapters are created
The dubbed contents become one title, and the title
is divided into chapters. The recorder divides the
title into chapters according to the setting in
[Video] Setup (5 or 10-minute intervals, or does
not divide at all) (page 67).
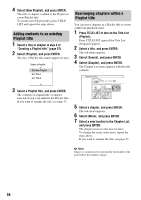
1
Press
Z
OPEN/CLOSE, and place a
recordable disc on the disc tray.
Make sure that the disc has enough free space
to record the contents of your tape.
2
Press
Z
OPEN/CLOSE to close the disc
tray.
Wait until “REAd” disappears from the front
panel display.
For details on how to insert and format a new
disc, see “Inserting and Formatting a Disc”
(page 26).
3
Insert the source DV/Digital8 format tape
into your digital video camera.
For the recorder to record or edit, your digital
video camera must be turned on and set to
video playback mode.
4
Press INPUT on the remote repeatedly to
select “dV.”
The selected input changes as follows:
5
Press REC MODE on the remote repeatedly
to select the recording mode.
The recording mode changes as follows:
For details about the recording modes, see
page 35.
6
Press SYSTEM MENU to turn on the System
Menu.
7
Select [Setup] and press ENTER.
The Setup Display appears.
8
Select
[Video] Setup and press
,
.
-
RW
VR
-
RW
Video
+
RW
+
R
-
R
1
2
3
4
5
6
7
8
9
0
REC MODE
Z
OPEN/
CLOSE
<
/
M
/
m
/
,
,
ENTER
X
PAUSE
x
REC STOP
z
REC
O
RETURN
H
PLAY
m
/
M
SYSTEM MENU
INPUT
Labeled side facing up
L1
L2
dV
HQ
SP
LP
EP
ULP