Sony RDR GX257 Operating Instructions - Page 61
Select [DV Input], and press, Digital8 format tape. - dvd recorder model
 |
UPC - 027242731318
View all Sony RDR GX257 manuals
Add to My Manuals
Save this manual to your list of manuals |
Page 61 highlights
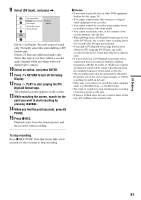
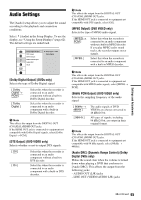
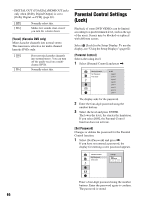
9 Select [DV Input], and press ,. Disc Record Mode DV Input Auto Chapter Set-Top Box Control Set-Top Box Edit Stereo 1 Stereo 2 [Stereo 1] (default): Records original sound only. Normally select this when dubbing a DV format tape. [Stereo 2]: Records additional audio only. Select this only if you have added a second audio channel when recording with your digital video camera. 10 Select an option, and press ENTER. 11 Press O RETURN to turn off the Setup Display. 12 Press H PLAY to start playing the DV/ Digital8 format tape. The playback picture appears on the screen. 13 While watching the screen, search for the point you want to start recording by pressing m/M. 14 When you find the point you want, press X PAUSE. 15 Press z REC. Playback starts from the selected point, and the recorder starts recording. b Notes • If you want to play the disc on other DVD equipment, finalize the disc (page 33). • You cannot connect more than one piece of digital video equipment to the recorder. • You cannot control the recorder using another device or another recorder of the same model. • You cannot record date, time, or the contents of the cassette memory onto the disc. • When dubbing from a DV/Digital8 format tape by way of the DV IN jack, the recorder starts recording about five seconds after the tape starts playing. • If you dub a DV/Digital8 format tape that has been edited on a PC using the DV IN jack, any audio recorded on the Stereo 2 track may only be recorded as noise. • If you record from a DV/Digital8 format tape with a sound track that is recorded in multiple sampling frequencies (48 kHz, 44.1 kHz, or 32 kHz), no sound or an unnatural sound will be output when playing back the sampling frequency switch point on the disc. • The recorded picture may be momentarily affected if the picture size of the source image changes, or if there is nothing recorded on the tape. • Noise may occur when you switch the audio sampling mode (e.g.48 kHz/16 bits t 32 kHz/12 bits). • The video or sound may drop out during the recording of start/stop points on the tape. • If there is a blank space for one second or more on the tape, DV dubbing ends automatically. To stop recording Press x REC STOP. Note that it may take a few seconds for the recorder to stop recording. DV Dubbing 61
-
 1
1 -
2
-
3
-
4
-
5
-
6
-
7
-
8
-
9
-
10
-
11
-
12
-
13
-
14
-
15
-
16
-
17
-
18
-
19
-
20
-
21
-
22
-
23
-
24
-
25
-
26
-
27
-
28
-
29
-
30
-
31
-
32
-
33
-
34
-
35
-
36
-
37
-
38
-
39
-
40
-
41
-
42
-
43
-
44
-
45
-
46
-
47
-
48
-
49
-
50
-
51
-
52
-
53
-
54
-
55
-
 56
56 -
 57
57 -
 58
58 -
 59
59 -
 60
60 -
 61
61 -
 62
62 -
 63
63 -
 64
64 -
 65
65 -
 66
66 -
67
-
68
-
69
-
70
-
71
-
72
-
73
-
74
-
75
-
76
-
77
-
78
-
79
-
80
-
81
-
82
-
83
-
84
 |
 |
