Sony RDR GX257 Operating Instructions - Page 37
Checking/Changing/ Canceling Timer Settings (Timer List), Rec Mode Adjust
 |
UPC - 027242731318
View all Sony RDR GX257 manuals
Add to My Manuals
Save this manual to your list of manuals |
Page 37 highlights
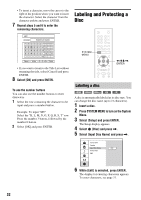
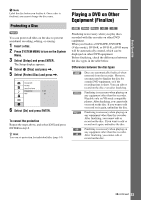
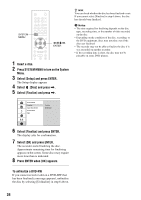
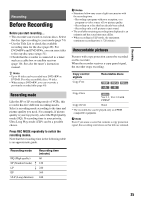
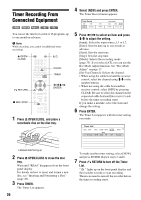
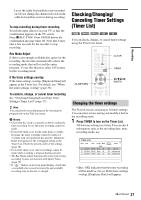
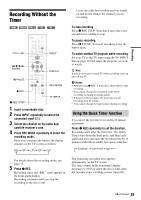
Recording Leave the cable box/satellite receiver turned on. Do not change the channel selected on the cable box/satellite receiver during recording. To stop recording during timer recording Switch the input selector on your TV so that the confirmation appears on the TV screen. Press x REC STOP. Press ENTER before the confirmation message turns off. Note that it may take a few seconds for the recorder to stop recording. Rec Mode Adjust If there is not enough available disc space for the recording, the recorder automatically selects the recording mode that will record the entire program. To use this function, select [AT] (auto) for the recording mode. If the timer settings overlap If the timer settings overlap, [Duplicate Date] will appear in the Timer List. For details, see "When the timer settings overlap" (page 38). To confirm, change, or cancel timer recording See "Checking/Changing/Cancelling Timer Settings (Timer List)" (page 37). z Hint You can play the recorded program by selecting the program title in the Title List menu. b Notes • Check that the clock is correctly set before setting the timer recording. If not, the timer recording cannot be made. • Even if the timer is set for the same daily or weekly program, the timer recording cannot be made if it overlaps with a program that has priority. [Duplicate Date] will appear for the overlapped setting in the Timer List. Check the priority order of the settings (page 38). • Even if the timer is set, timer recordings cannot be made while recording a program that has priority. • The Rec Mode Adjust function only works with a timer recording. It does not function with Quick Timer (page 39). • If " " flashes on the front panel display, check that a recordable disc is inserted correctly and available recording time on the disc is enough. Checking/Changing/ Canceling Timer Settings (Timer List) +RW -RWVR -RWVideo +R -R You can check, change, or cancel timer settings using the Timer List menu. 123 456 789 0 O RETURN CLEAR TIMER
-
 1
1 -
2
-
3
-
4
-
5
-
6
-
7
-
8
-
9
-
10
-
11
-
12
-
13
-
14
-
15
-
16
-
17
-
18
-
19
-
20
-
21
-
22
-
23
-
24
-
25
-
26
-
27
-
28
-
29
-
30
-
31
-
 32
32 -
 33
33 -
 34
34 -
 35
35 -
 36
36 -
 37
37 -
 38
38 -
 39
39 -
 40
40 -
 41
41 -
 42
42 -
43
-
44
-
45
-
46
-
47
-
48
-
49
-
50
-
51
-
52
-
53
-
54
-
55
-
56
-
57
-
58
-
59
-
60
-
61
-
62
-
63
-
64
-
65
-
66
-
67
-
68
-
69
-
70
-
71
-
72
-
73
-
74
-
75
-
76
-
77
-
78
-
79
-
80
-
81
-
82
-
83
-
84
 |
 |