Sony RDR GX257 Operating Instructions - Page 63
Recorder Settings (General), Clock Setting], TV Type], Power Save] - help
 |
UPC - 027242731318
View all Sony RDR GX257 manuals
Add to My Manuals
Save this manual to your list of manuals |
Page 63 highlights
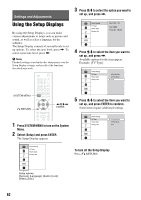
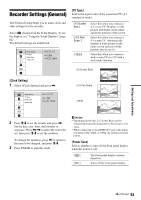
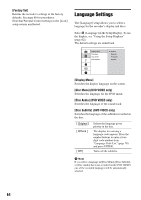
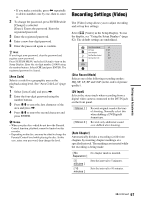
Recorder Settings (General) The [General] setup helps you to make clock and other settings for the recorder. Select [General] in the Setup Display. To use the display, see "Using the Setup Displays" (page 62). The default settings are underlined. Clock Setting TV Type Power Save Factory Set Date 12 / 4 Year 2008 Time 12 : 00 AM [TV Type] Selects the aspect ratio of the connected TV (4:3 standard or wide). [ 4:3 Letter Box ] [ 4:3 Pan Scan ] [ 16:9 ] Select this when you connect a 4:3 screen TV. Displays a wide picture with bands on the upper and lower portions of the screen. Select this when you connect a 4:3 screen TV. Automatically displays a wide picture on the entire screen and cuts off the portions that do not fit. Select this when you connect a wide-screen TV or a TV with a wide mode function. [4:3 Letter Box] [Clock Setting] 1 Select [Clock Setting] and press ,. Clock Setting TV Type Power Save Factory Set Date 12 / 4 Year 2008 Time 12 : 00 AM [4:3 Pan Scan] [16:9] 2 Press M/m to set the month, and press ,. Set the day, year, hour, and minutes in sequence. Press
-
 1
1 -
2
-
3
-
4
-
5
-
6
-
7
-
8
-
9
-
10
-
11
-
12
-
13
-
14
-
15
-
16
-
17
-
18
-
19
-
20
-
21
-
22
-
23
-
24
-
25
-
26
-
27
-
28
-
29
-
30
-
31
-
32
-
33
-
34
-
35
-
36
-
37
-
38
-
39
-
40
-
41
-
42
-
43
-
44
-
45
-
46
-
47
-
48
-
49
-
50
-
51
-
52
-
53
-
54
-
55
-
56
-
57
-
 58
58 -
 59
59 -
 60
60 -
 61
61 -
 62
62 -
 63
63 -
 64
64 -
 65
65 -
 66
66 -
 67
67 -
 68
68 -
69
-
70
-
71
-
72
-
73
-
74
-
75
-
76
-
77
-
78
-
79
-
80
-
81
-
82
-
83
-
84
 |
 |
