Sony VPLHS3 Operating Instructions - Page 30
Using the Menus, INPUT SETTING - parts
 |
UPC - 027242628793
View all Sony VPLHS3 manuals
Add to My Manuals
Save this manual to your list of manuals |
Page 30 highlights
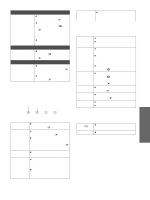
Using the Menus Item Description Black Level Emphasizes black color to produce a Adj (Adjust) bolder "dynamic" picture. Set according to the input signal source. High: Gives higher emphasis to the black color. Low: Gives lower emphasis to the black color. Off: Cancels this feature. Gamma Mode Graphics: Reproduces the photos in natural tones. Text: Contrasts black and white. Suitable for images that contain lots of text. Color Temp. High: Gives the white colors a blue tint. Middle: Gives the white colors a neutral tint. Low: Gives the white colors a red tint. DDE (Dynamic Detail Enhancer) Off: Plays a video signal in an interlace format without converting. Progressive: Converts an interlace format video signal to a progressive format. Film: Normally, select this option. Reproduces the 2-3 Pull-Down film sources with smooth picture movement. When the video signal with a format other than the 2-3 Pull-Down is input, "Progressive" is automatically selected. Cinema Black Pro Iris Control Switches the iris function during projection. Off: Normal contrast. On: Enhances the black by emphasizing the contrast. Lamp Control Switches the lamp wattage during projection. High: Normal wattage. Low: Enhances the black by reducing the lamp wattage. Tip If "Lamp Control" is set to "Low," the next time the power is turned on, the lamp will use the "High" setting initially, and then go to "Low." INPUT SETTING Item Adjust Signal... Dot Phase H Size Description Adjusts the picture from a computer for clearer picture after it is adjusted by pressing the APA button. Adjusts the horizontal size of the picture from a computer. The higher the setting, the wider the picture. The lower the setting, the narrower the picture. Item Shift Wide Mode Description As the setting for H (horizontal) increases, the picture moves to the right, and as the setting decreases, the picture moves to the left. Use < or , to adjust the horizontal position. As the setting for V (vertical) increases, the picture moves up, and as the setting decreases, the picture moves down. Use M or m to adjust the vertical position. You can select the 4:3 aspect ratio picture mode, "Normal" and "Normal Through," and 16:9 aspect ratio picture mode, "Full," "Wide Zoom," "Zoom," "Subtitle" and "Full Through." Full: The 16:9 squeezed* picture is diplayed with the correct aspect. The 4:3 picture is enlarged horizontally to fit the 16:9 screen. * squeezed: An original 16:9 aspect ratio picture is recorded horizontally compressed to be a 4:3 picture. Normal: The picture with normal 4:3 aspect ratio is displayed to fill the vertical screen size. Wide Zoom: The picture with 4:3 aspect ratio is enlarged and the upper and lower portions of the picture are compressed to fit the 16:9 screen. Use this mode to view news, variety shows, etc. Zoom: The normal 4:3 aspect ratio picture is enlarged verticall and horizontally at the equal ratio to fill the 16:9 screen. The mode is ideal for viewing a wide-format movie. Subtitle: The subtitle area is compressed and displayed at the lower part of the screen. Use this mode to view a movie with the subtitle. Full Through: One-to-one mapping is done on a squeezed 16:9 picture. It is displayed in the center of the screen. Normal Through: One-to-one mapping is done on the picture with 4:3 aspect ratio. It is displayed in the center of the screen. Note If "Full Through" or "Normal Through" is selected when a video (50 Hz) or progressive video (50p) signal is input, the picture may not be completely displayed on the screen due to the number of dots of the LCD panel. For details, see "Selecting the Wide Screen Mode" on page 24. 30 GB Menu Lists
-
 1
1 -
2
-
3
-
4
-
5
-
6
-
7
-
8
-
9
-
10
-
11
-
12
-
13
-
14
-
15
-
16
-
17
-
18
-
19
-
20
-
21
-
22
-
23
-
24
-
 25
25 -
 26
26 -
 27
27 -
 28
28 -
 29
29 -
 30
30 -
 31
31 -
 32
32 -
 33
33 -
 34
34 -
 35
35 -
36
-
37
-
38
-
39
-
40
-
41
-
42
-
43
-
44
-
45
-
46
-
47
-
48
-
49
-
50
-
51
-
52
-
53
-
54
-
55
-
56
-
57
-
58
-
59
-
60
-
61
-
62
-
63
-
64
-
65
-
66
-
67
-
68
-
69
-
70
-
71
-
72
-
73
-
74
-
75
-
76
-
77
-
78
-
79
-
80
-
81
-
82
-
83
-
84
-
85
-
86
-
87
-
88
-
89
-
90
-
91
-
92
-
93
-
94
-
95
-
96
-
97
-
98
-
99
-
100
-
101
-
102
-
103
-
104
-
105
-
106
-
107
-
108
-
109
-
110
-
111
-
112
-
113
-
114
-
115
-
116
-
117
-
118
-
119
-
120
-
121
-
122
-
123
-
124
-
125
-
126
-
127
-
128
-
129
-
130
-
131
-
132
-
133
-
134
-
135
-
136
-
137
-
138
-
139
-
140
-
141
-
142
-
143
-
144
-
145
-
146
-
147
-
148
 |
 |
