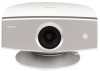
Sony VPLHS3 Operating Instructions - Page 34
Others, Troubleshooting - replacing lamp
 |
UPC - 027242628793
View all Sony VPLHS3 manuals
Add to My Manuals
Save this manual to your list of manuals |
Page 34 highlights
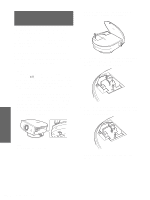
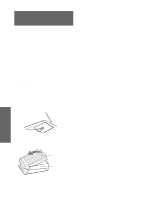
Others This section describes how to solve the problems, how to replace a lamp and air filter, etc. Troubleshooting Power The power is not turned on. c Wait for about one minute before turning on the power. (1 page 24) c Close the lamp cover securely. (1 page 36) c Close the air filter cover securely. (1 page 38) Picture No picture. c Check that the proper connections have been made. (1 page 9) c Select the input source correctly using the INPUT button. (1 page 23) c Set the computer signal to output from an external monitor. c Set the computer signal to output only to an external monitor. c Select "Computer", "Component" or "Video GBR" for "Input-A Signal Sel" in the SET SETTING menu according to the input signal. (1 page 31) The picture from the PJ c Select "Computer", MULTI connector is "Component" or "Video GBR" colored strange. for "Input-A Signal Sel" in the SET SETTING menu according to the input signal. (1 page 31) Color balance is incorrect. c Adjust the picture in the "Adjust Picture ..." of the PICTURE SETTING menu (1 page 29). c Set "Color System" in the SET SETTING menu to match the color system being input. (1 page 31) The picture is too dark. c Adjust the contrast or brightness in the "Adjust Picture ..." of the PICTURE SETTING menu properly. (1 page 29) The picture is not clear. c Adjust the focus with the FOCUS ring. (1 page 23) c Condensation has occurred on the lens. Leave the projector for about two hours with the power on. The picture flickers. c Adjust "Dot Phase" for "Adjust Signal..." in the INPUT SETTING menu properly. (1 page 30) 34 GB Troubleshooting
-
 1
1 -
2
-
3
-
4
-
5
-
6
-
7
-
8
-
9
-
10
-
11
-
12
-
13
-
14
-
15
-
16
-
17
-
18
-
19
-
20
-
21
-
22
-
23
-
24
-
25
-
26
-
27
-
28
-
 29
29 -
 30
30 -
 31
31 -
 32
32 -
 33
33 -
 34
34 -
 35
35 -
 36
36 -
 37
37 -
 38
38 -
 39
39 -
40
-
41
-
42
-
43
-
44
-
45
-
46
-
47
-
48
-
49
-
50
-
51
-
52
-
53
-
54
-
55
-
56
-
57
-
58
-
59
-
60
-
61
-
62
-
63
-
64
-
65
-
66
-
67
-
68
-
69
-
70
-
71
-
72
-
73
-
74
-
75
-
76
-
77
-
78
-
79
-
80
-
81
-
82
-
83
-
84
-
85
-
86
-
87
-
88
-
89
-
90
-
91
-
92
-
93
-
94
-
95
-
96
-
97
-
98
-
99
-
100
-
101
-
102
-
103
-
104
-
105
-
106
-
107
-
108
-
109
-
110
-
111
-
112
-
113
-
114
-
115
-
116
-
117
-
118
-
119
-
120
-
121
-
122
-
123
-
124
-
125
-
126
-
127
-
128
-
129
-
130
-
131
-
132
-
133
-
134
-
135
-
136
-
137
-
138
-
139
-
140
-
141
-
142
-
143
-
144
-
145
-
146
-
147
-
148
 |
 |
