Toshiba 32C120U User Guide - Page 110
MPEG Noise Reduction
 |
View all Toshiba 32C120U manuals
Add to My Manuals
Save this manual to your list of manuals |
Page 110 highlights
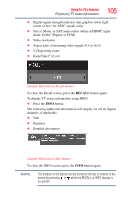
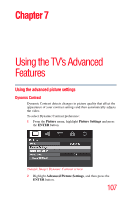
110 Using the TV's Advanced Features Using the advanced picture settings 2 Highlight Noise Reduction, and then press the ENTER button. 3 In the CableClear field, select the desired setting. The available selections are Off, Low, Middle, and High. Low, Middle, and High will reduce the noise in varying degrees, from lowest to highest, respectively. NOTE If the current input is ANT/CABLE or VIDEO, the menu will display the text "CableClear". If the current input is ColorStream HD, HDMI 1 or HDMI 2, the menu will display the text "DNR". 4 To save your new settings, highlight Done, and then press the ENTER button. To revert to your original settings, highlight Reset, and then press the ENTER button. MPEG Noise Reduction The MPEG Noise Reduction feature allows you to reduce visible interference caused by MPEG compression. Choices for MPEG Noise Reduction are Off, Low, Middle, and High. Off is automatically selected when this feature is disabled ("grayed out"). To select the MPEG Noise Reduction level: 1 Press the MENU button and open the Picture menu. 2 Highlight Noise Reduction, and then press the ENTER button. 3 Press the ( / arrow) buttons to highlight the MPEG Noise Reduction field, and then press the ( / arrow) buttons to select either Off, Low, Middle, or High. 4 To save your new settings, highlight Done, and then press the ENTER button. To revert to your original settings, highlight Reset, and then press the ENTER button.
-
 1
1 -
2
-
3
-
4
-
5
-
6
-
7
-
8
-
9
-
10
-
11
-
12
-
13
-
14
-
15
-
16
-
17
-
18
-
19
-
20
-
21
-
22
-
23
-
24
-
25
-
26
-
27
-
28
-
29
-
30
-
31
-
32
-
33
-
34
-
35
-
36
-
37
-
38
-
39
-
40
-
41
-
42
-
43
-
44
-
45
-
46
-
47
-
48
-
49
-
50
-
51
-
52
-
53
-
54
-
55
-
56
-
57
-
58
-
59
-
60
-
61
-
62
-
63
-
64
-
65
-
66
-
67
-
68
-
69
-
70
-
71
-
72
-
73
-
74
-
75
-
76
-
77
-
78
-
79
-
80
-
81
-
82
-
83
-
84
-
85
-
86
-
87
-
88
-
89
-
90
-
91
-
92
-
93
-
94
-
95
-
96
-
97
-
98
-
99
-
100
-
101
-
102
-
103
-
104
-
 105
105 -
 106
106 -
 107
107 -
 108
108 -
 109
109 -
 110
110 -
 111
111 -
 112
112 -
 113
113 -
 114
114 -
 115
115 -
116
-
117
-
118
-
119
-
120
-
121
-
122
-
123
-
124
-
125
-
126
-
127
-
128
-
129
-
130
 |
 |