Tripp Lite SU3000RTXLCD2U Owner's Manual for SU3000RTXLCD2U UPS System 9332C3 - Page 22
Overload, Scroll, Select
 |
View all Tripp Lite SU3000RTXLCD2U manuals
Add to My Manuals
Save this manual to your list of manuals |
Page 22 highlights
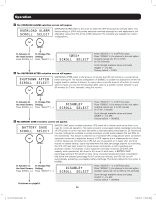
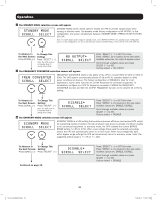
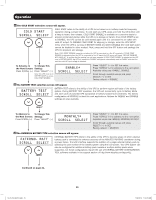
Operation 14 The AUDIBLE ALARM selection screen will appear. The AUDIBLE ALARM screen gives the user the ability to permanently enable or disable the UPS's audible alarm in case of an alarm event. The factory configuration of ENABLE is ideal for most applications. Certain applications may require the alarm to be disabled, in which case the option of DISABLE can be selected. To Advance to To Change This the Next Screen: Setting: Press SCROLL (v) Press "SELECT" (^) ENABLE* SCROLL SELECT Press SELECT (^) to SET this value. Press SCROLL (v) to advance to the next option. Available values are: ENABLE, DISABLE Scroll through available values and press SELECT (^) to SET. Factory Default: ENABLE 15 The ALARM HISTORY selection screen will appear. ALARM HISTORY displays up to 5 alarm events. Possible alarms include CHARGER FAULT, FAN FAULT, OVER TEMP, +/-DC BUS HIGH/LOW, BUS OVP, INVERTER FAULT, BATTERY FAULT, DC-DC FAULT, OVERLOAD, O/P SHORT, NO BATTERY, SITE WIRE FAULT, BYPASS VOLT BAD, BYPASS FREQ BAD, INPUT OVERCURRENT, and BATTERY LOW. To Advance to To Change This the Next Screen: Setting: Press SCROLL (v) Press "SELECT" (^) 1: OVERLOAD SCROLL SELECT Press "SELECT" (^) to SET this value. Press "SCROLL" (v) to advance to the next option. Available values are: ALARM HISTORY 1-5 & ERASE Scroll through available values and press SELECT (^) to SET 16 The INFORMATION screen will appear. INFORMATION refers to a series of 3 information screens that are viewable via the LCD interface: Firmware version, UPS serial number and SNMP IP address. These values are for viewing only and cannot be modified via the LCD interface To Advance to To Change This the Next Screen: Setting: Press SCROLL (v) Press "SELECT" (^) FW VER:FW##### SCROLL SELECT Press "SELECT" (^) to EXIT this section. Press "SCROLL" (v) to advance to the next information screen. Available Information: FIRMWARE VERSION, UPS SERIAL #, SNMP IP ADDRESS Scroll through available values and press SELECT (^) to EXIT. 17 The ORIGINAL UPS SET-UP EXIT/ENTER screen will appear. Press EXIT (v) to exit the UPS SET-UP section. Press "ENTER" (^) to re-enter UPS SET-UP screens. 22 13-07-015-9332C3.indb 22 7/26/2013 11:16:32 AM
-
 1
1 -
2
-
3
-
4
-
5
-
6
-
7
-
8
-
9
-
10
-
11
-
12
-
13
-
14
-
15
-
16
-
 17
17 -
 18
18 -
 19
19 -
 20
20 -
 21
21 -
 22
22 -
 23
23 -
 24
24 -
 25
25 -
 26
26 -
 27
27 -
28
-
29
-
30
-
31
-
32
-
33
-
34
-
35
-
36
-
37
-
38
-
39
-
40
-
41
-
42
-
43
-
44
-
45
-
46
-
47
-
48
-
49
-
50
-
51
-
52
-
53
-
54
-
55
-
56
-
57
-
58
-
59
-
60
-
61
-
62
-
63
-
64
-
65
-
66
-
67
-
68
-
69
-
70
-
71
-
72
-
73
-
74
-
75
-
76
-
77
-
78
-
79
-
80
 |
 |
