Yamaha CVP-94 Owner's Manual - Page 32
Changing the Split Point, Playing Two Voices from Different Sides of the Keyboard - Split Mode
 |
View all Yamaha CVP-94 manuals
Add to My Manuals
Save this manual to your list of manuals |
Page 32 highlights
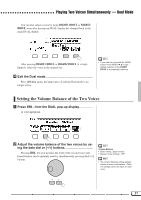
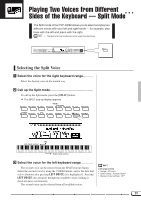
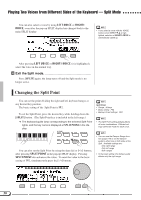
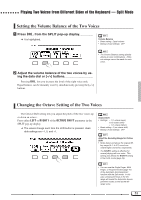
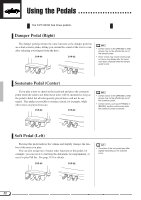
Playing Two Voices from Different Sides of the Keyboard - Split Mode You can also select a voice by using LEFT VOICE or RIGHT1 VOICE, even after the pop-up SPLIT display has changed back to the main SPLIT display. • If you select a voice with the VOICE buttons when STYLE M L is highlighted, selection of RIGHT1 VOICE is automatically called up. After pressing LEFT VOICE or RIGHT1 VOICE (it is highlighted), select the voice in the normal way. VExit the Split mode Press [SPLIT] again; the lamp turns off and the Split mode is no longer active. Changing the Split Point You can set the point dividing the right and left keyboard ranges at any desired key position. The basic setting of the Split Point is F#2. To set the Split Point, press the desired key while holding down the [SPLIT] button. (The Split Point key is included in the left range.) ➔ The keyboard guide lamp corresponding to the selected Split Point lights, and the key name is displayed at SPLIT POINT in the dis- play. AVI. TONE/ SYNTH ORGAN DUAL REVERB RUMS XG SPLIT EFFECT You can also set the Split Point by using the data dial or [-/+] buttons, after pressing SPLIT POINT in the pop-up SPLIT display. Pressing SPLIT POINT also advances the value. To reset the value to the basic setting of F#2, simultaneously press the [-/+] buttons. Split Point • Range: All keys • Basic setting: F#2 • Backup of last settings: OFF • The Split Point setting globally affects all voice combinations. Different settings cannot be made for each voice. • You can use the Damper Range function (page 119) to set the damper pedal to affect one or both sides of the Split. Available settings are: Only right range Only left range Both ranges • In the basic setting, the damper pedal affects only the right range. 30
-
 1
1 -
2
-
3
-
4
-
5
-
6
-
7
-
8
-
9
-
10
-
11
-
12
-
13
-
14
-
15
-
16
-
17
-
18
-
19
-
20
-
21
-
22
-
23
-
24
-
25
-
26
-
 27
27 -
 28
28 -
 29
29 -
 30
30 -
 31
31 -
 32
32 -
 33
33 -
 34
34 -
 35
35 -
 36
36 -
 37
37 -
38
-
39
-
40
-
41
-
42
-
43
-
44
-
45
-
46
-
47
-
48
-
49
-
50
-
51
-
52
-
53
-
54
-
55
-
56
-
57
-
58
-
59
-
60
-
61
-
62
-
63
-
64
-
65
-
66
-
67
-
68
-
69
-
70
-
71
-
72
-
73
-
74
-
75
-
76
-
77
-
78
-
79
-
80
-
81
-
82
-
83
-
84
-
85
-
86
-
87
-
88
-
89
-
90
-
91
-
92
-
93
-
94
-
95
-
96
-
97
-
98
-
99
-
100
-
101
-
102
-
103
-
104
-
105
-
106
-
107
-
108
-
109
-
110
-
111
-
112
-
113
-
114
-
115
-
116
-
117
-
118
-
119
-
120
-
121
-
122
-
123
-
124
-
125
-
126
-
127
-
128
-
129
-
130
-
131
-
132
-
133
-
134
-
135
-
136
-
137
-
138
-
139
-
140
-
141
-
142
-
143
-
144
-
145
-
146
-
147
-
148
 |
 |
