Yamaha CVP-94 Owner's Manual - Page 68
Delete from Disk, Save to Disk, EXIT]
 |
View all Yamaha CVP-94 manuals
Add to My Manuals
Save this manual to your list of manuals |
Page 68 highlights
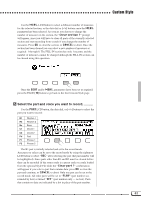
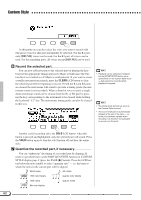
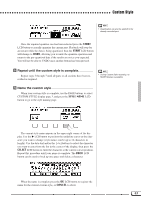
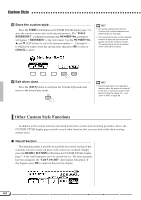
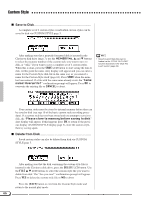
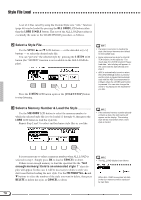
Custom Style I Save to Disk ...A complete set of 4 custom styles or individual custom styles can be saved to disk via CUSTOM STYLE page 5. After making sure that a properly formatted disk is inserted in the Clavinova disk drive (page 7), use the MEMORY No. L and M buttons to select the memory number of the custom style you want to save to disk, or "ALL" if you want to save a complete set of 4 custom styles. When this is done, press the SAVE LCD button to start saving the data to disk. At this point the name entry display will appear and you can enter a name for the Custom Style disk file in the same way as you entered a name for the Custom Style itself (page 63). Press SAVE when the name has been entered. If a file with the same name already exists the "Same name! Overwrite?" confirmation prompt will appear. Press OK to overwrite the existing file or CANCEL to abort. • Saved Custom Style files can be loaded via the "STYLE FILE LOAD" function described in the "Style File Load" section (page 69). Your custom styles must be stored to internal memory before they can be saved to disk (see step 10 of the basic custom style recording procedure). If a custom style has not been stored and you attempt to save it to disk, the "Please store to memory before saving to disk" alert display will appear. If this happens press OK to return to the previous display (CUSTOM STYLE display page 3), store the custom style, then try saving again. I Delete from Disk Saved custom styles can also be deleted from disk via CUSTOM STYLE page 5. After making sure that the disk containing the custom style files is inserted in the Clavinova disk drive, press the DELETE LCD button. Use the FILE L M LCD buttons to select the custom style file you want to delete from disk. The "Are you sure?" confirmation prompt will appear. Press YES to delete the custom style file or NO to abort. Press the [EXIT] button to exit from the Custom Style mode and return to the normal play mode. 66
-
 1
1 -
2
-
3
-
4
-
5
-
6
-
7
-
8
-
9
-
10
-
11
-
12
-
13
-
14
-
15
-
16
-
17
-
18
-
19
-
20
-
21
-
22
-
23
-
24
-
25
-
26
-
27
-
28
-
29
-
30
-
31
-
32
-
33
-
34
-
35
-
36
-
37
-
38
-
39
-
40
-
41
-
42
-
43
-
44
-
45
-
46
-
47
-
48
-
49
-
50
-
51
-
52
-
53
-
54
-
55
-
56
-
57
-
58
-
59
-
60
-
61
-
62
-
 63
63 -
 64
64 -
 65
65 -
 66
66 -
 67
67 -
 68
68 -
 69
69 -
 70
70 -
 71
71 -
 72
72 -
 73
73 -
74
-
75
-
76
-
77
-
78
-
79
-
80
-
81
-
82
-
83
-
84
-
85
-
86
-
87
-
88
-
89
-
90
-
91
-
92
-
93
-
94
-
95
-
96
-
97
-
98
-
99
-
100
-
101
-
102
-
103
-
104
-
105
-
106
-
107
-
108
-
109
-
110
-
111
-
112
-
113
-
114
-
115
-
116
-
117
-
118
-
119
-
120
-
121
-
122
-
123
-
124
-
125
-
126
-
127
-
128
-
129
-
130
-
131
-
132
-
133
-
134
-
135
-
136
-
137
-
138
-
139
-
140
-
141
-
142
-
143
-
144
-
145
-
146
-
147
-
148
 |
 |
