Yamaha DG80-112A Owner's Manual - Page 7
Rear Panel
 |
View all Yamaha DG80-112A manuals
Add to My Manuals
Save this manual to your list of manuals |
Page 7 highlights
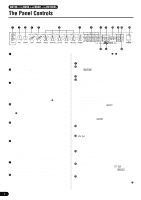
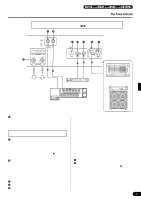
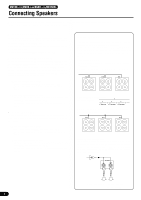
s Rear Panel DG100-212A/DG80-210A/DG80-112A/DG130HA The Panel Controls Before making any connections, make sure that the power on the DG amplifier and any external devices is switched OFF. !9 @0 * The DG80-112A is shown in the illustration. @1 @3 @2 @4 @5 !8 On the DG100-212A, you can connect the internal speaker or, an external speaker to the amplifier. On the DG80-210A/DG80-112A, you can connect the internal speaker or, an external speaker or, the internal speaker plus an external speaker to the amplifier. On the DG130HA, connect speaker(s) to the amplifier. MIDI IN Store data from the DG amplifier's internal memory to a MIDI device. OUT IN External Effector MIDI OUT STATUS DATA/CTRL BANK MSB/MAX BANK LSB/MIN TOGGLE ON-OFF /NUMBER OF PGM 8.8.8. DEC /NO ±10 INC /YES MEMORY PC EDIT EDIT WRITE /EXIT A MIDI Controller can be used to select memory and control volume. Mixer or additional amp !8 Speaker Jack (SPEAKER) DG100-212A: The internal speaker is connected to the amp. DG80-210A/DG80-112A: Equipped with 2 speaker jacks. The internal speaker is connected to the SPEAKER 1 jack. DG130HA: Equipped with 2 speaker jacks. Refer to the "Connecting Speakers" section on page 8 for instruction on the connection of speakers to the amp. !9 MIDI OUT Jack Connect this jack to the MIDI IN jack of a device that can save MIDI data. The data stored in the DG amplifier's internal memory can then be transmitted to an external MIDI device for storage. (→ page 12: MIDI Bulk Out) Also, transmits MIDI data received by the MIDI IN jack @,0 to an external device when MIDI Merge is set to ON. (→ page 12.) @0 MIDI IN Jack Connect this jack to a MIDI Foot Controller's MIDI OUT jack, and the external foot controller can be used to control the DG amplifier. Memory selection, volume control, effects can all be controlled via an external foot controller. (→ page 11.) Also, memory data stored in an external storage device can be re-loaded into any DG amplifier's internal memory. (→ page 12 MIDI Bulk In) @1 Effect Blend Control (EFFECT BLEND) @2 Effect Send Jack (EFFECT SEND) @3 Effect Return Jack (EFFECT RETURN) An external effector can be inserted into the signal circuit between the SEND/RETURN jacks. This allows further processing of the tone signal, created by the main unit, by an external effector. Use the BLEND knob to control the balance level between the external effector's sound (EFFECT) and the sound created by the DG amplifier (DRY). Rotating the knob fully to the EFFECT position allows only the sound produced by the external effector to be heard. Rotating the knob fully to the DRY position allows only the internal sound created by the amp to be heard, without the added coloration of the external effector. * Connecting a plug to the RETURN jack disconnects the internal circuit. The signal returning from the effector enters the internal circuit here, where it goes on to the power amp → speaker. When the RETURN jack is not in use, the BLEND knob will have no affect. Also, the SEND jack can function as a pre-out jack, and the RETURN jack can function as a main-in jack. @4 Line Out Jack (LINE OUT) @5 Line Out Level Control (LINE OUT LEVEL) The same signal that is sent to the speaker output jack !,8 is also sent to the LINE OUT jack at a line level (+4 dBm / 600 Ω). The amp also has an internal Speaker Simulator (can be switched ON/OFF → page 13.), the output level can be controlled with the LINE OUT LEVEL knob. The line signal can be sent to a mixer and can be used as an output jack to an external amp. 7
-
 1
1 -
 2
2 -
 3
3 -
 4
4 -
 5
5 -
 6
6 -
 7
7 -
 8
8 -
 9
9 -
 10
10 -
 11
11 -
 12
12 -
13
-
14
-
15
-
16
-
17
-
18
-
19
-
20
-
21
-
22
-
23
-
24
-
25
-
26
-
27
-
28
-
29
-
30
-
31
-
32
-
33
-
34
-
35
-
36
-
37
-
38
-
39
-
40
-
41
-
42
-
43
-
44
-
45
-
46
-
47
-
48
-
49
-
50
-
51
-
52
-
53
-
54
-
55
-
56
-
57
-
58
-
59
-
60
-
61
-
62
-
63
-
64
-
65
-
66
-
67
-
68
-
69
-
70
-
71
-
72
-
73
-
74
-
75
-
76
-
77
-
78
-
79
-
80
-
81
-
82
-
83
-
84
 |
 |
