Yamaha PSR-S900 Owner's Manual - Page 60
Adding Harmony Vocals to Your Voice PSR-S900, Vocal Harmony Setting display.
 |
View all Yamaha PSR-S900 manuals
Add to My Manuals
Save this manual to your list of manuals |
Page 60 highlights
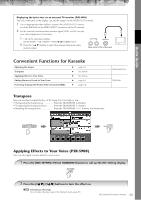
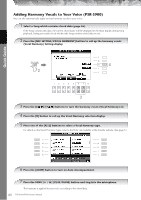
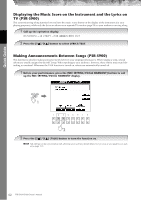
Quick Guide Adding Harmony Vocals to Your Voice (PSR-S900) You can also automatically apply various harmony vocals to your voice. 1 Select a Song which contains chord data (page 36). If the Song contains this data, the current chord name will be displayed in the Main display during Song playback, letting you easily check whether the Song contains chord data or not. 2 Press the [MIC SETTING/VOCAL HARMONY] button to call up the harmony vocals (Vocal Harmony) Setting display. 4 2 3 3 Press the [6π†]/[7π†] buttons to turn the harmony vocals (Vocal Harmony) on. 4 Press the [H] button to call up the Vocal Harmony selection display. 5 Press one of the [A]-[J] buttons to select a Vocal Harmony type. For details on the Vocal Harmony types, refer to the Data List available at the Yamaha website. (See page 5.) 6 Press the [ACMP] button to turn on Auto Accompaniment. 7 Press the SONG [F/K] (PLAY/PAUSE) button and sing into the microphone. The harmony is applied to your voice according to the chord data. 60 PSR-S900/S700 Owner's Manual
-
 1
1 -
2
-
3
-
4
-
5
-
6
-
7
-
8
-
9
-
10
-
11
-
12
-
13
-
14
-
15
-
16
-
17
-
18
-
19
-
20
-
21
-
22
-
23
-
24
-
25
-
26
-
27
-
28
-
29
-
30
-
31
-
32
-
33
-
34
-
35
-
36
-
37
-
38
-
39
-
40
-
41
-
42
-
43
-
44
-
45
-
46
-
47
-
48
-
49
-
50
-
51
-
52
-
53
-
54
-
 55
55 -
 56
56 -
 57
57 -
 58
58 -
 59
59 -
 60
60 -
 61
61 -
 62
62 -
 63
63 -
 64
64 -
 65
65 -
66
-
67
-
68
-
69
-
70
-
71
-
72
-
73
-
74
-
75
-
76
-
77
-
78
-
79
-
80
-
81
-
82
-
83
-
84
-
85
-
86
-
87
-
88
-
89
-
90
-
91
-
92
-
93
-
94
-
95
-
96
-
97
-
98
-
99
-
100
-
101
-
102
-
103
-
104
-
105
-
106
-
107
-
108
-
109
-
110
-
111
-
112
-
113
-
114
-
115
-
116
-
117
-
118
-
119
-
120
-
121
-
122
-
123
-
124
-
125
-
126
-
127
-
128
-
129
-
130
-
131
-
132
-
133
-
134
-
135
-
136
-
137
-
138
-
139
-
140
-
141
-
142
-
143
-
144
-
145
-
146
-
147
-
148
-
149
-
150
-
151
-
152
-
153
-
154
-
155
-
156
-
157
-
158
-
159
-
160
-
161
-
162
-
163
-
164
-
165
-
166
-
167
-
168
-
169
-
170
-
171
-
172
-
173
-
174
-
175
-
176
-
177
-
178
-
179
-
180
-
181
-
182
-
183
-
184
-
185
-
186
-
187
-
188
-
189
-
190
-
191
-
192
-
193
-
194
-
195
-
196
-
197
-
198
-
199
-
200
-
201
-
202
-
203
-
204
-
205
-
206
-
207
-
208
-
209
-
210
-
211
-
212
-
213
-
214
-
215
-
216
-
217
-
218
-
219
-
220
-
221
-
222
-
223
-
224
 |
 |
