2014 Chevrolet Impala Owner Manual - Page 176
2014 Chevrolet Impala Manual

Page 176 highlights
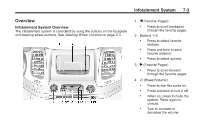
7-6 Infotainment System adjust is to select a number from 5- 25 to show that selection of favorites. Audible Touch Feedback: Select Audible Touch Feedback to turn feedback off or on. Auto Volume (If Equipped): This feature adjusts the volume based on vehicle speed. The options are Off, Low, Medium-Low, Medium, Medium-High, or High. Select the desired volume. DSP Modes (If Equipped): This feature has four modes: . . Radio Setup From the RADIO/BAND screen icon, the following may be displayed: Manage Favorites: . Centerpoint®: Turns on Bose Centerpoint® surround technology. Turn the MENU knob and press to select a favorite. . Centerpoint creates a surround sound from nearly any audio source: existing CD collection, satellite radio, and audio players. Maximum Startup Volume: This feature sets the maximum startup volume. If the vehicle is started and the volume is greater than this level, the volume is adjusted to this level. To set the maximum startup volume, Turn the MENU knob to increase or decrease startup volume. Rear Camera (If Equipped) From the Rear Camera screen button, the following may be displayed: Park Assist Symbols: This feature will display symbols where objects are detected by the Rear Parking Assist system. Select Park Assist Symbols, then select Off or On. See Assistance Systems for Parking or Backing on page 9-46. To delete a favorite, press the button just below the DELETE screen button. To move a favorite, press the MOVE screen button. Turn the MENU knob to select a new location, then press the DROP screen button to select the new location. . . Select q BACK to go back to the previous menu. Normal: Adjusts the audio to normal mode. This provides the best sound quality for all seating positions. Driver: Adjusts the audio to give the driver the best possible sound quality. Rear: Adjusts the audio to give the rear seat occupants the best possible sound quality. . Number of Favorites Shown: To set the number of favorites for display, select Auto to automatically adjust the number of Favorites pages shown as Favorites are added and removed. Another way to .
-
 1
1 -
2
-
3
-
4
-
5
-
6
-
7
-
8
-
9
-
10
-
11
-
12
-
13
-
14
-
15
-
16
-
17
-
18
-
19
-
20
-
21
-
22
-
23
-
24
-
25
-
26
-
27
-
28
-
29
-
30
-
31
-
32
-
33
-
34
-
35
-
36
-
37
-
38
-
39
-
40
-
41
-
42
-
43
-
44
-
45
-
46
-
47
-
48
-
49
-
50
-
51
-
52
-
53
-
54
-
55
-
56
-
57
-
58
-
59
-
60
-
61
-
62
-
63
-
64
-
65
-
66
-
67
-
68
-
69
-
70
-
71
-
72
-
73
-
74
-
75
-
76
-
77
-
78
-
79
-
80
-
81
-
82
-
83
-
84
-
85
-
86
-
87
-
88
-
89
-
90
-
91
-
92
-
93
-
94
-
95
-
96
-
97
-
98
-
99
-
100
-
101
-
102
-
103
-
104
-
105
-
106
-
107
-
108
-
109
-
110
-
111
-
112
-
113
-
114
-
115
-
116
-
117
-
118
-
119
-
120
-
121
-
122
-
123
-
124
-
125
-
126
-
127
-
128
-
129
-
130
-
131
-
132
-
133
-
134
-
135
-
136
-
137
-
138
-
139
-
140
-
141
-
142
-
143
-
144
-
145
-
146
-
147
-
148
-
149
-
150
-
151
-
152
-
153
-
154
-
155
-
156
-
157
-
158
-
159
-
160
-
161
-
162
-
163
-
164
-
165
-
166
-
167
-
168
-
169
-
170
-
 171
171 -
 172
172 -
 173
173 -
 174
174 -
 175
175 -
 176
176 -
 177
177 -
 178
178 -
 179
179 -
 180
180 -
 181
181 -
182
-
183
-
184
-
185
-
186
-
187
-
188
-
189
-
190
-
191
-
192
-
193
-
194
-
195
-
196
-
197
-
198
-
199
-
200
-
201
-
202
-
203
-
204
-
205
-
206
-
207
-
208
-
209
-
210
-
211
-
212
-
213
-
214
-
215
-
216
-
217
-
218
-
219
-
220
-
221
-
222
-
223
-
224
-
225
-
226
-
227
-
228
-
229
-
230
-
231
-
232
-
233
-
234
-
235
-
236
-
237
-
238
-
239
-
240
-
241
-
242
-
243
-
244
-
245
-
246
-
247
-
248
-
249
-
250
-
251
-
252
-
253
-
254
-
255
-
256
-
257
-
258
-
259
-
260
-
261
-
262
-
263
-
264
-
265
-
266
-
267
-
268
-
269
-
270
-
271
-
272
-
273
-
274
-
275
-
276
-
277
-
278
-
279
-
280
-
281
-
282
-
283
-
284
-
285
-
286
-
287
-
288
-
289
-
290
-
291
-
292
-
293
-
294
-
295
-
296
-
297
-
298
-
299
-
300
-
301
-
302
-
303
-
304
-
305
-
306
-
307
-
308
-
309
-
310
-
311
-
312
-
313
-
314
-
315
-
316
-
317
-
318
-
319
-
320
-
321
-
322
-
323
-
324
-
325
-
326
-
327
-
328
-
329
-
330
-
331
-
332
-
333
-
334
-
335
-
336
-
337
-
338
-
339
-
340
-
341
-
342
-
343
-
344
-
345
-
346
-
347
-
348
-
349
-
350
-
351
-
352
-
353
-
354
-
355
-
356
-
357
-
358
-
359
-
360
-
361
-
362
-
363
-
364
-
365
-
366
-
367
-
368
-
369
-
370
-
371
-
372
-
373
-
374
-
375
-
376
-
377
-
378
-
379
-
380
-
381
-
382
-
383
-
384
-
385
-
386
-
387
-
388
-
389
-
390
-
391
-
392
-
393
-
394
-
395
-
396
-
397
-
398
-
399
-
400
-
401
-
402
-
403
-
404
-
405
-
406
-
407
-
408
-
409
-
410
-
411
-
412
-
413
-
414
-
415
-
416
-
417
-
418
-
419
-
420
-
421
-
422
 |
 |
