Alesis Strike MultiPad User Guide - Page 10
Recording a Sample, F5-Start Recording
 |
View all Alesis Strike MultiPad manuals
Add to My Manuals
Save this manual to your list of manuals |
Page 10 highlights
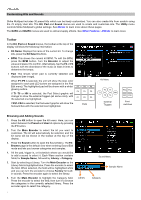
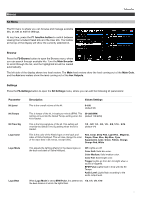
Recording a Sample You can also use Strike Multipad to create samples from a mobile device, instrument, microphone or other device connected to the Record Inputs, or directly from your computer using the USB Audio port. To record a sample to use with Strike Multipad: 1. Press the Sample button to open the Sample menu. 2. Turn the Main Encoder to set the Source to Record In or USB Audio. Note: Make sure to select Alesis Strike Multipad as the audio output option on your computer. 3. If desired, set a threshold level to automatically start recording with. If you do not want to auto-start recording, use the Main Encoder to turn the threshold up until it says 0 dB. 4. Press F5-Arm to Record to arm the recording. Sample Menu 5. Adjust your recording source (such as a turntable, mixer, smartphone, or computer) to its optimal output level. If desired, play the source to view the level in the input meter on the display. 6. When you are ready to begin recording, press F5-Start Recording. You can also press F6-Exit to unarm recording. 7. When you are finished recording, press F5-Stop Recording. You can also press F6-Exit at any time. 8. To preview the recording, press F4-Play/Stop. If you are happy with the result, press F5-Save to save the sample. It will automatically be added to the currently selected pad, trigger in, or foot control on the current kit. 10
-
 1
1 -
2
-
3
-
4
-
 5
5 -
 6
6 -
 7
7 -
 8
8 -
 9
9 -
 10
10 -
 11
11 -
 12
12 -
 13
13 -
 14
14 -
 15
15 -
16
-
17
-
18
-
19
-
20
-
21
-
22
-
23
-
24
-
25
-
26
-
27
-
28
-
29
-
30
-
31
 |
 |