Alesis Strike MultiPad User Guide - Page 9
Importing Files from USB, F4-Play/Stop
 |
View all Alesis Strike MultiPad manuals
Add to My Manuals
Save this manual to your list of manuals |
Page 9 highlights
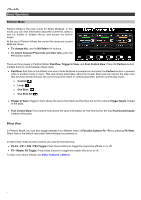
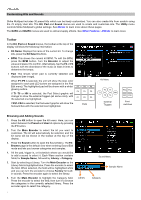
7. Turn the Main Encoder to highlight the Sample Name field. The list of samples in the currently selected category will be shown on the right side of the display, under Browse. Press the encoder to move the cursor to the Browse field, then turn it to browse the list of samples. Press the encoder again to load the highlighted sample to the selected Wave. 8. Once a sample has been added, you can use the F4-Mode and F5-Mix buttons in the Sound menu to adjust the sample settings, such as Playback Mode, Poly/Mono, Volume, Pan, and more. Importing Files from USB In addition to the factory preset sounds, you can import your own sounds to the User Library to add to kits. 1. Start by adding sound files from a computer to a USB flash drive (mass storage class). IMPORTANT: Your flash drive must be formatted using FAT32, and all WAV files must be 44.1 kHz / 16-bit and located in the root directory of the drive (not in any folder or sub-folder). 2. Insert the USB flash drive to the USB Memory port on the rear panel. 3. Press the Sound button to open the Sound Menu, then hit the pad, trigger in, or foot control where you want to import the sample. 4. Press the F3-Import button and wait for the USB scanning to complete. If Strike Multipad is not able to read your USB flash drive, an error message will appear on the display and return to the Browse screen. Sound Menu 5. If WAV files are found on the USB flash drive, they will appear in the Import list. Use the Main Encoder to scroll through the samples, and press it to select a sample. While browsing, you can press F4-Play/Stop to listen to the highlighted file. 6. You can quickly import a selected WAV to the currently selected pad by pressing the F5-Single button. If you want to import multiple samples at once, use the Main Encoder to select the samples, then press the F6-Multi button to begin importing. 7. When a sample has finished importing, it will automatically be added to Wave A or B of the currently selected pad, and assigned to the User Library in the New Sample category. Note: Samples will be automatically added only when Single import is used. 8. To add another sample to another pad, simply select another pad. The Import list will stay the same, so you can quickly select a pad, select a sample and import it, then select another pad and import another sample. 9. To view all of your newly imported samples, press the F2-Browse button, select the User Library, and the New Samples Category. 9
-
 1
1 -
2
-
3
-
 4
4 -
 5
5 -
 6
6 -
 7
7 -
 8
8 -
 9
9 -
 10
10 -
 11
11 -
 12
12 -
 13
13 -
 14
14 -
15
-
16
-
17
-
18
-
19
-
20
-
21
-
22
-
23
-
24
-
25
-
26
-
27
-
28
-
29
-
30
-
31
 |
 |