Alesis Strike MultiPad User Guide - Page 7
Looper View, BPM and Time Signature
 |
View all Alesis Strike MultiPad manuals
Add to My Manuals
Save this manual to your list of manuals |
Page 7 highlights
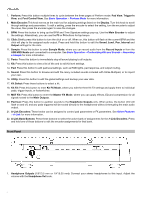
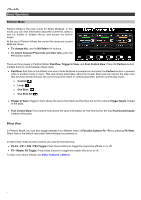
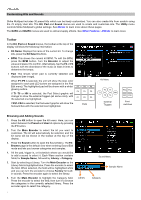
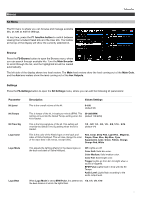
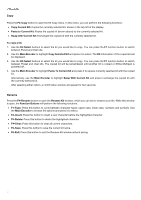
Looper View Press the F6-View function button while in Effect View in Perform Mode to access the built-in Looper. When the Looper is activated, you can set the following parameters for your recording: • Number of Measures: Press the F4 button to cycle through the lengths of the loop according to the current global time signature and BPM settings. Select 1-8, 12, or 16. The default setting is 4 measures. • After Recording: Press the F5 button to open the Settings popup. Here, you can select the behavior of the looper once recording is completed. Select Playback for the loop to enter playback mode, or Overdub for the loop to enter overdub recording. • BPM and Time Signature: Displays the current global BPM and Time Signature settings. To change the values, press the BPM button. Recording a Loop Once you have set the parameters for your loop, you can begin recording. 1. Press the F3-Arm to Record button to arm the recording. You can also press F2-Cancel to return to disarm recording. 2. Press F3-Start Rec to initiate recording. Once pressed, the click will activate and a one-measure countdown will begin. The progress bar above the Looper controls will fill according to the number of bars and beats selected in the Time Signature settings. 3. Once recording begins, the display will show a red progress bar that will fill according to the number of beats and measures selected, which are also shown to the right of the bar. During recording, you can press the F3-Recording button to stop recording and enter playback mode on the next downbeat. You can also press F2-Cancel to cancel recording and return to the previous page. 4. After you have recorded for the set number of beats and measures, the Looper will enter playback mode. The progress bar countdown will still be shown, but in green. In playback mode, the options for the Function buttons are as follows: • F2-Play/Stop: Press this button to start or stop loop playback. • F3-Start Dub: Press this button to immediately begin recording on top of the previous recording. The progress bar will turn red again to indicate recording is active, and the display will show Dubbing above the button. Press this button again to stop overdubbing, or press F2-Play/Stop. • F4-Save: Press this button to save the current loop as a WAV file. Saved loops will automatically be stored in the User > New Sample category. • F5-Cancel: When playback is stopped, press this button to delete the recording and return to Arm to Record mode. A confirmation window will appear; use the Main Encoder to select No to return to the previous page, or Yes to discard the loop. 7
-
 1
1 -
 2
2 -
 3
3 -
 4
4 -
 5
5 -
 6
6 -
 7
7 -
 8
8 -
 9
9 -
 10
10 -
 11
11 -
 12
12 -
13
-
14
-
15
-
16
-
17
-
18
-
19
-
20
-
21
-
22
-
23
-
24
-
25
-
26
-
27
-
28
-
29
-
30
-
31
 |
 |
