Alesis Strike MultiPad User Guide - Page 4
Front Panel, Basic Operation, Perform Mode, Customizing Kits and Sounds, Recording, a Sample - sound list
 |
View all Alesis Strike MultiPad manuals
Add to My Manuals
Save this manual to your list of manuals |
Page 4 highlights
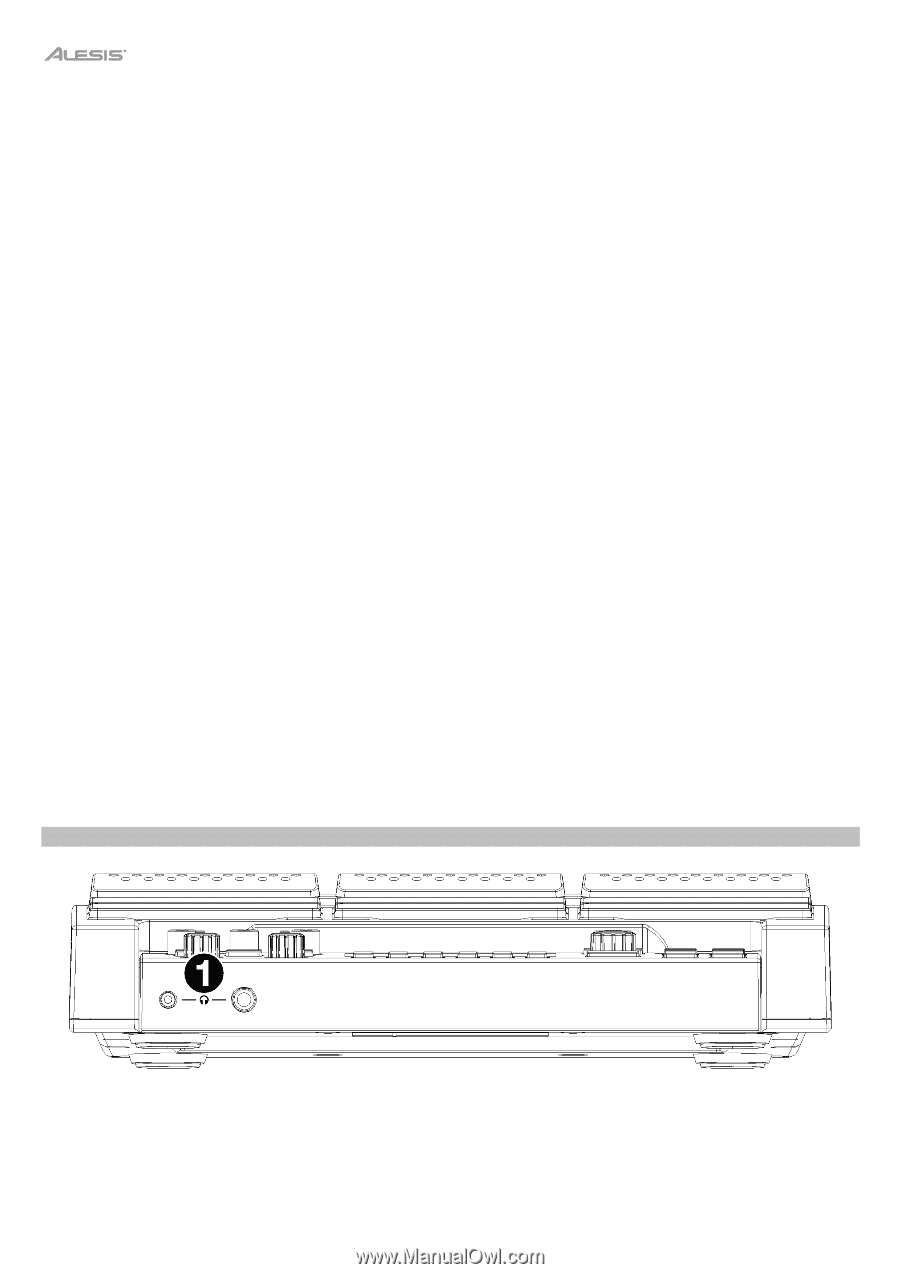
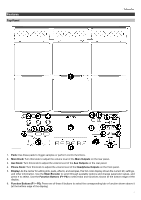
7. Perform: Press this button multiple times to cycle between the three pages of Perform mode: Pad View, Trigger In View, and Foot Control View. See Basic Operation > Perform Mode for more information. 8. Main Encoder: This knob serves as the main tool for adjusting settings listed on the Display. Turn this knob to scroll through settings and parameters. To edit a setting, press the encoder to select the setting, turn the encoder to adjust the value, then press the encoder again to save the changes. 9. BPM: Press this button to bring up the BPM and Time Signature settings pop-up. Use the Main Encoder to adjust the settings. Alternatively, you can use the F3 or F4 buttons for tap tempo. 10. Click: Briefly press this button to turn the click on or off. When on, this button will flash at the current BPM and the click will play to the assigned audio output. Press and hold this button to edit the Sound, Level, Pan, Interval and Output settings for the click. 11. Sample: Press this button to enter Sample Mode, where you can record audio from the Record Inputs or from the USB MIDI/Audio port connected to a computer. See Basic Operation > Customizing Kits and Sounds > Recording a Sample for more information. 12. Panic: Press this button to immediately stop all sound playing to all outputs. 13. Kit: Press this button to view a list of kits and to edit kit level settings. 14. Pad: Press this button to edit pad level settings, such as RGB lights, pad response, and output routing. 15. Sound: Press this button to browse and edit the many included sounds included with Strike Multipad, or to import your own. 16. Utility: Press this button to edit the global settings and backup your user data. 17. Kit Select: Press these buttons to select a kit. 18. Kit FX: Press this button to enter Kit FX Mode, where you edit the three Kit FX settings and apply them to individual pads, trigger inputs, or footswitches. 19. MST FX: Press this button to enter the Master FX Mode, where you can apply effects, EQ and compression for all signals routed to the Main Outputs. 20. Pad Cue: Press this button to audition sounds to the Headphone Outputs only. When active, the button LED will flash on and off, and any pads triggered will be routed directly to the headphones without interrupting the main audio output. 21. A-Link Encoders: These knobs can be assigned to control pad parameters or FX parameters. See Other Features > A-Link for more information. 22. A-Link Bank Buttons: Press these buttons to select the active bank of assignments for the A-Link Encoders. Press and hold one of these buttons to edit the encoder assignments for that bank. Front Panel 1. Headphone Outputs (1/8"/3.5 mm or 1/4"/6.35 mm): Connect your stereo headphones to this input. Adjust the volume with the Headphone Vol knob. 4
-
 1
1 -
 2
2 -
 3
3 -
 4
4 -
 5
5 -
 6
6 -
 7
7 -
 8
8 -
 9
9 -
 10
10 -
11
-
12
-
13
-
14
-
15
-
16
-
17
-
18
-
19
-
20
-
21
-
22
-
23
-
24
-
25
-
26
-
27
-
28
-
29
-
30
-
31
 |
 |